Feathering Your Lighting- How to shoot your flash from the ground up by Jason Lanier

1 Comment

Feathering Your Lighting- How to shoot your flash from the ground up by Jason Lanier

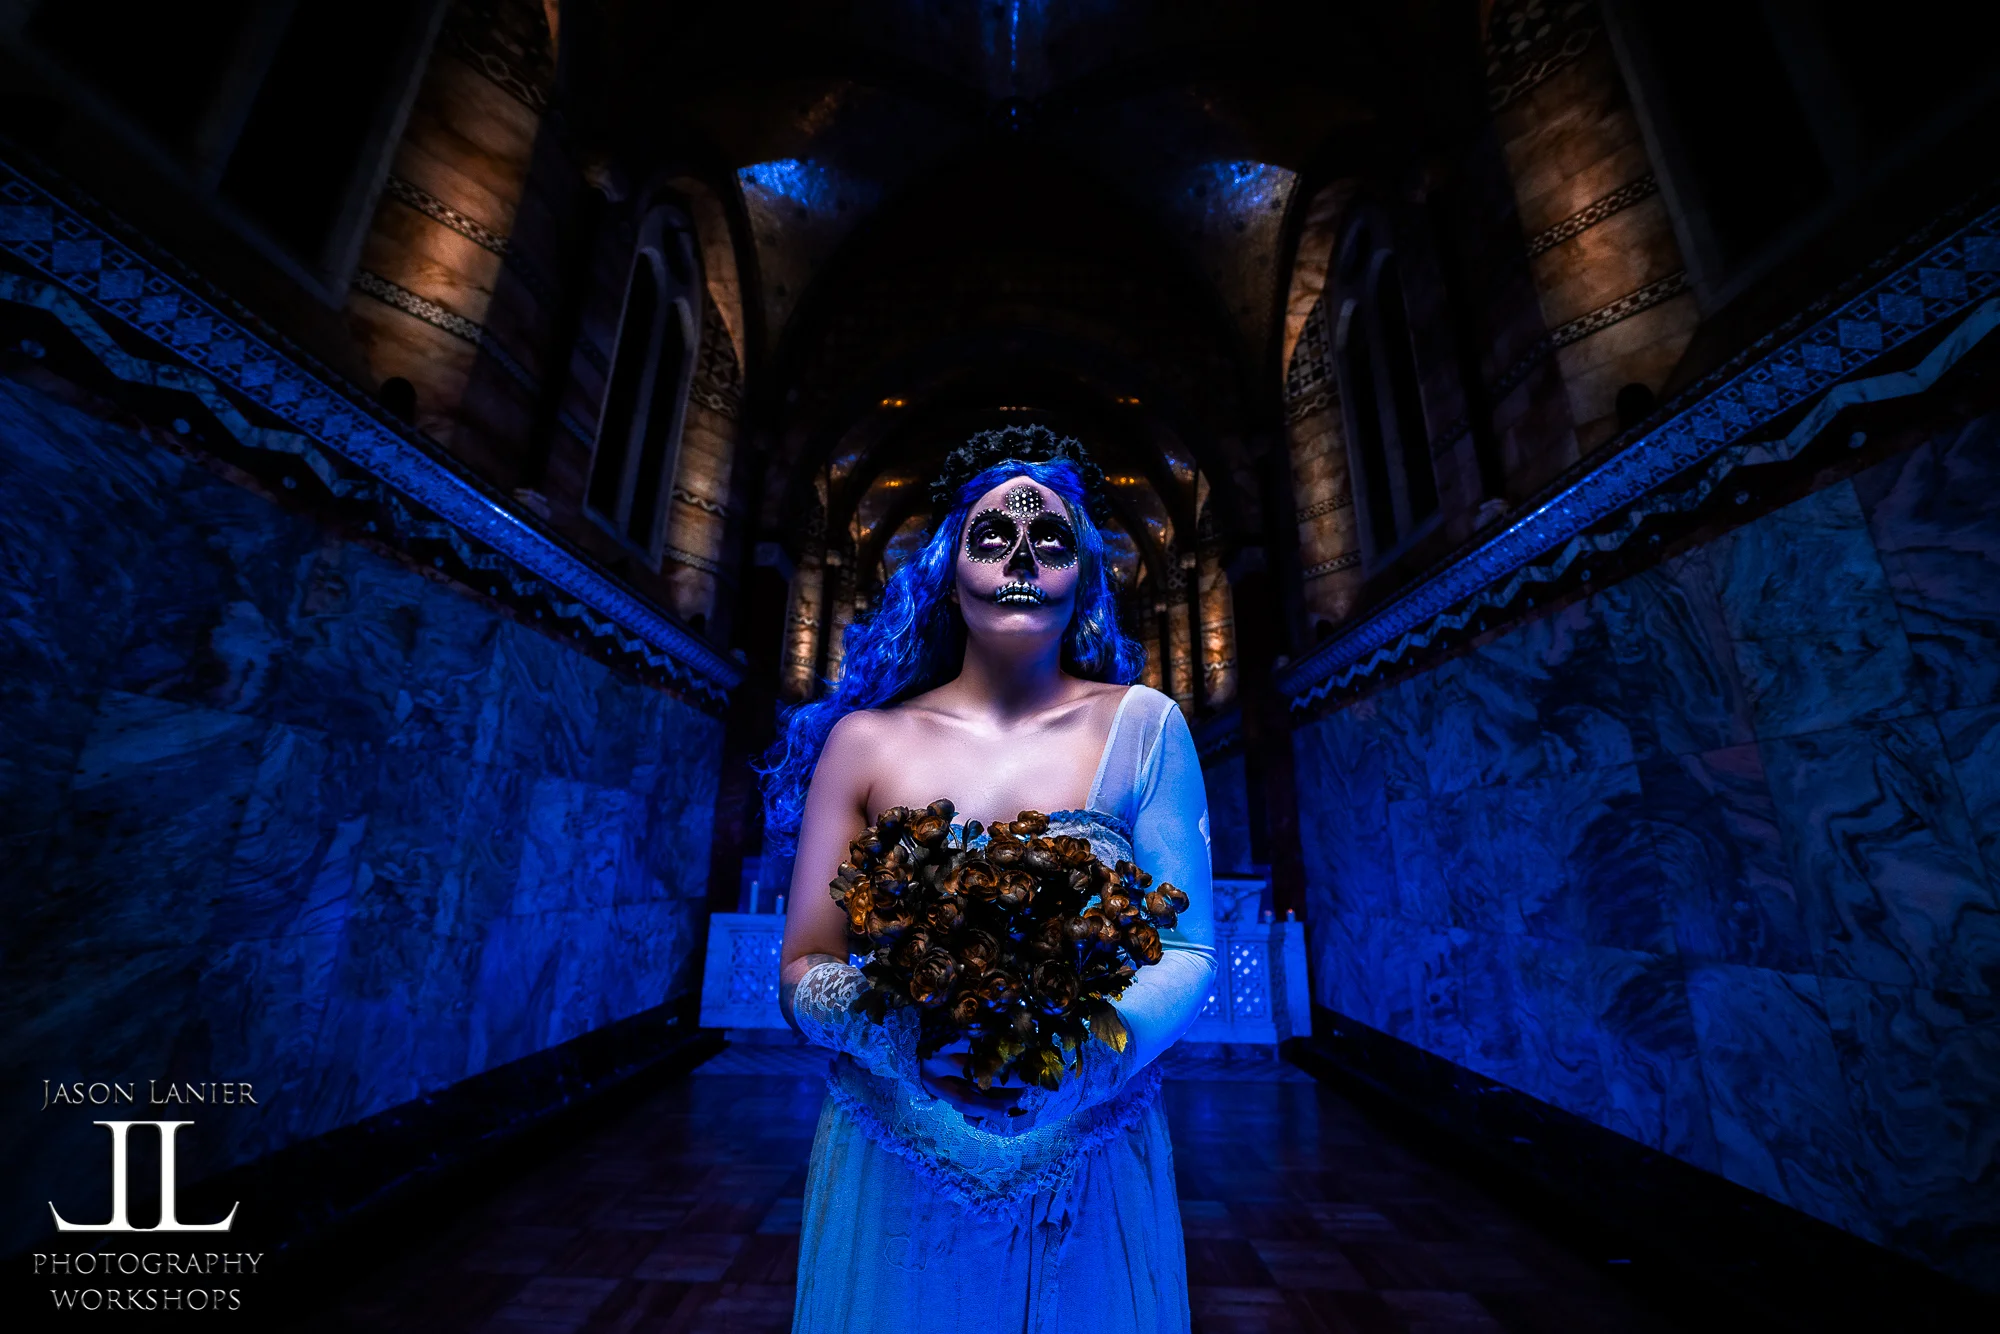
Most experienced photographers know that when you use artificial light you should place it above your subject. That’s because when you do so, you are creating a lighting pattern that casts shadows down on your subject.

But there is a lighting technique called Feathering Light. That technique is utilized by having the edges of your light paint light onto your subject. This is done to minimize the effect of using light with your subject and even more importantly on the canvas of your image.

For example, if you want to do a shoot and don’t want there to be light spill or shadows on the ground coming from the flash, you would feather the light. This technique can also include facing the light up or even placing it on the ground so the light is shooting up.

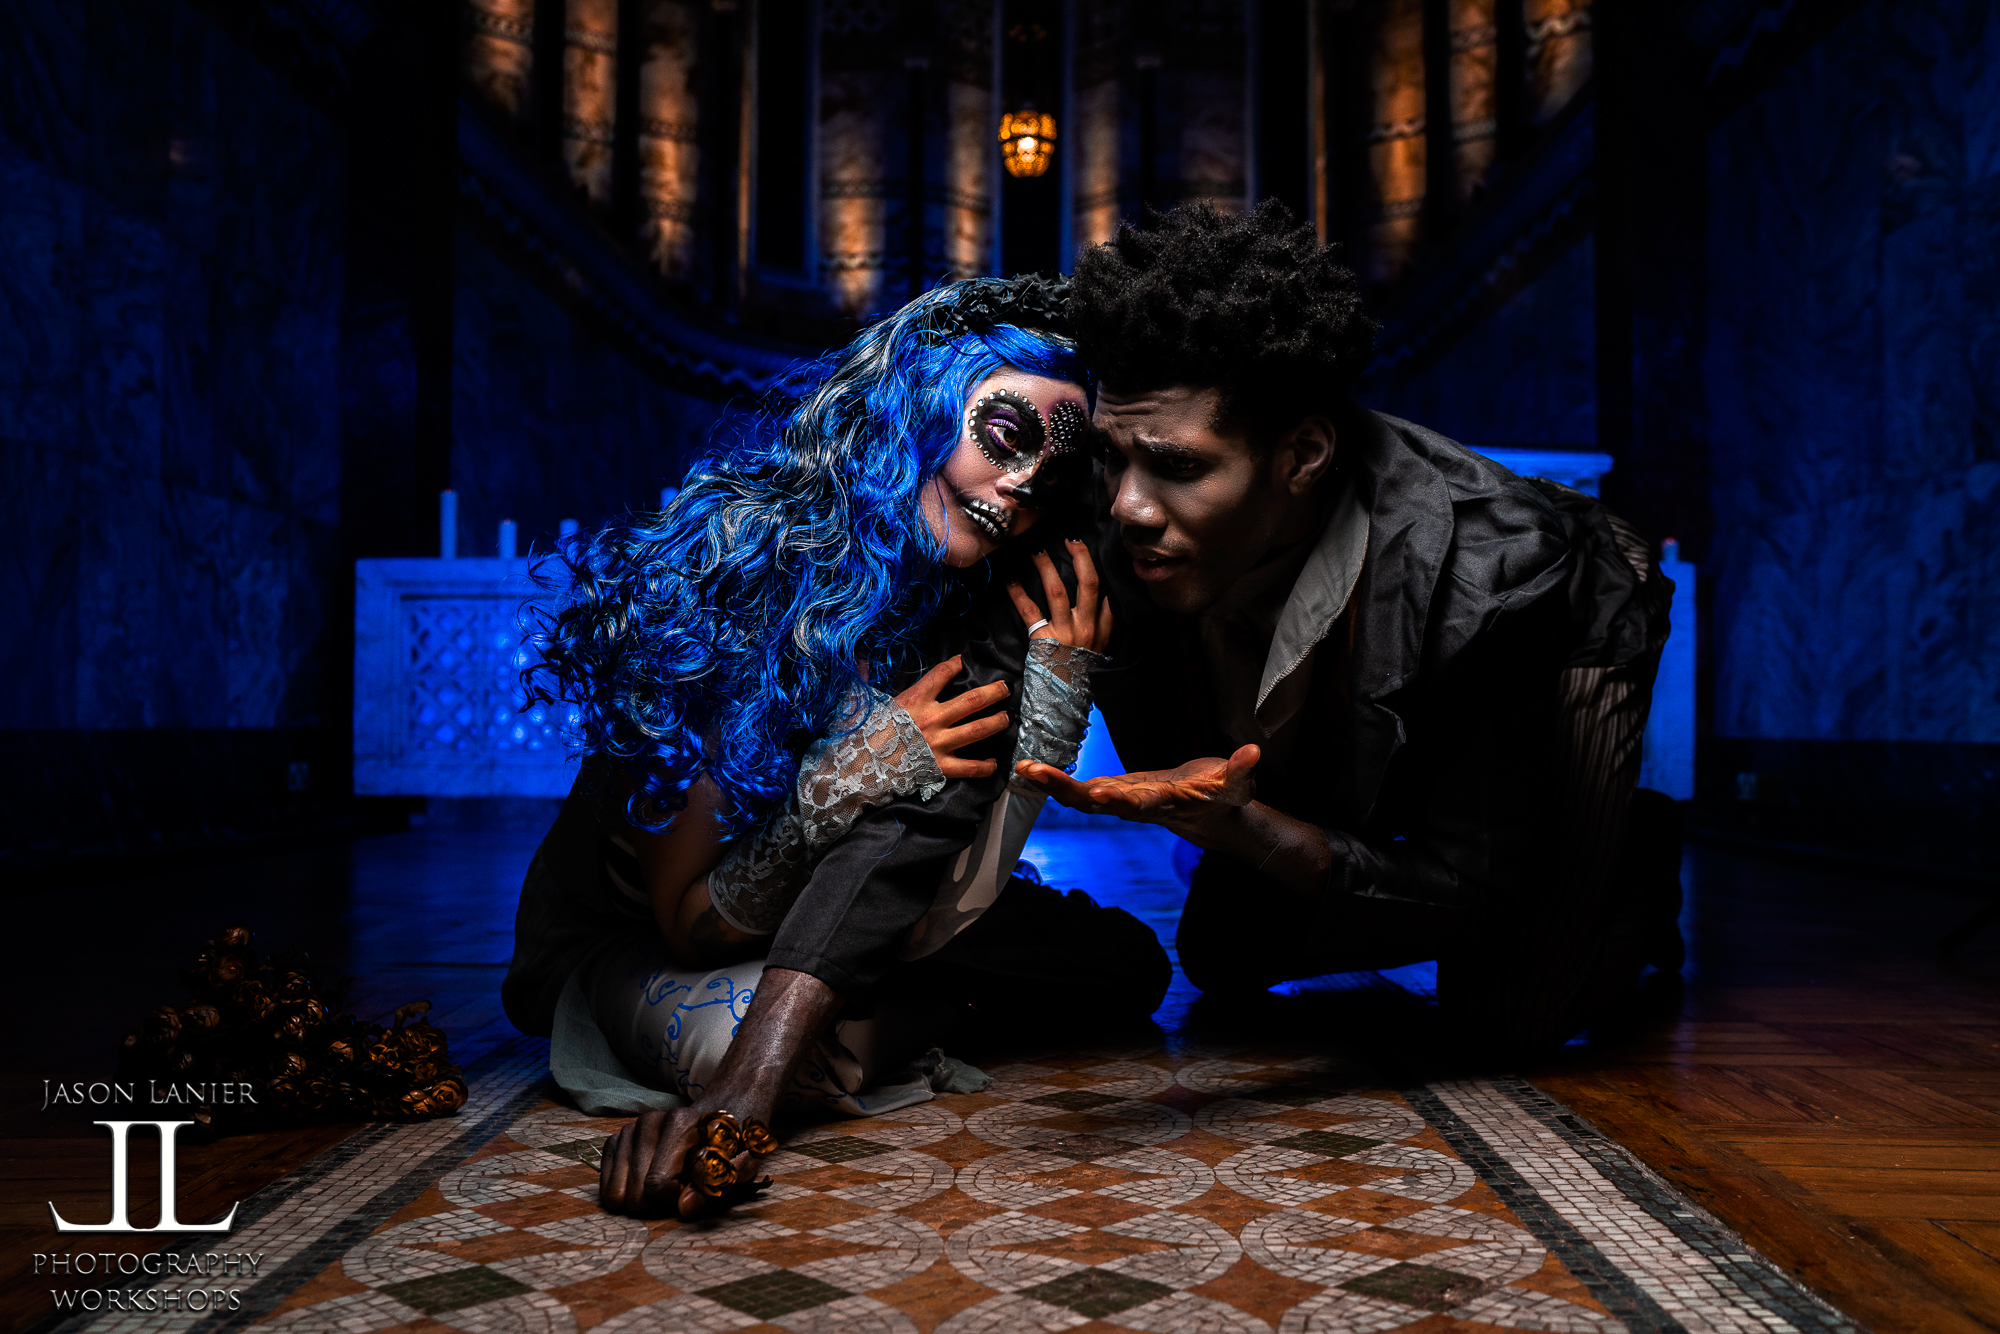
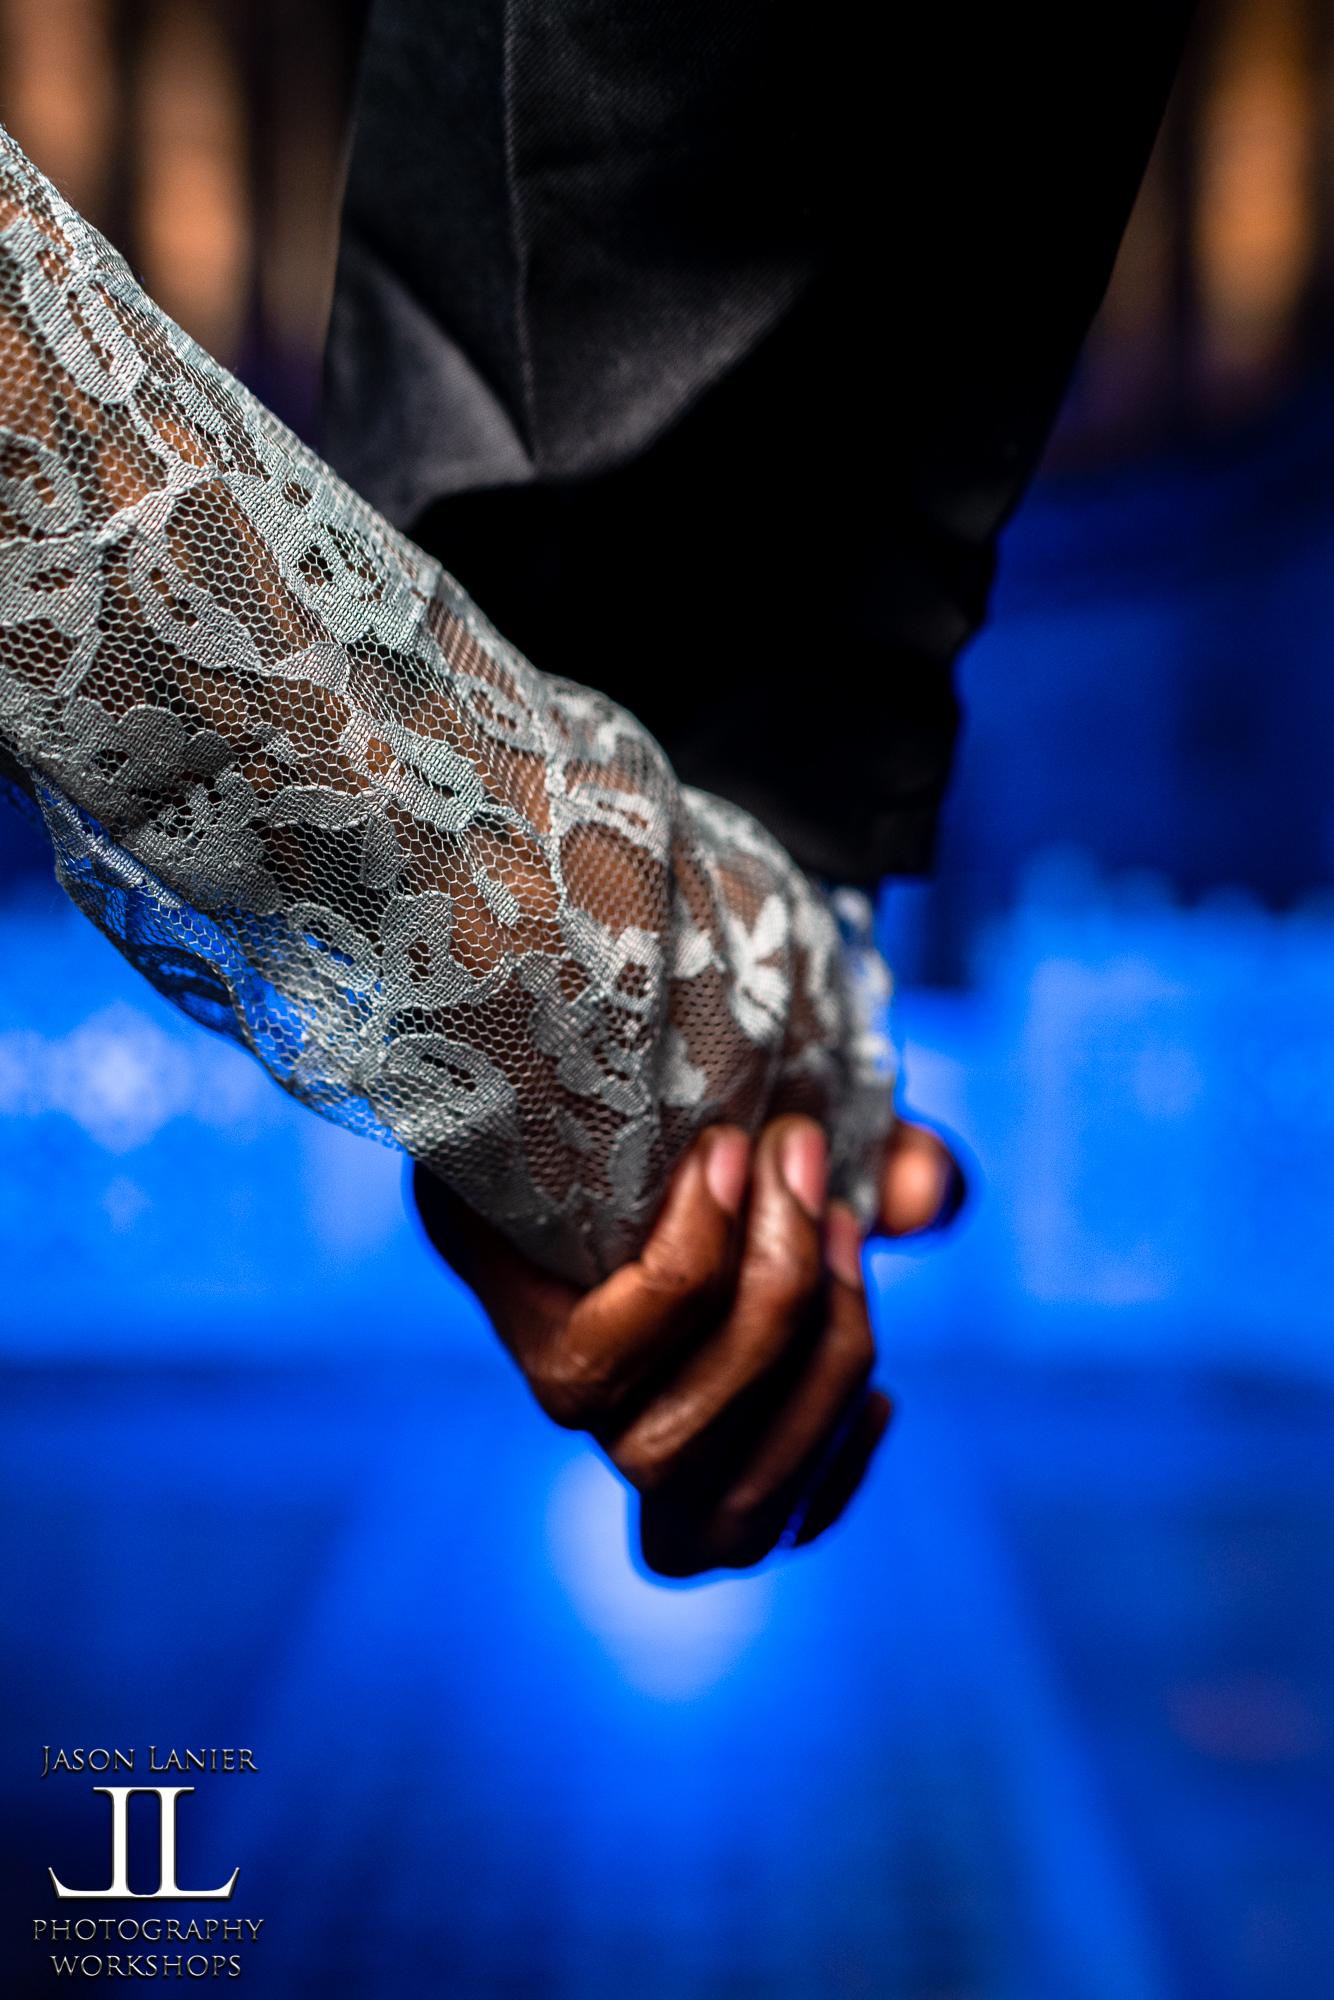
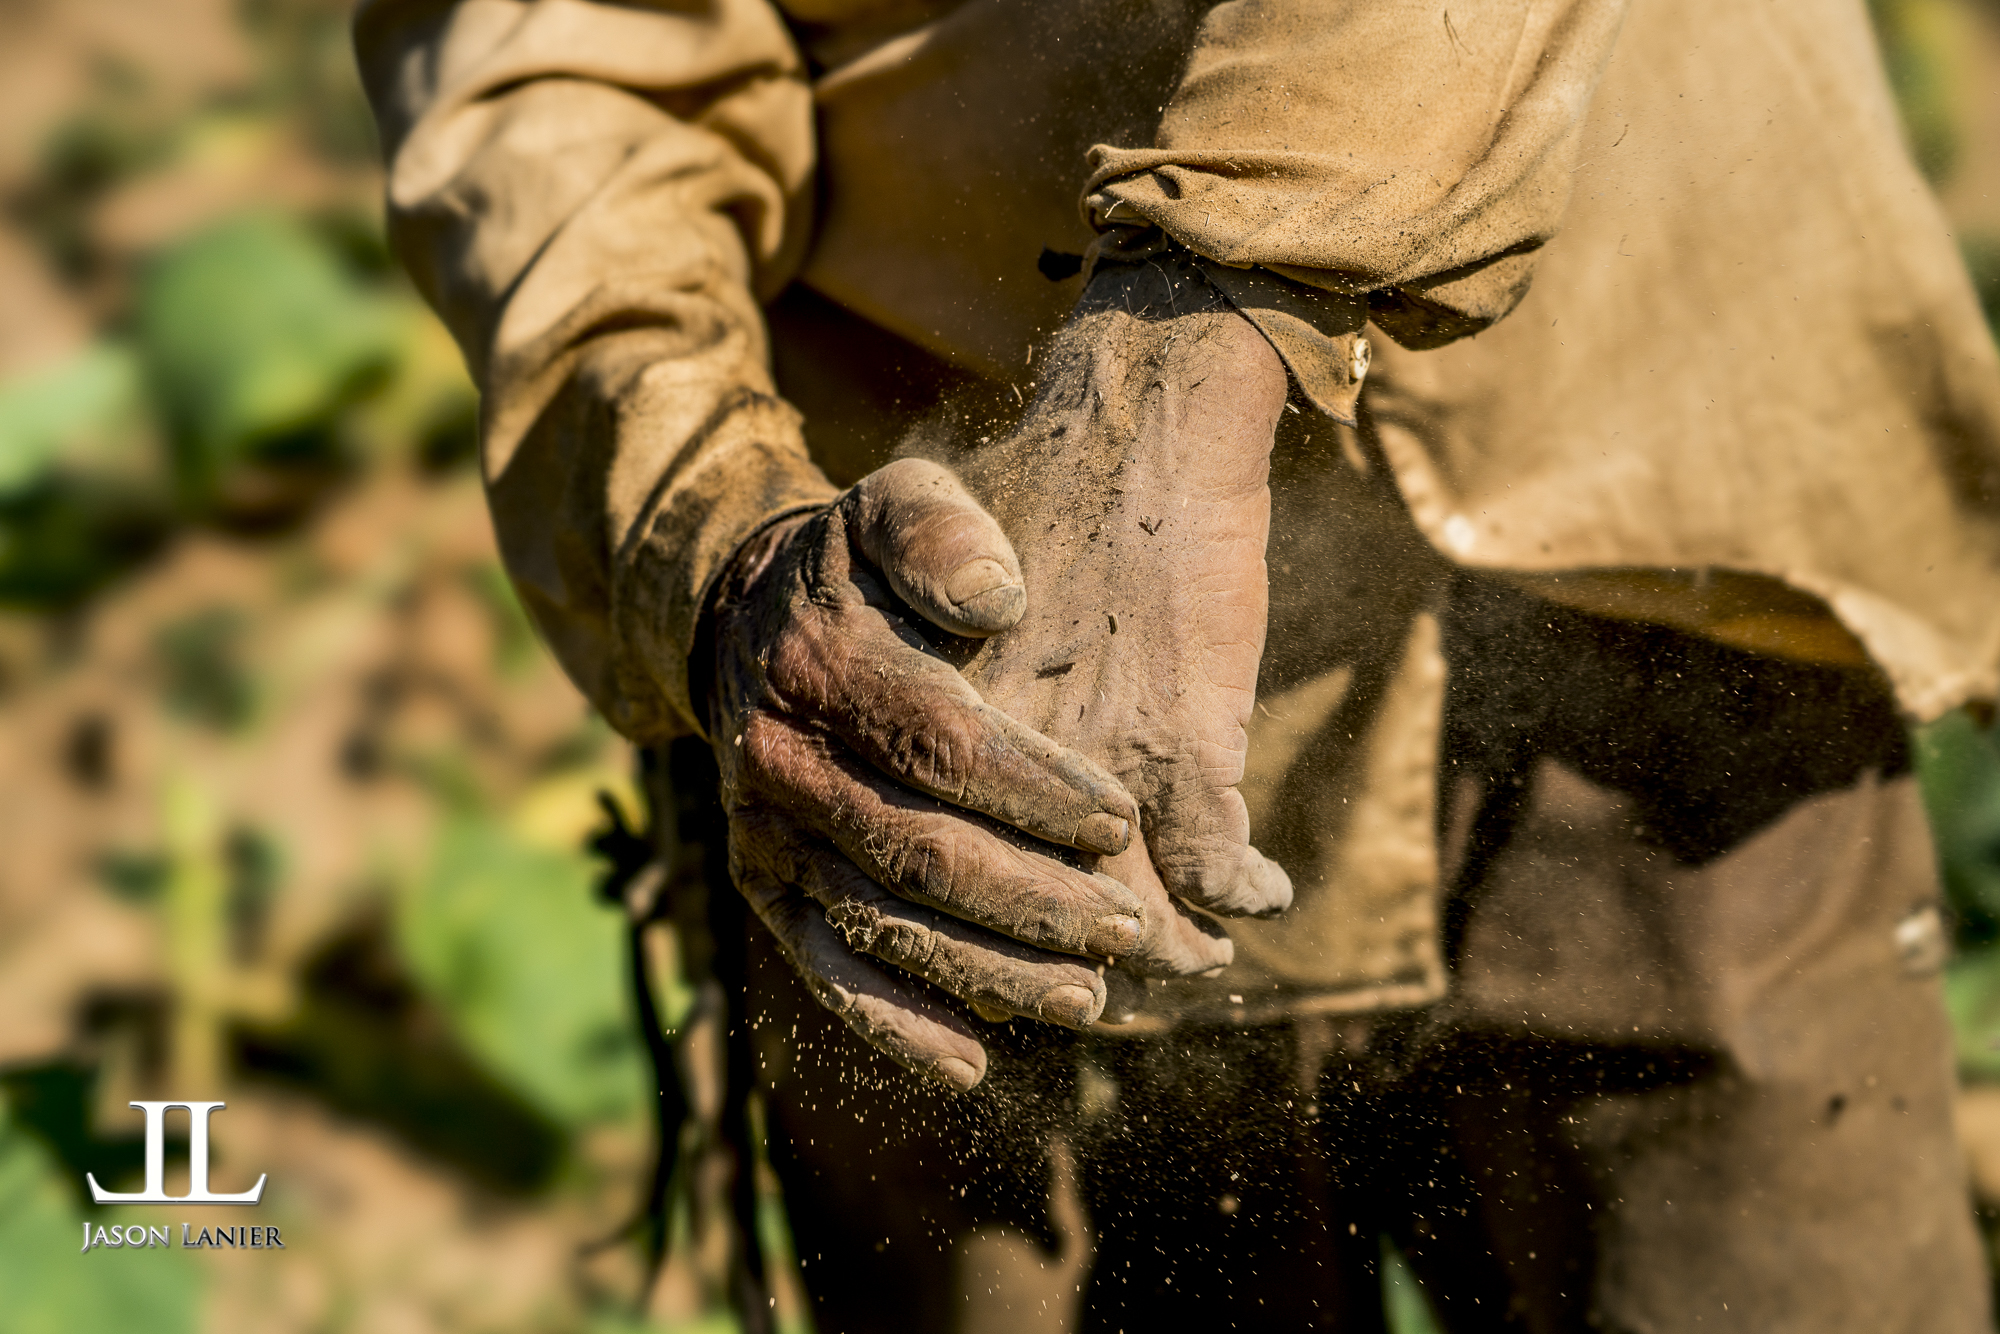
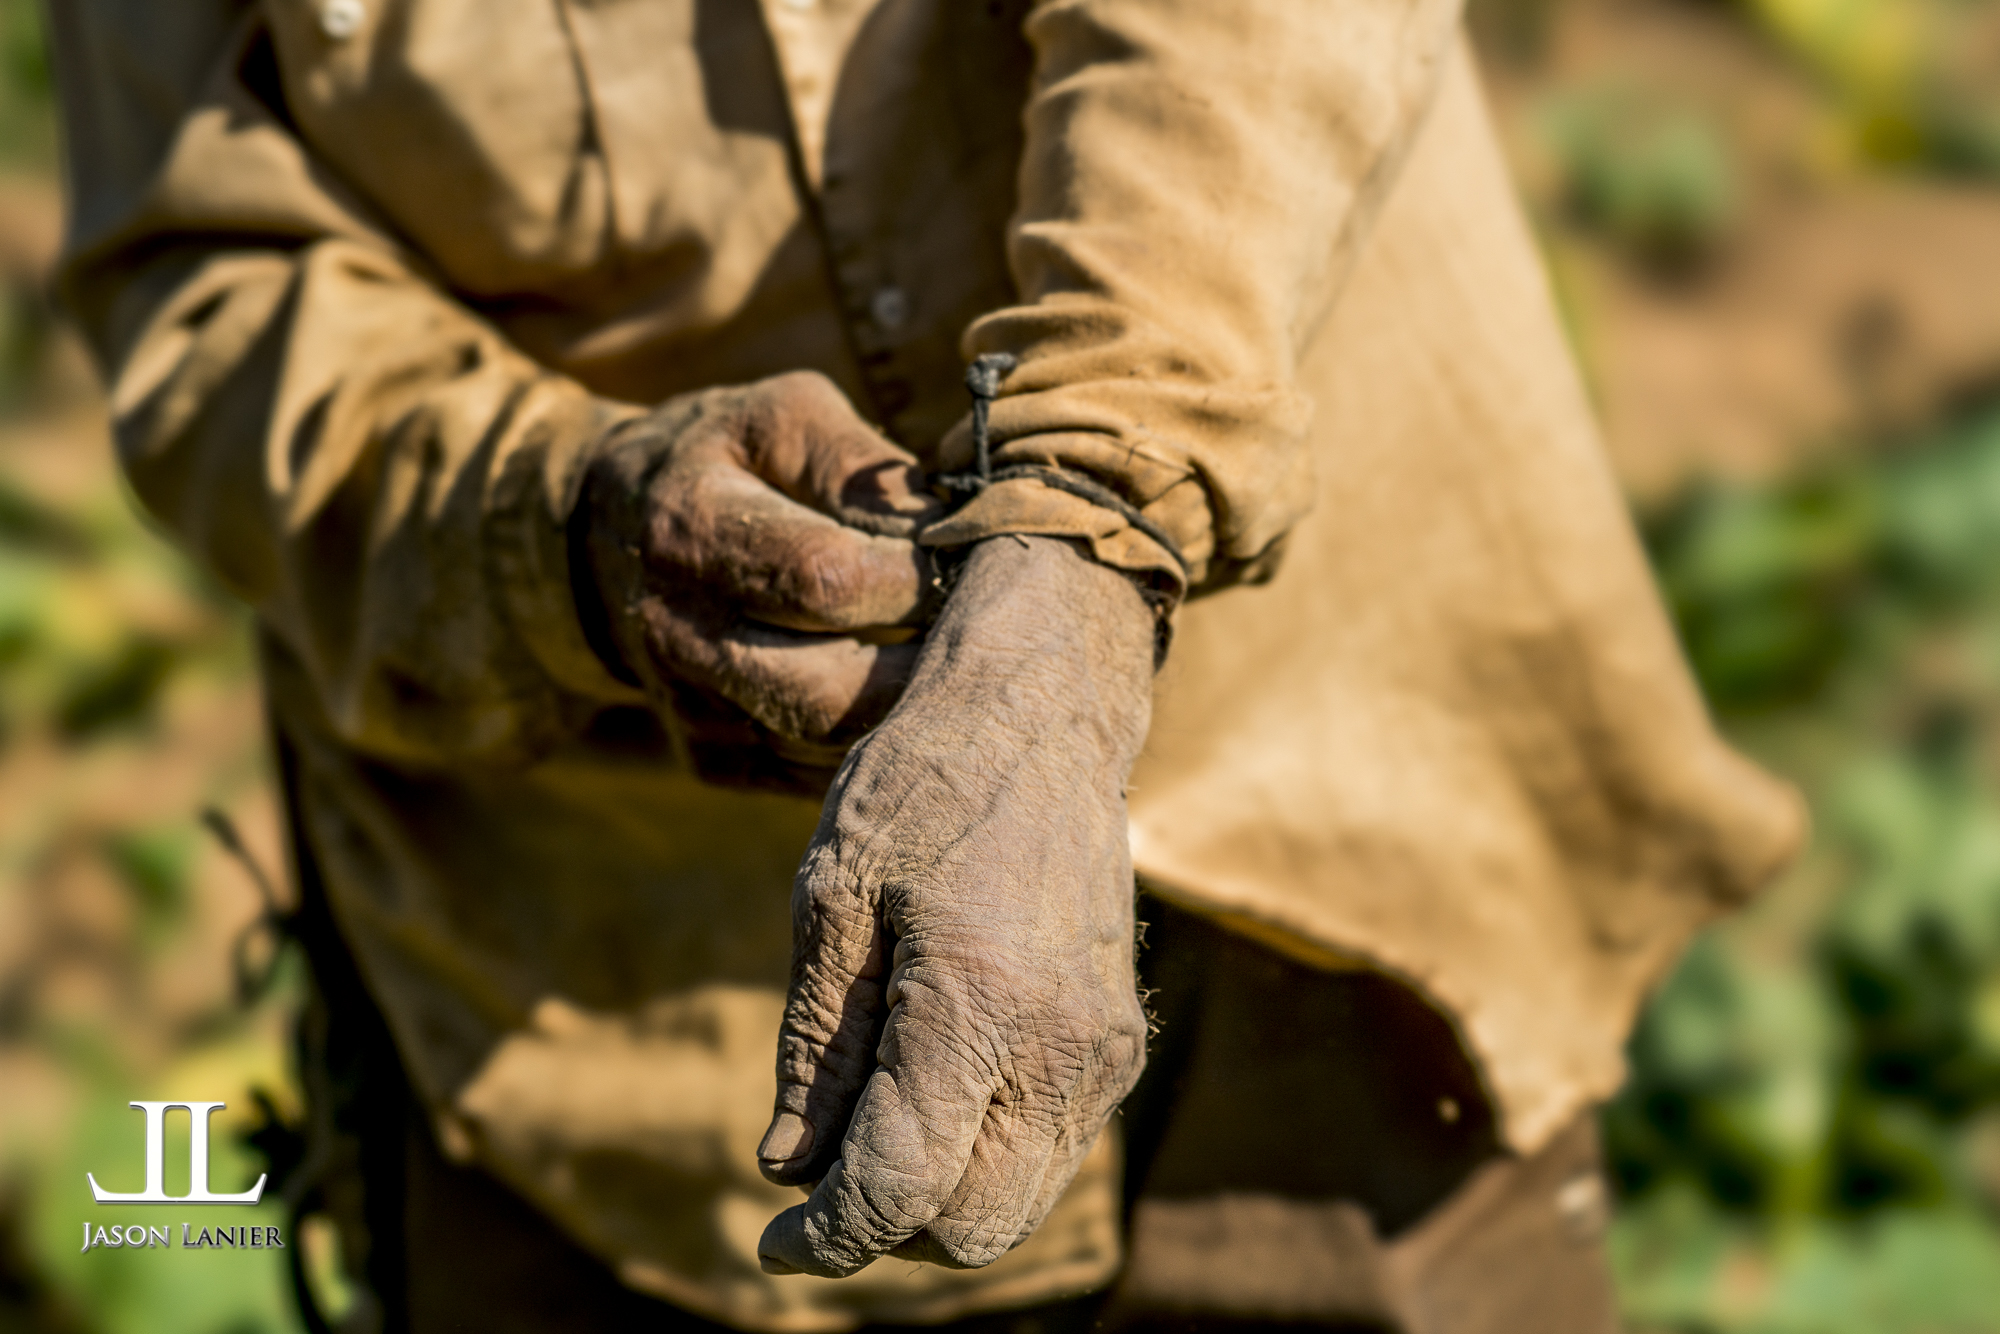
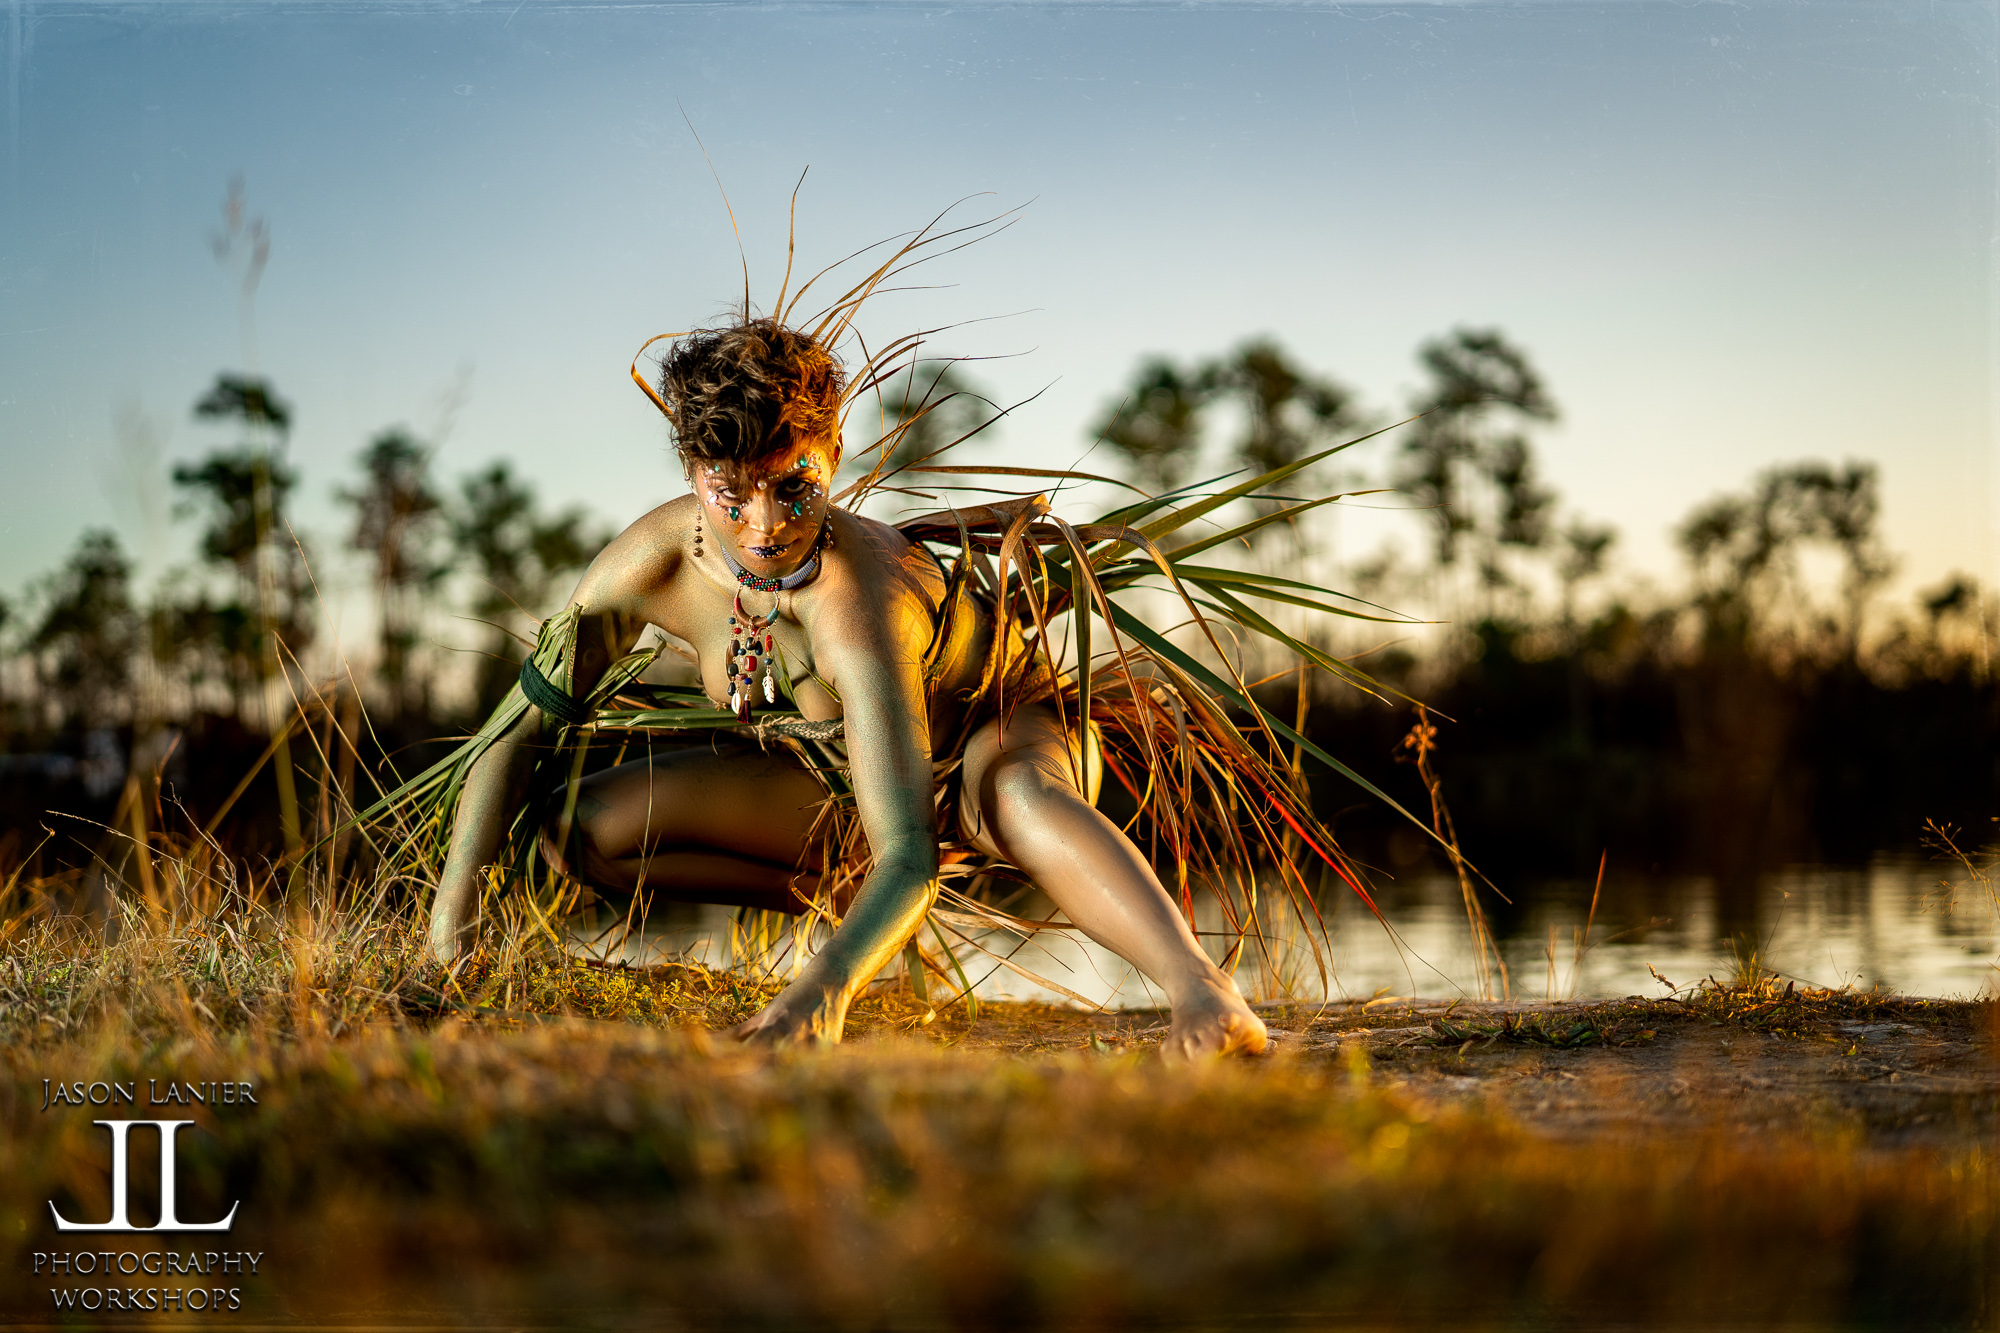
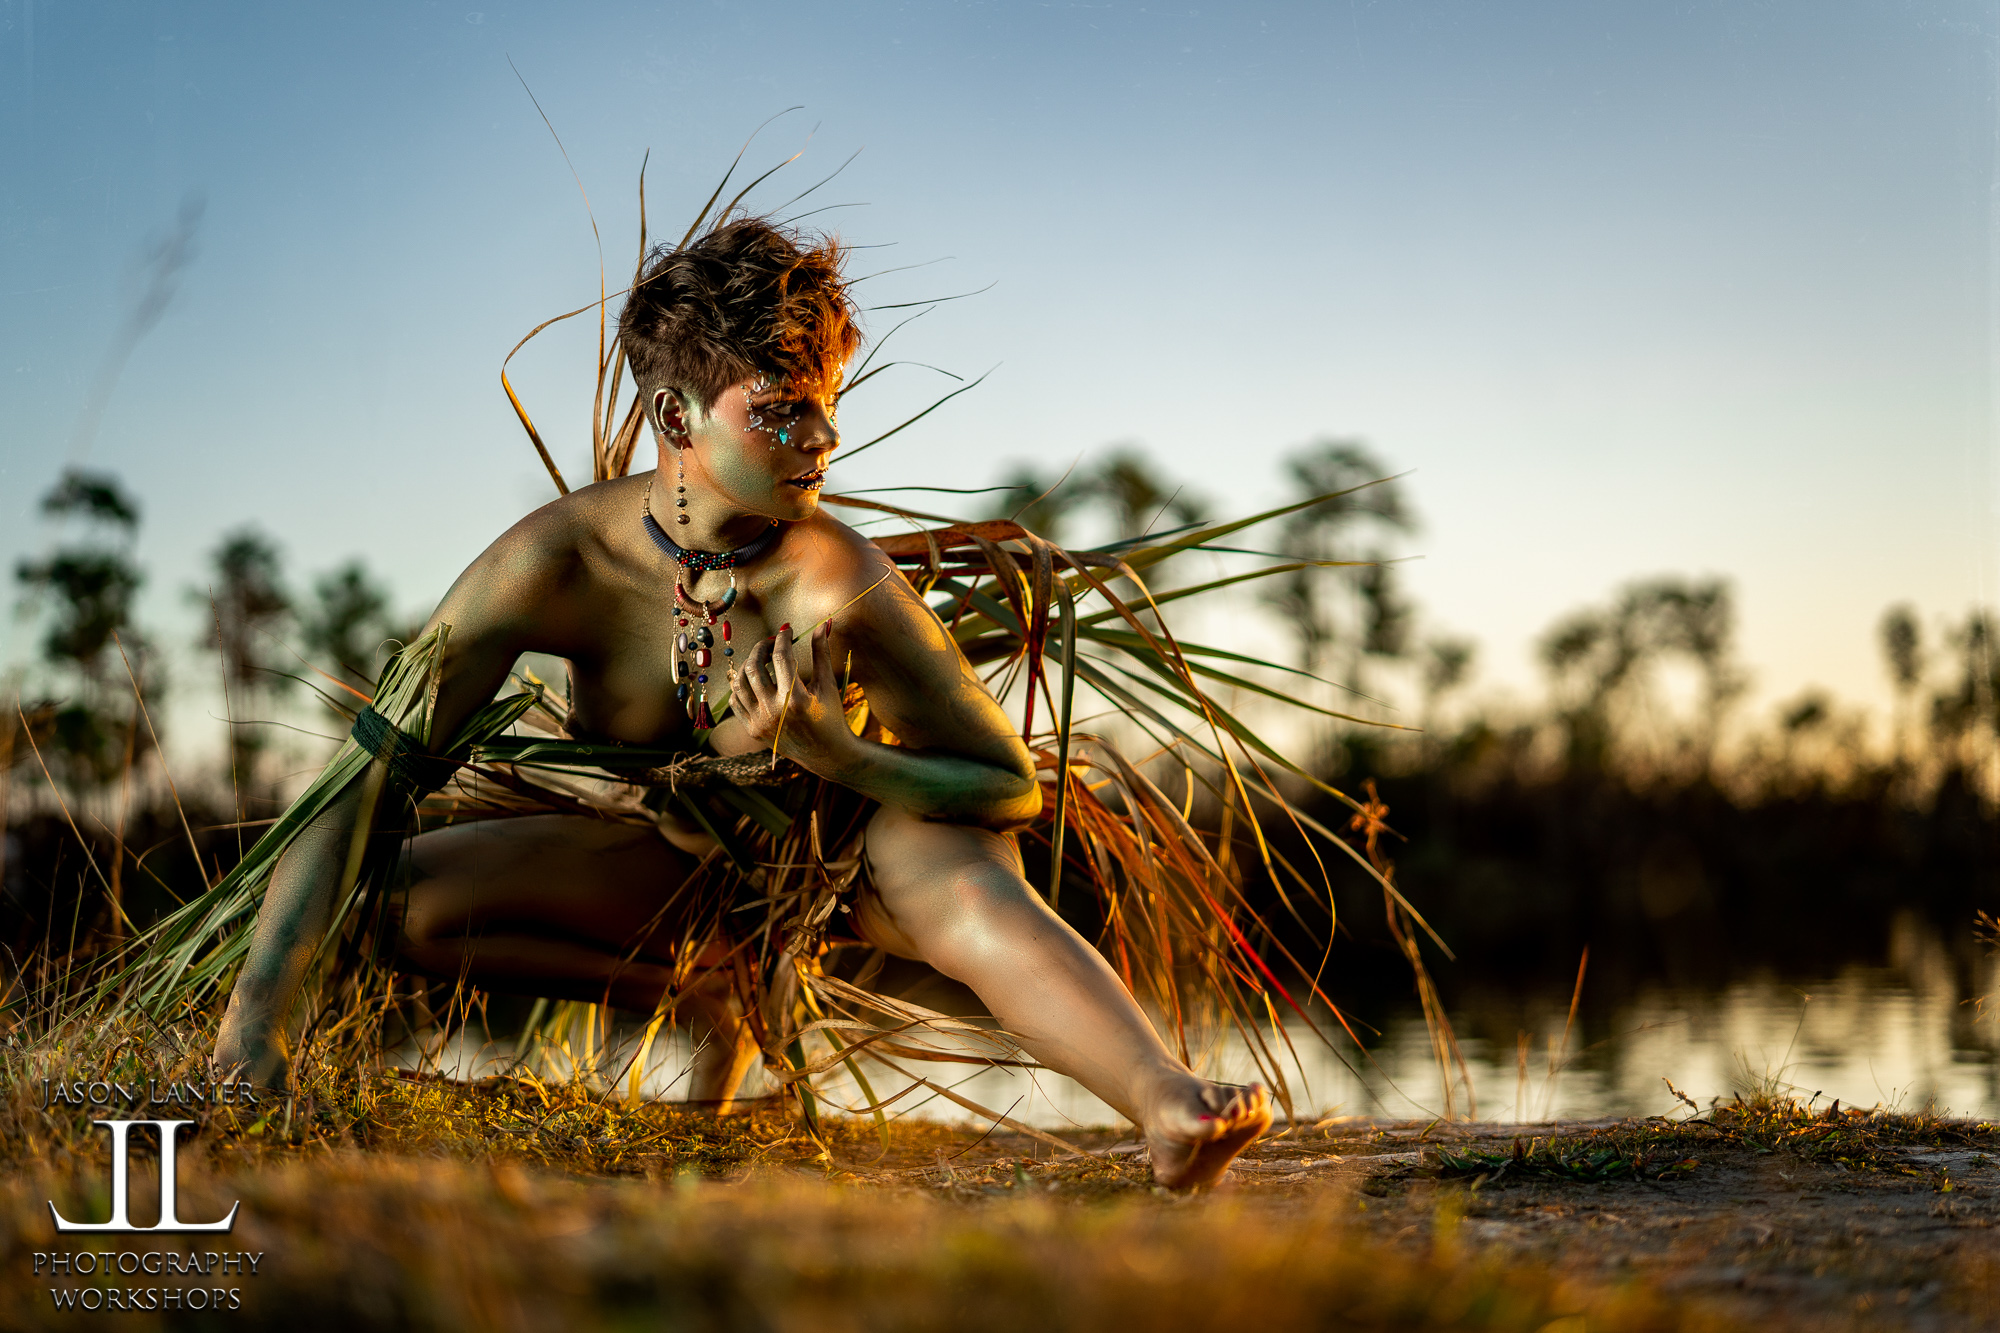
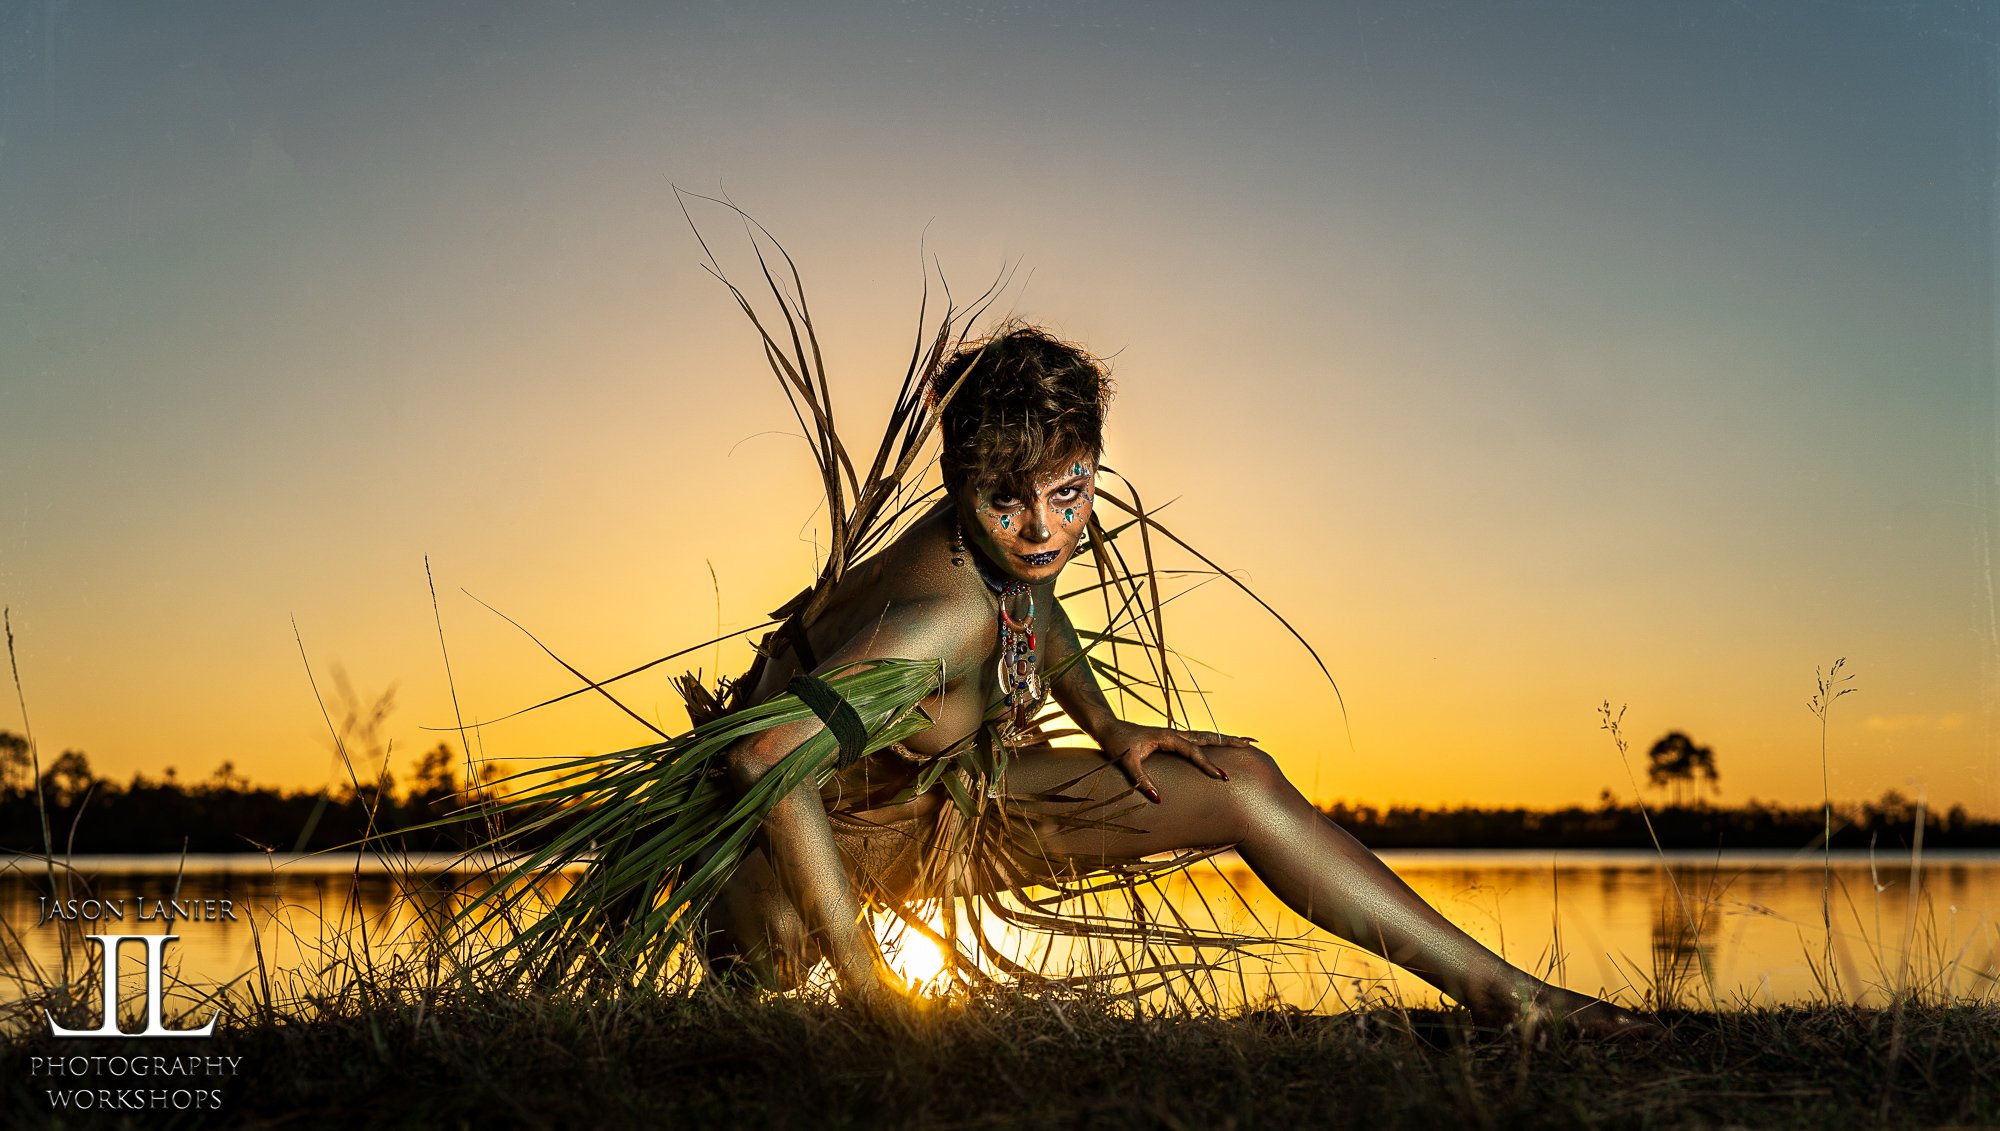
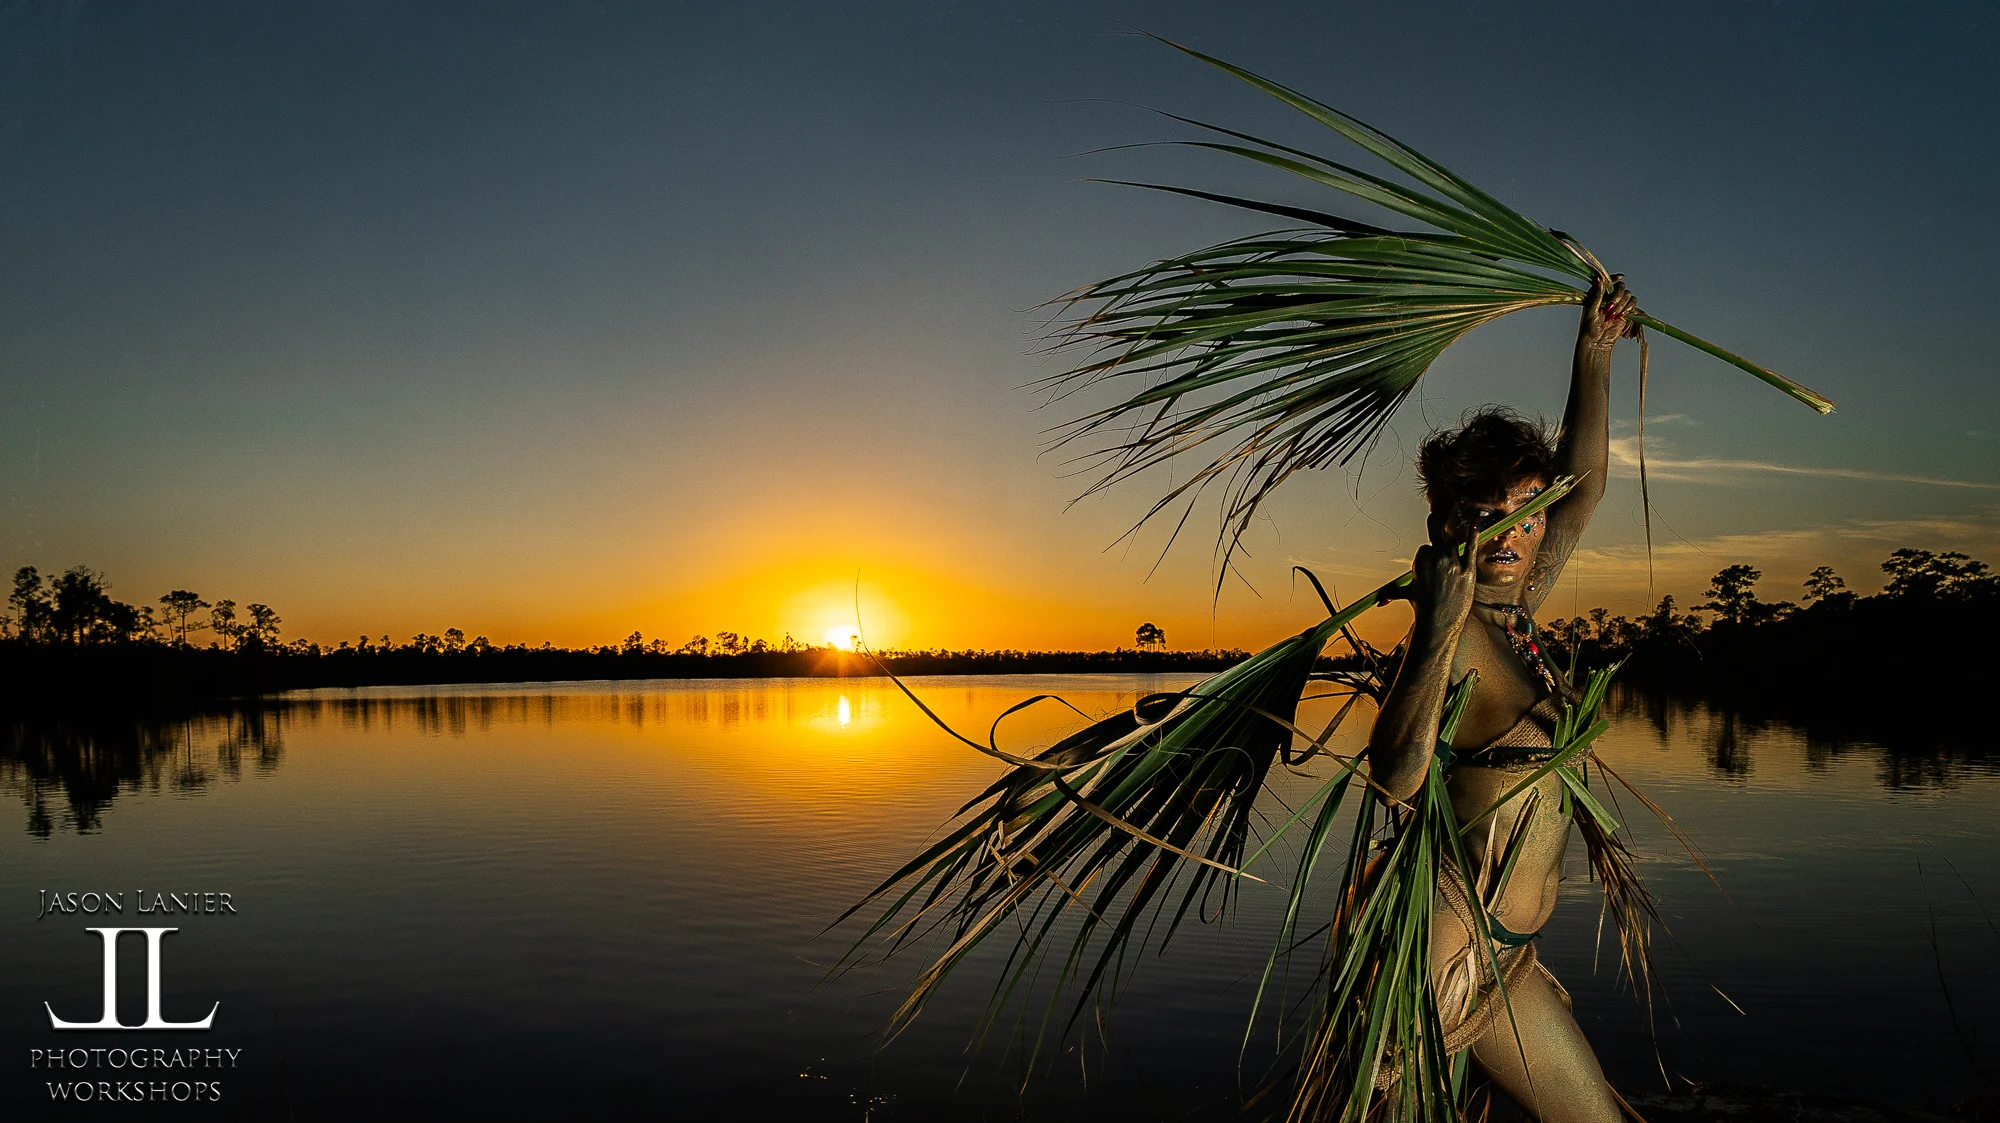
Check out the video above of the shoot that I did in the Everglades which shows exactly what I’m talking about. This was a crazy shoot with my Model Emily who painted herself up and used palm fronds on the ground to create an amazing outfit.

This was done using the Godox AD 600 Pro flash inside of the Westcott Rapid Box XXL modifier with three layers of diffusion; the deflector plate, the inner baffle and outer sock.

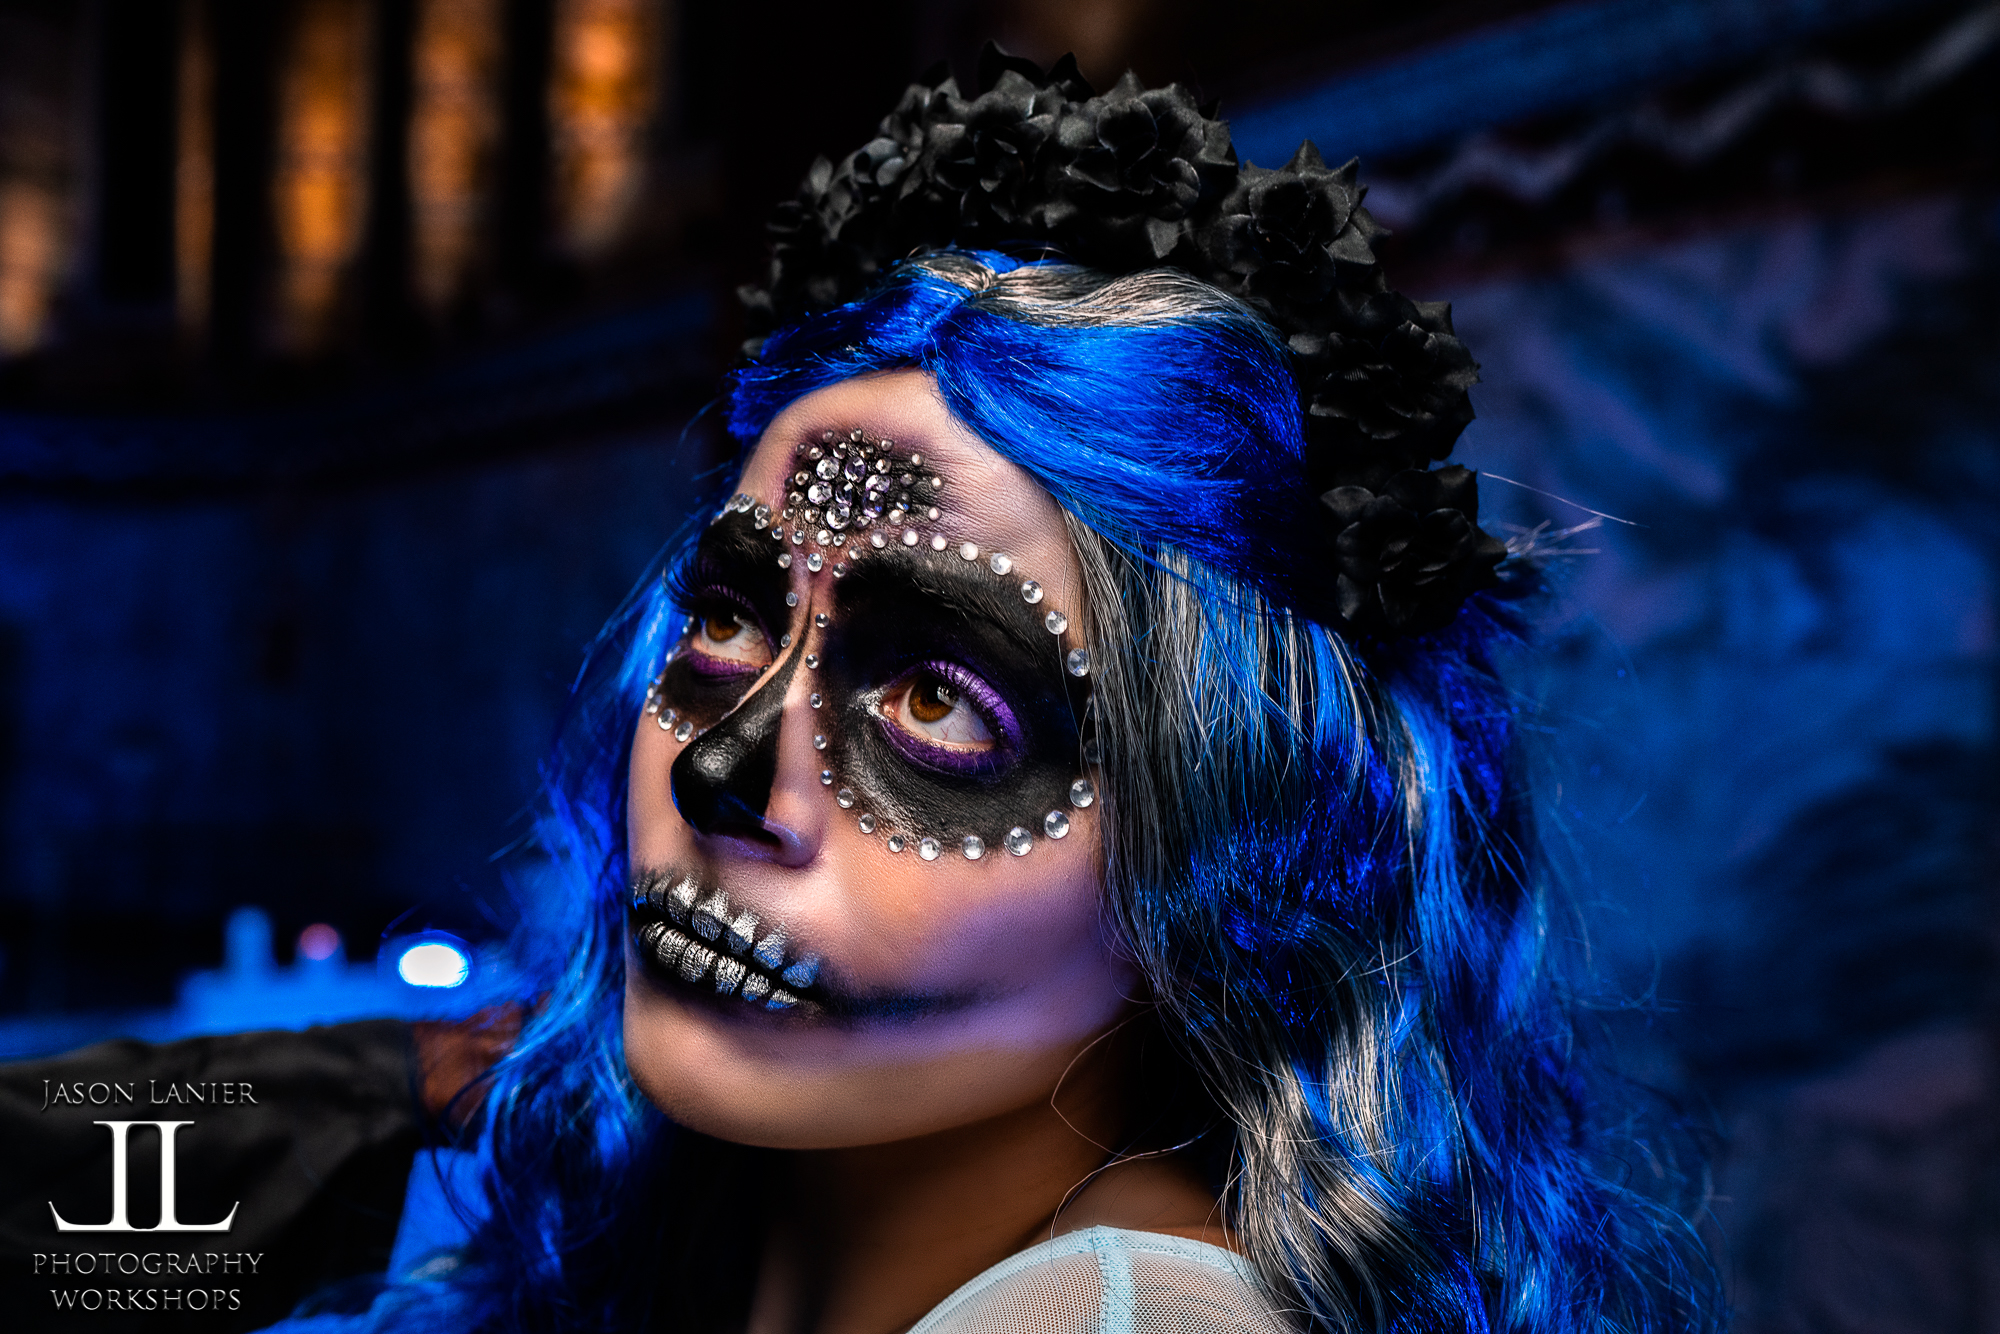
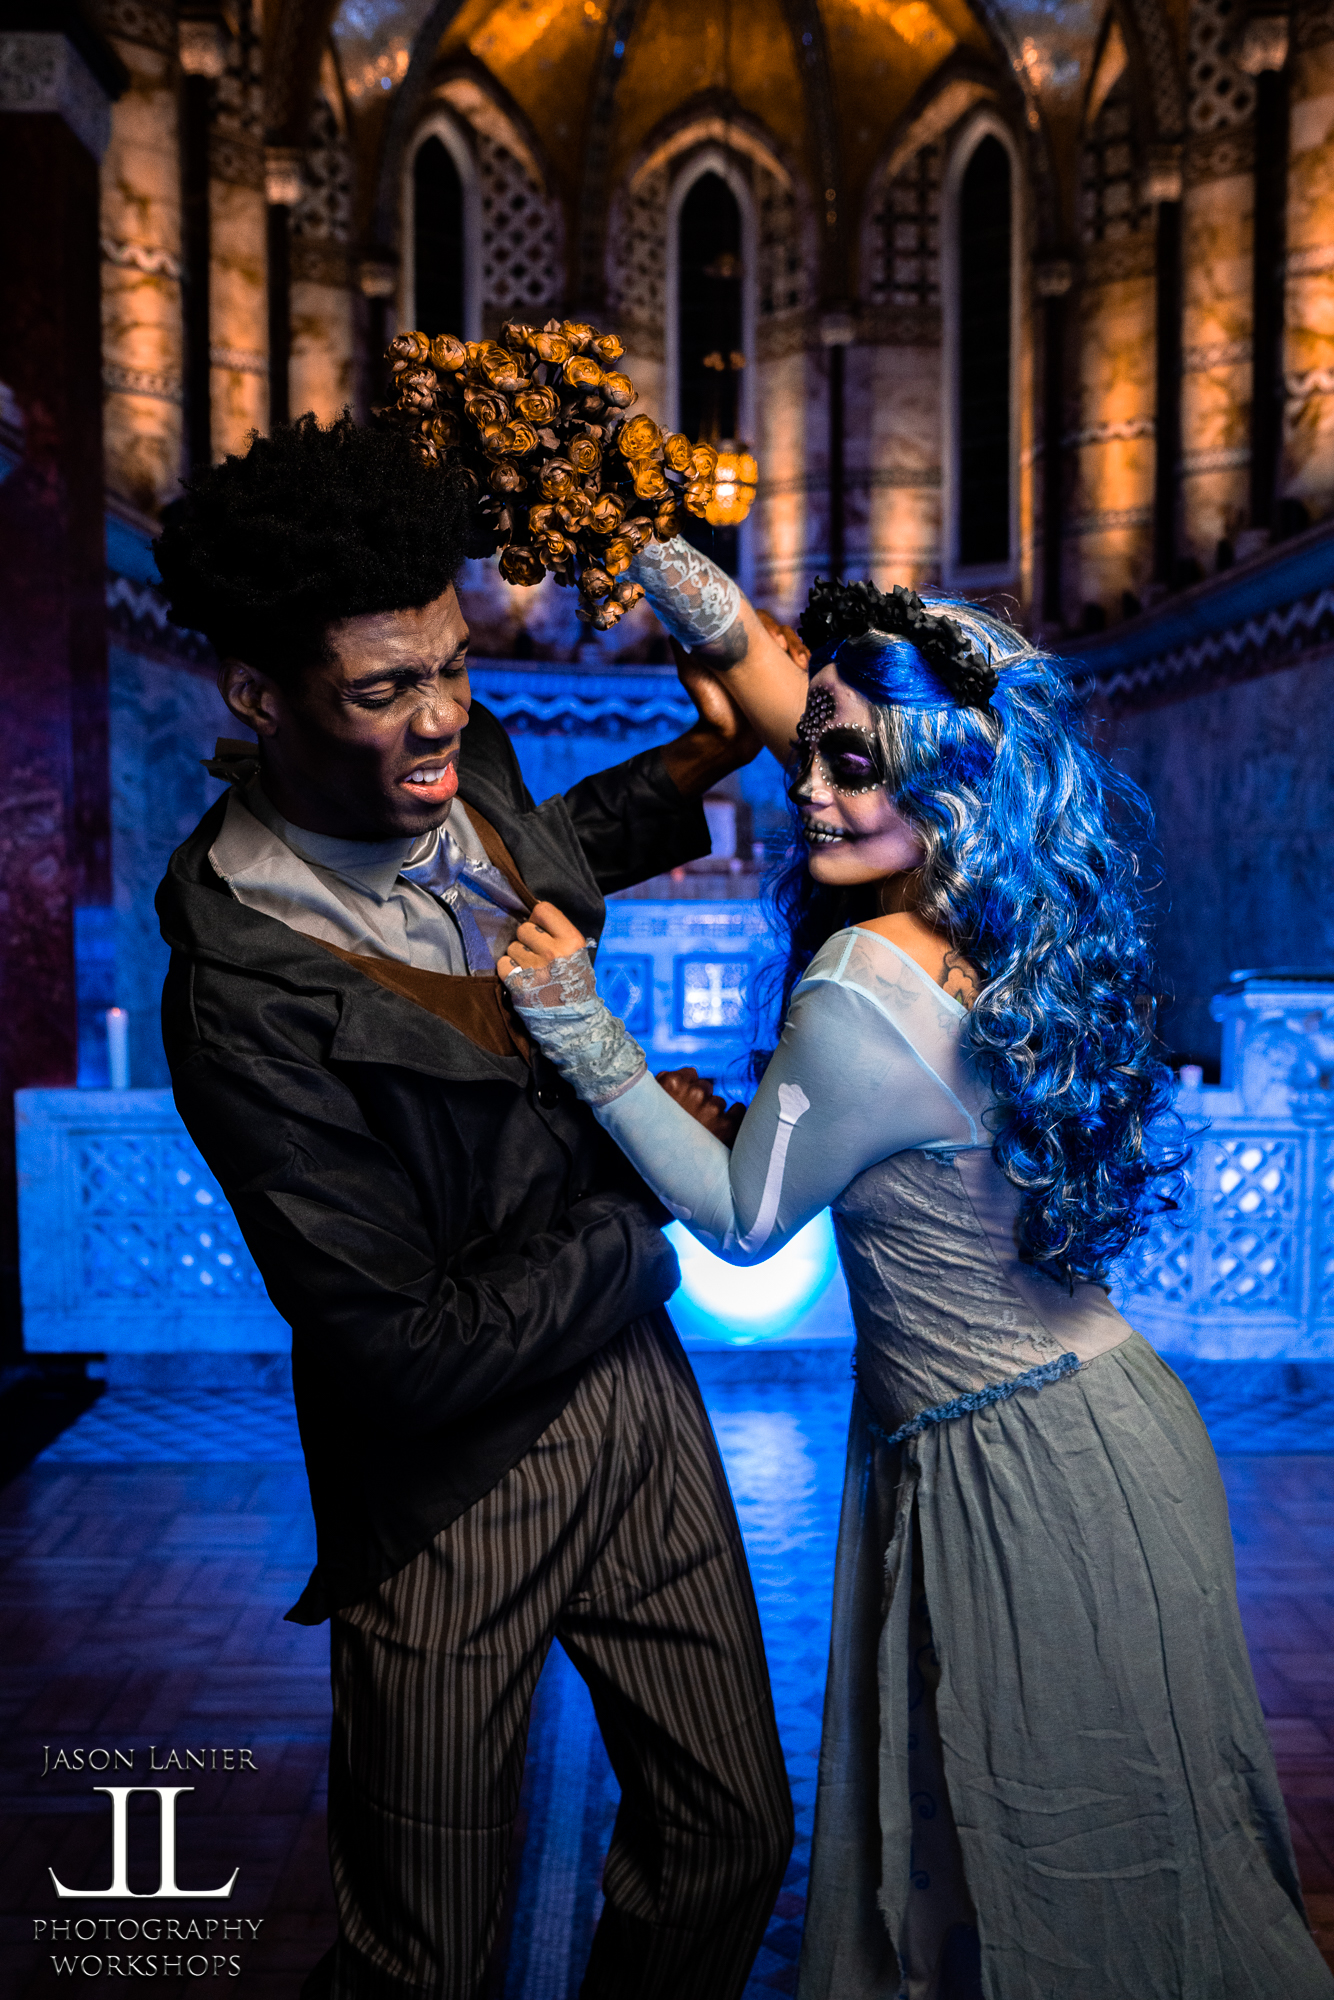
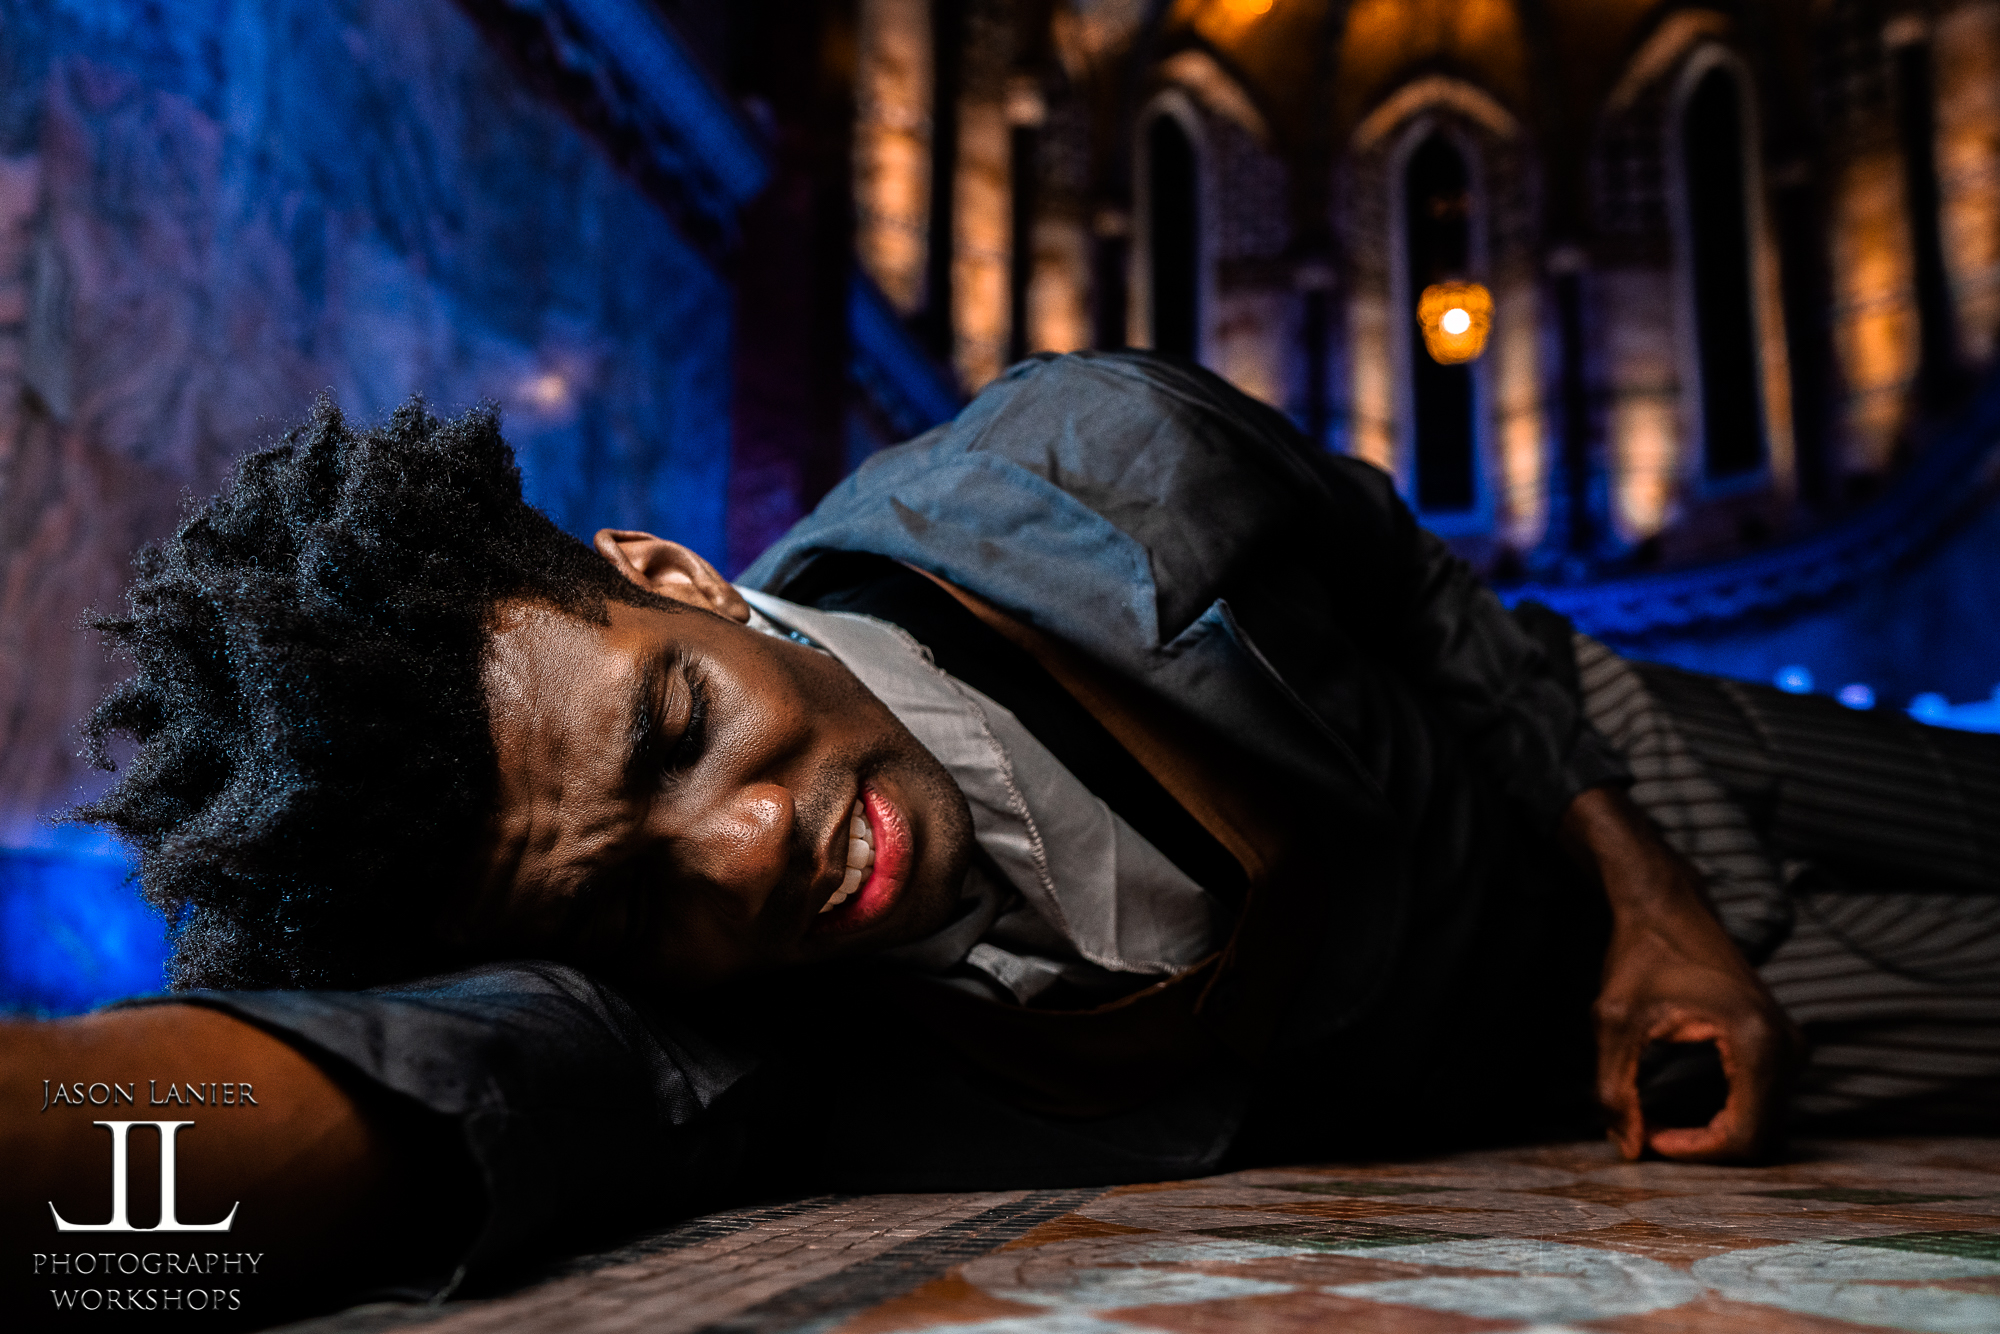
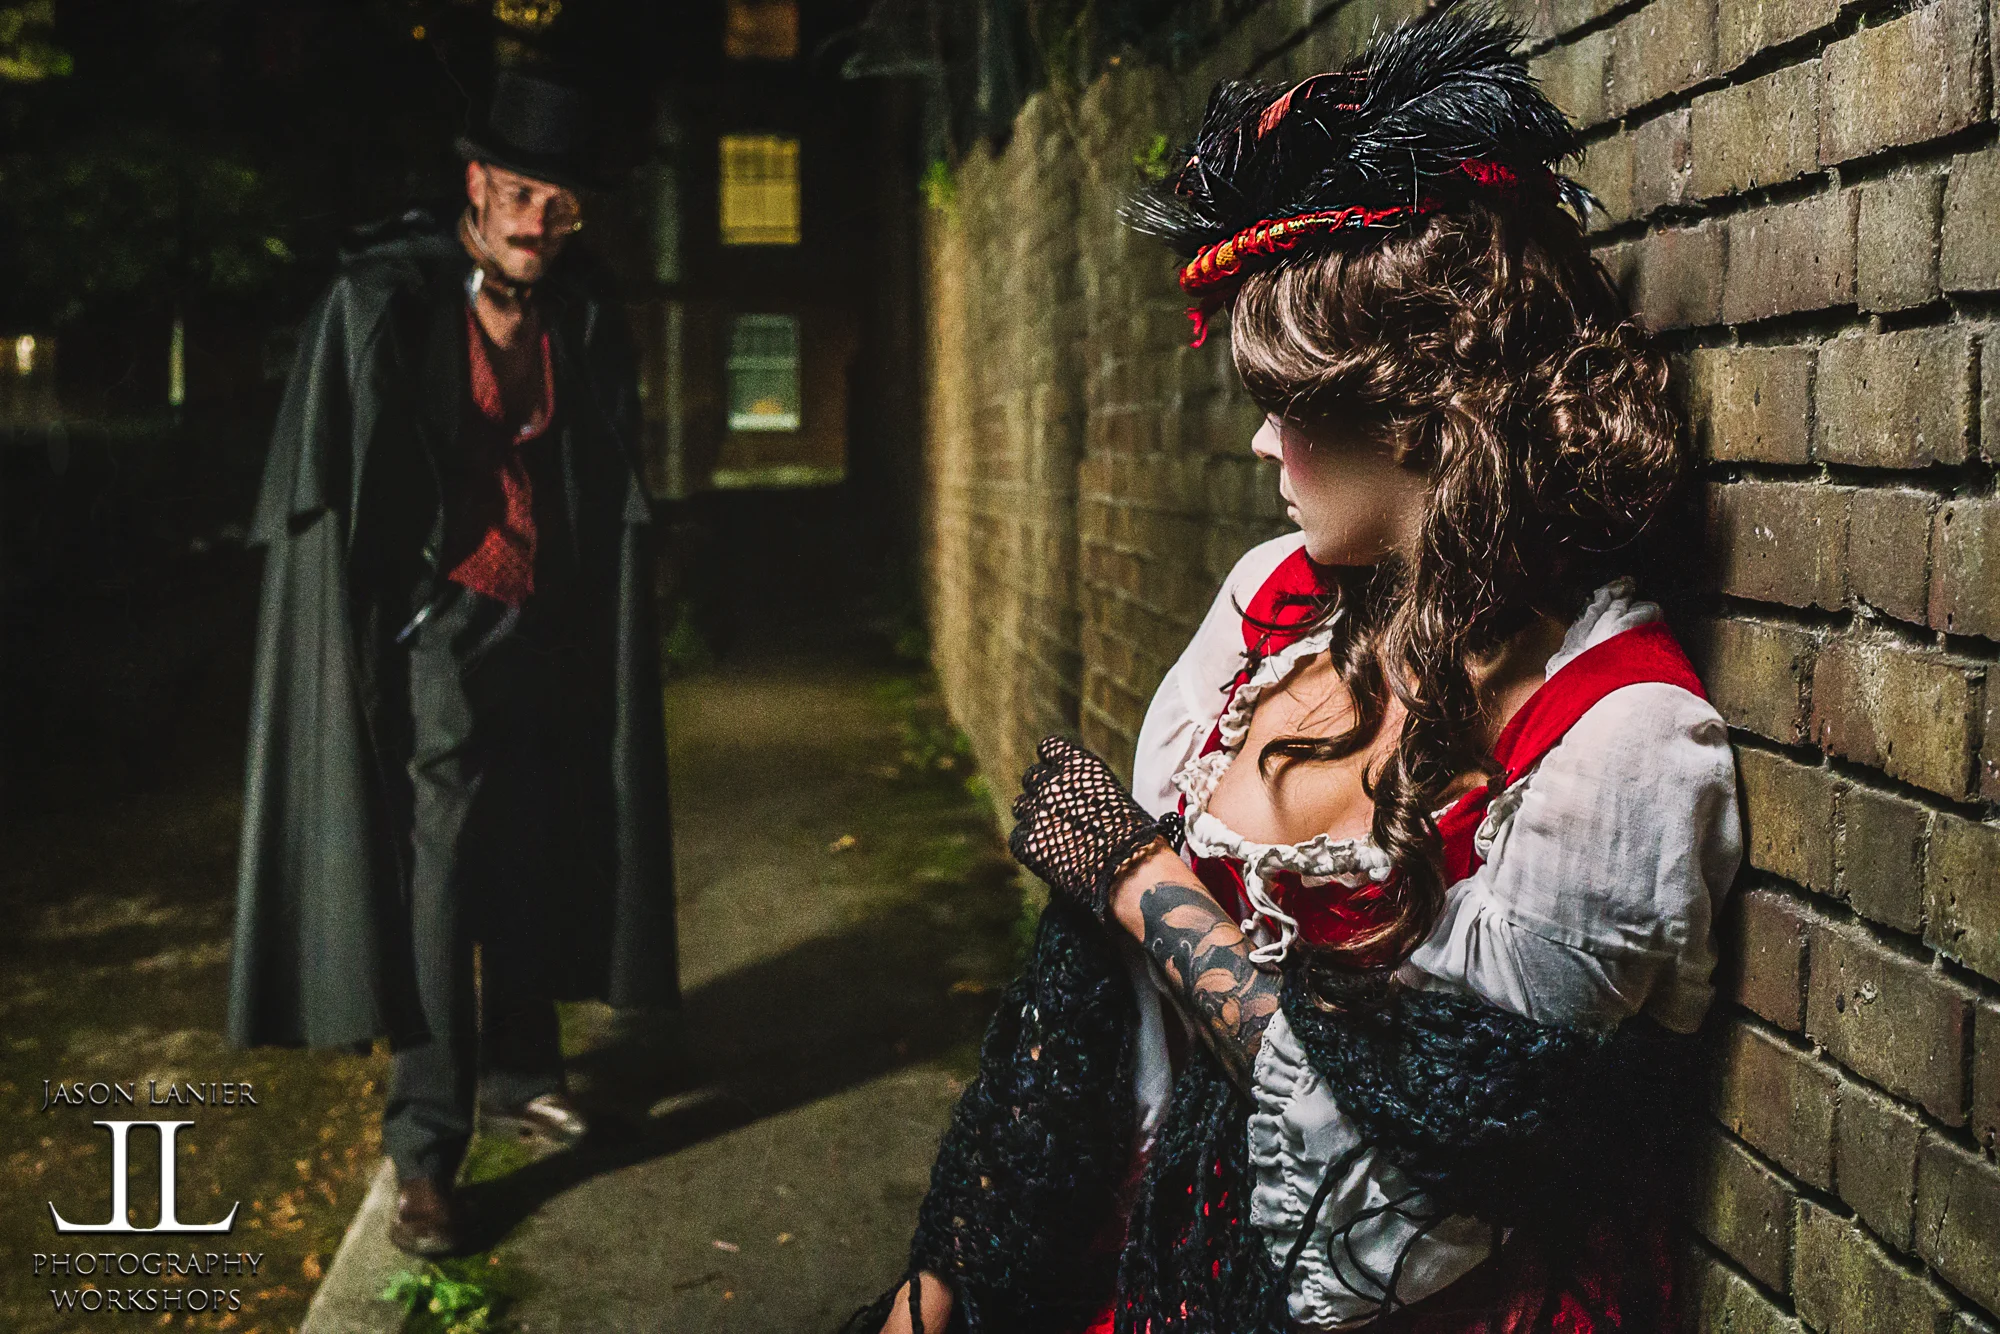
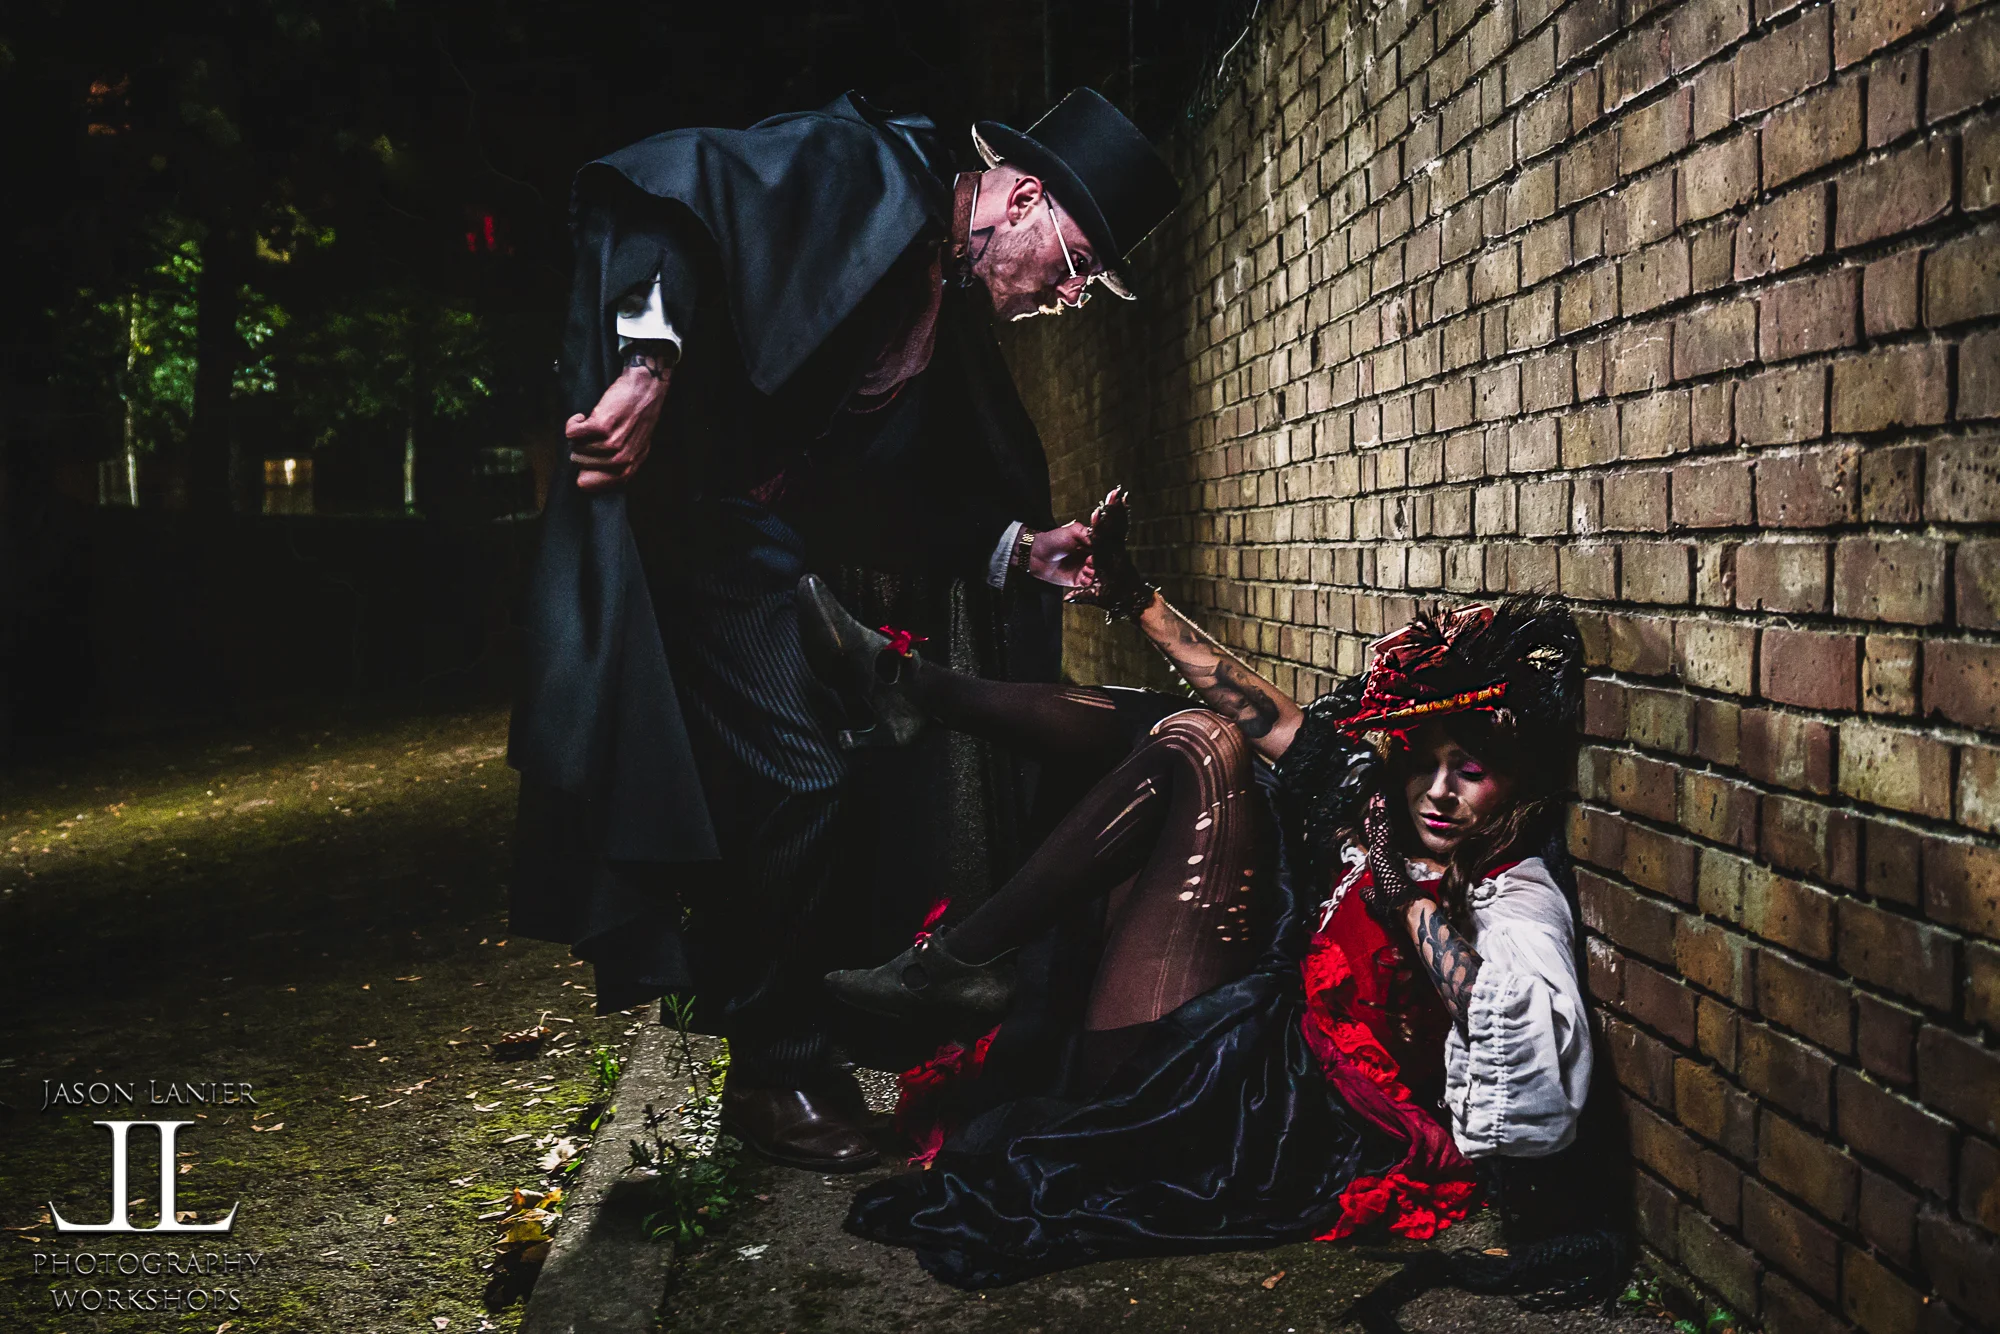
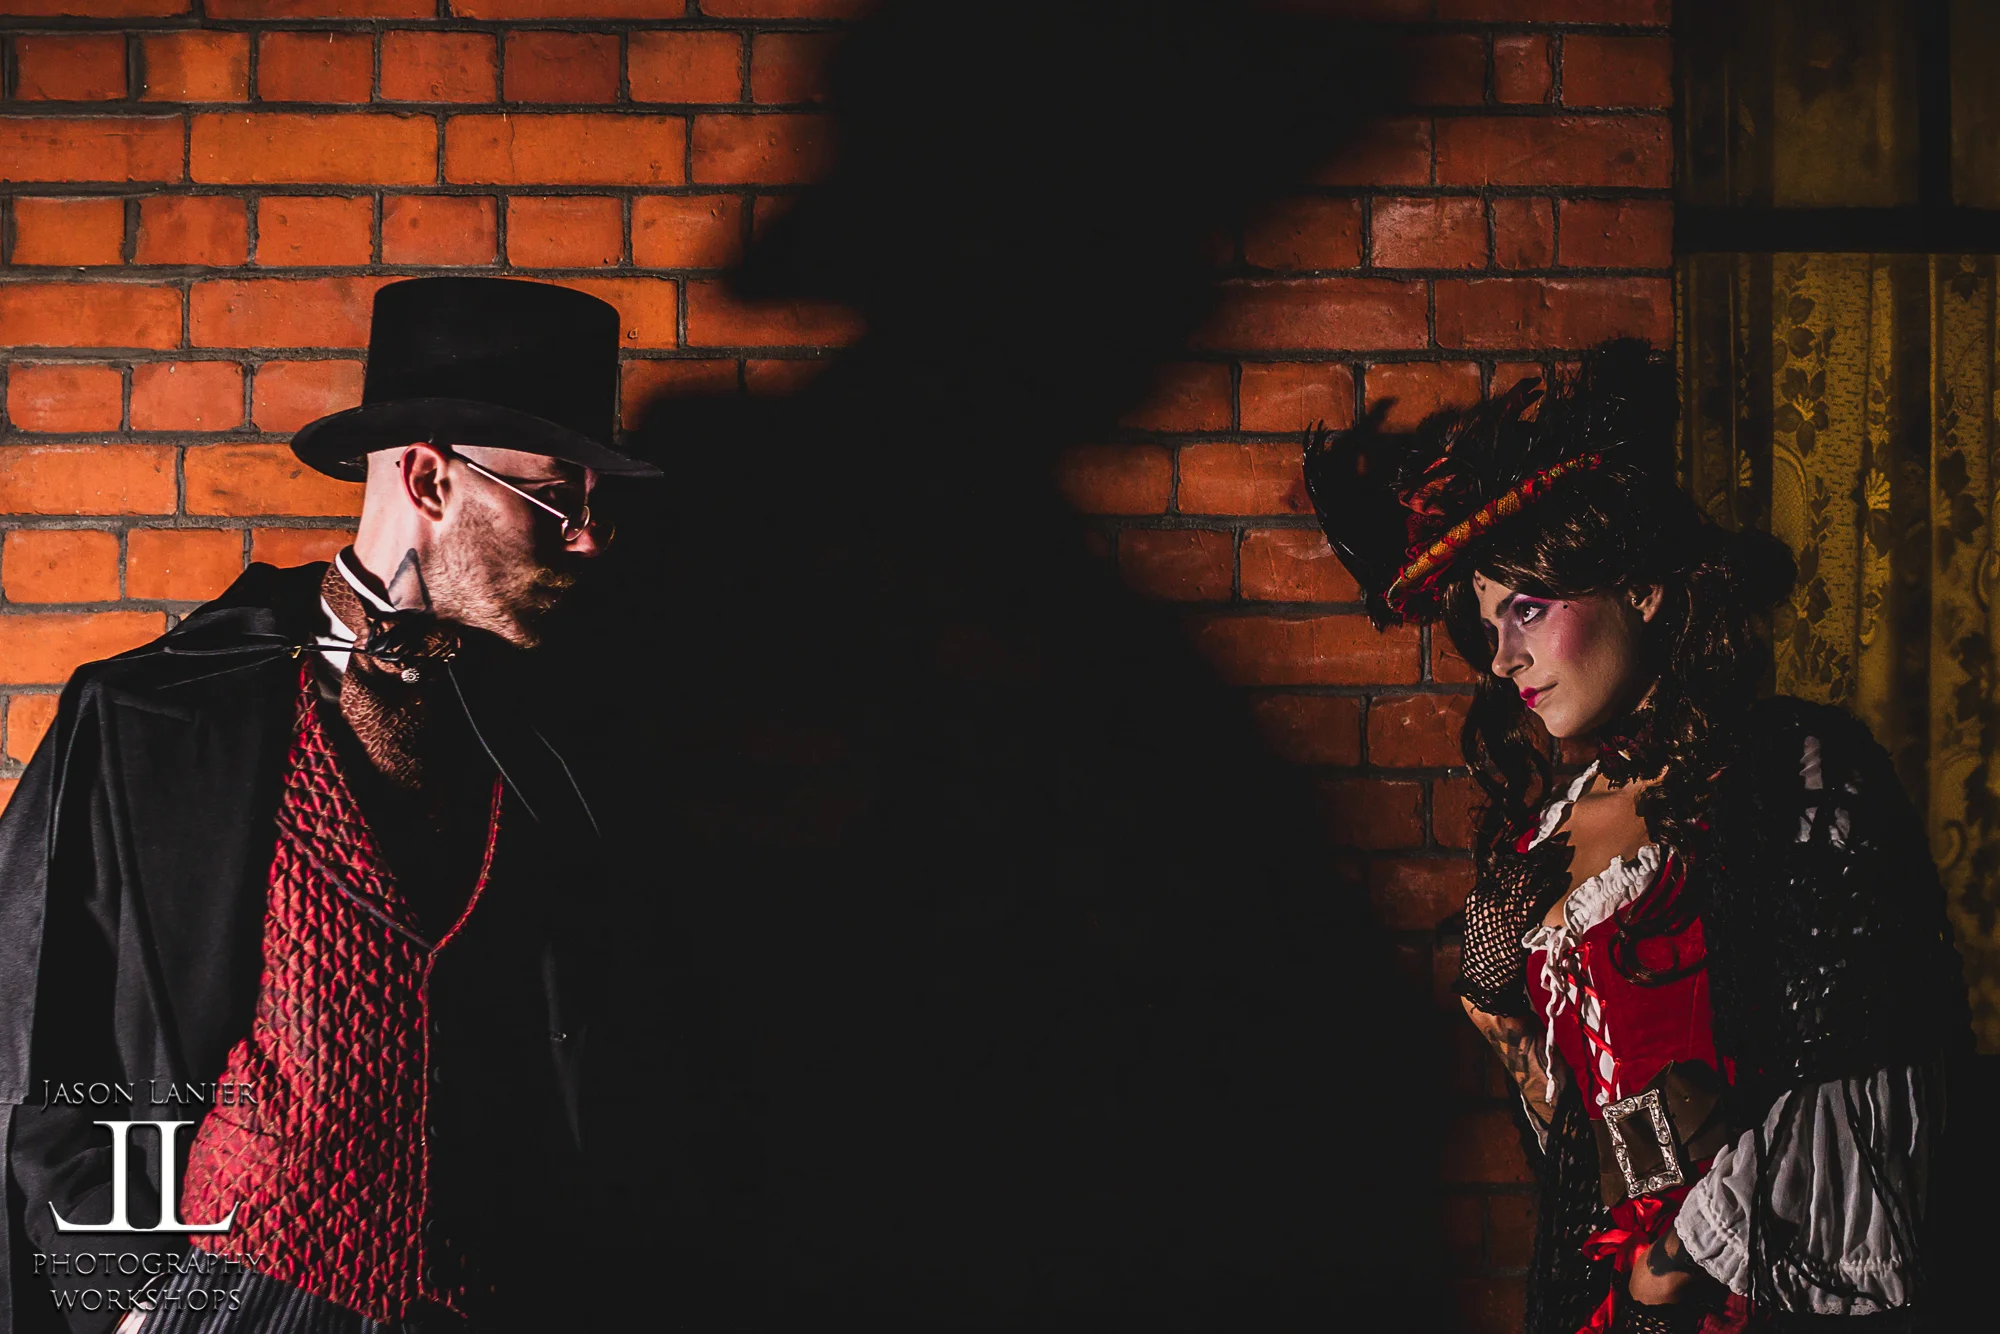
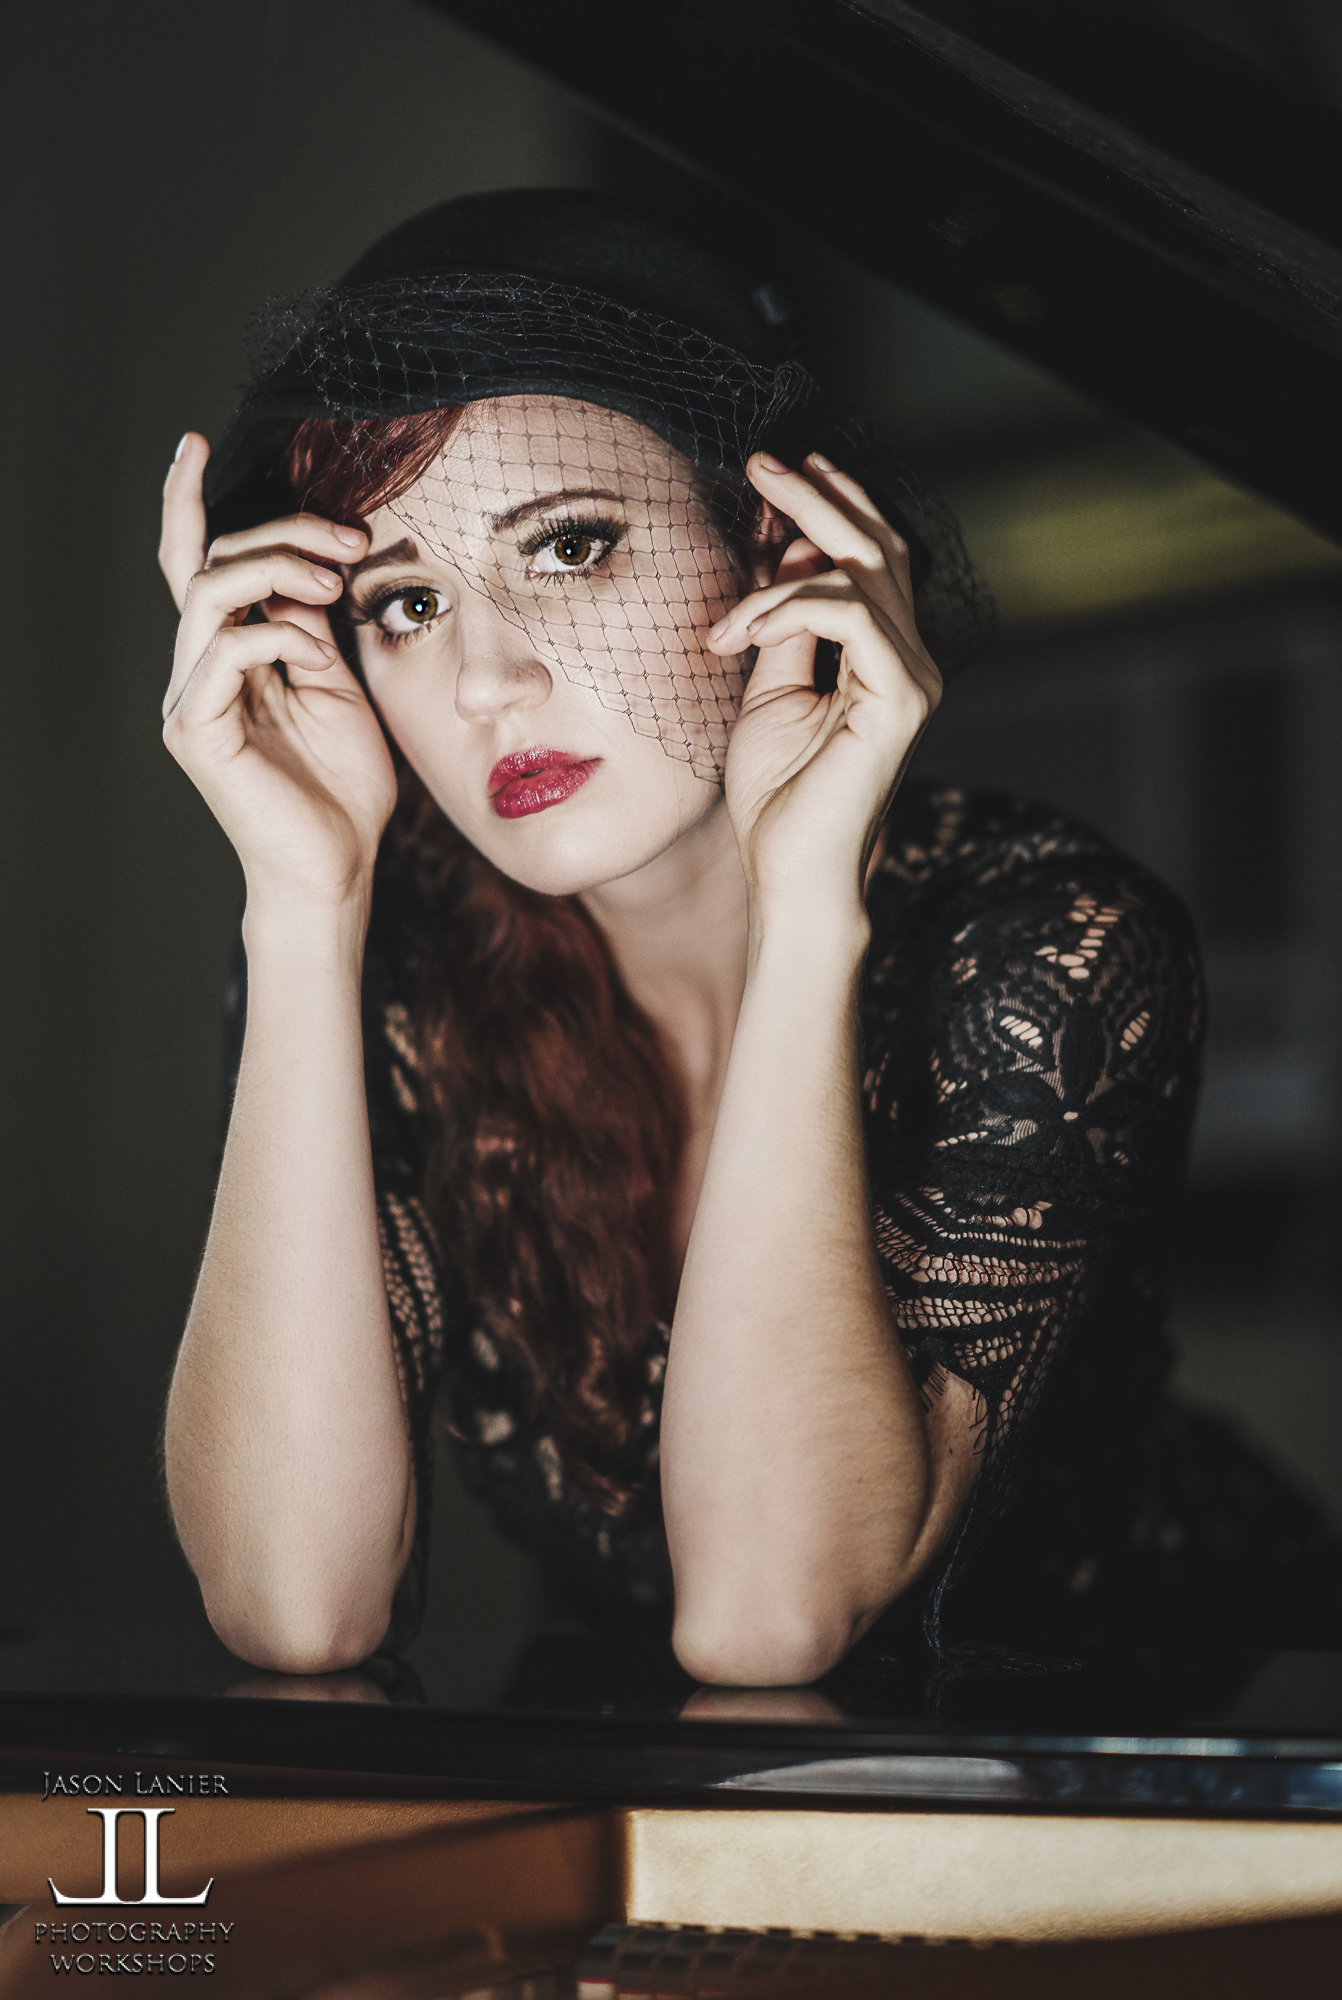
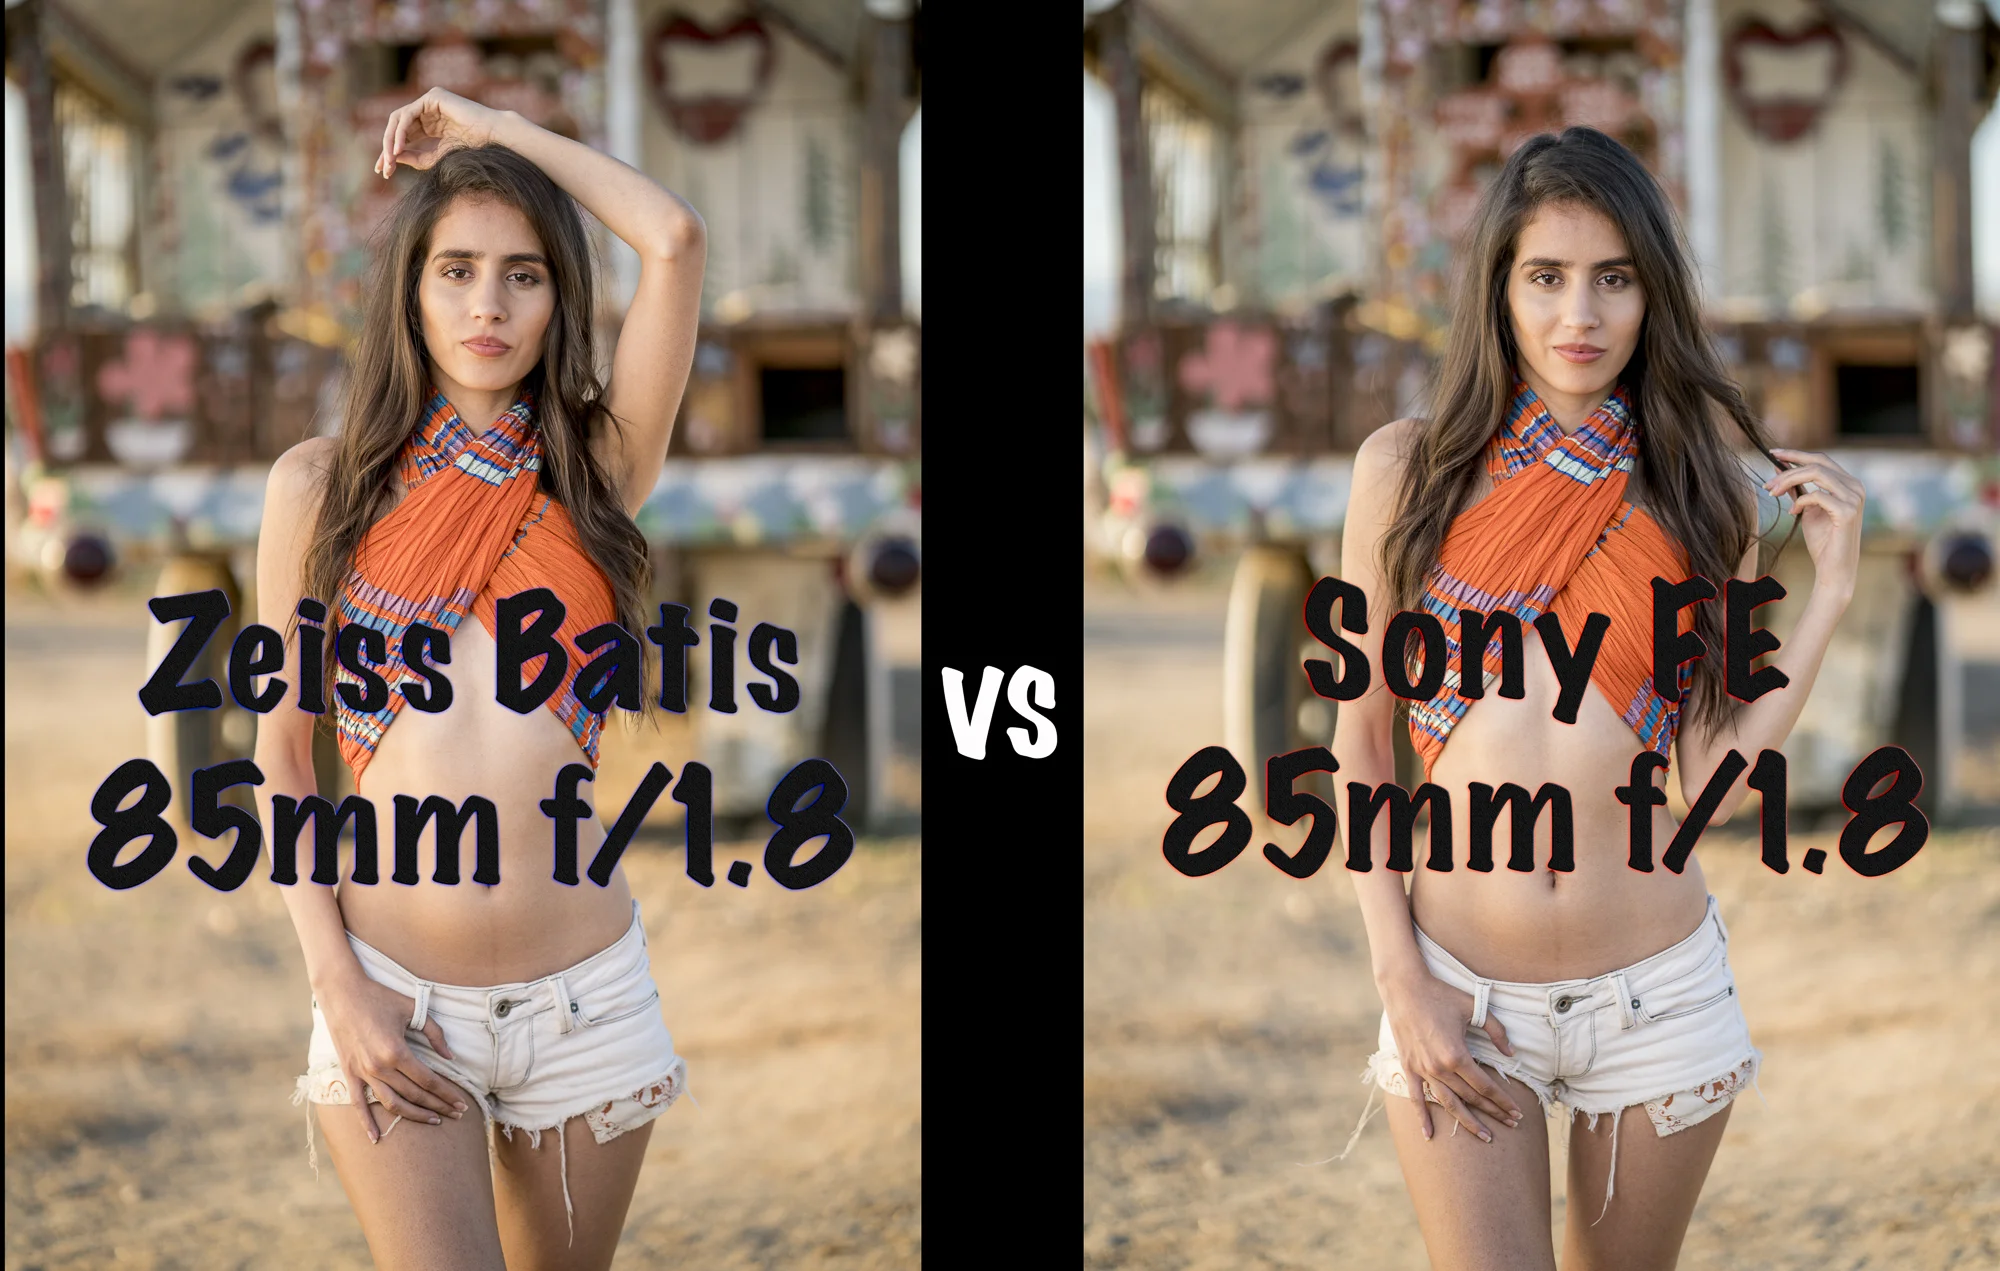
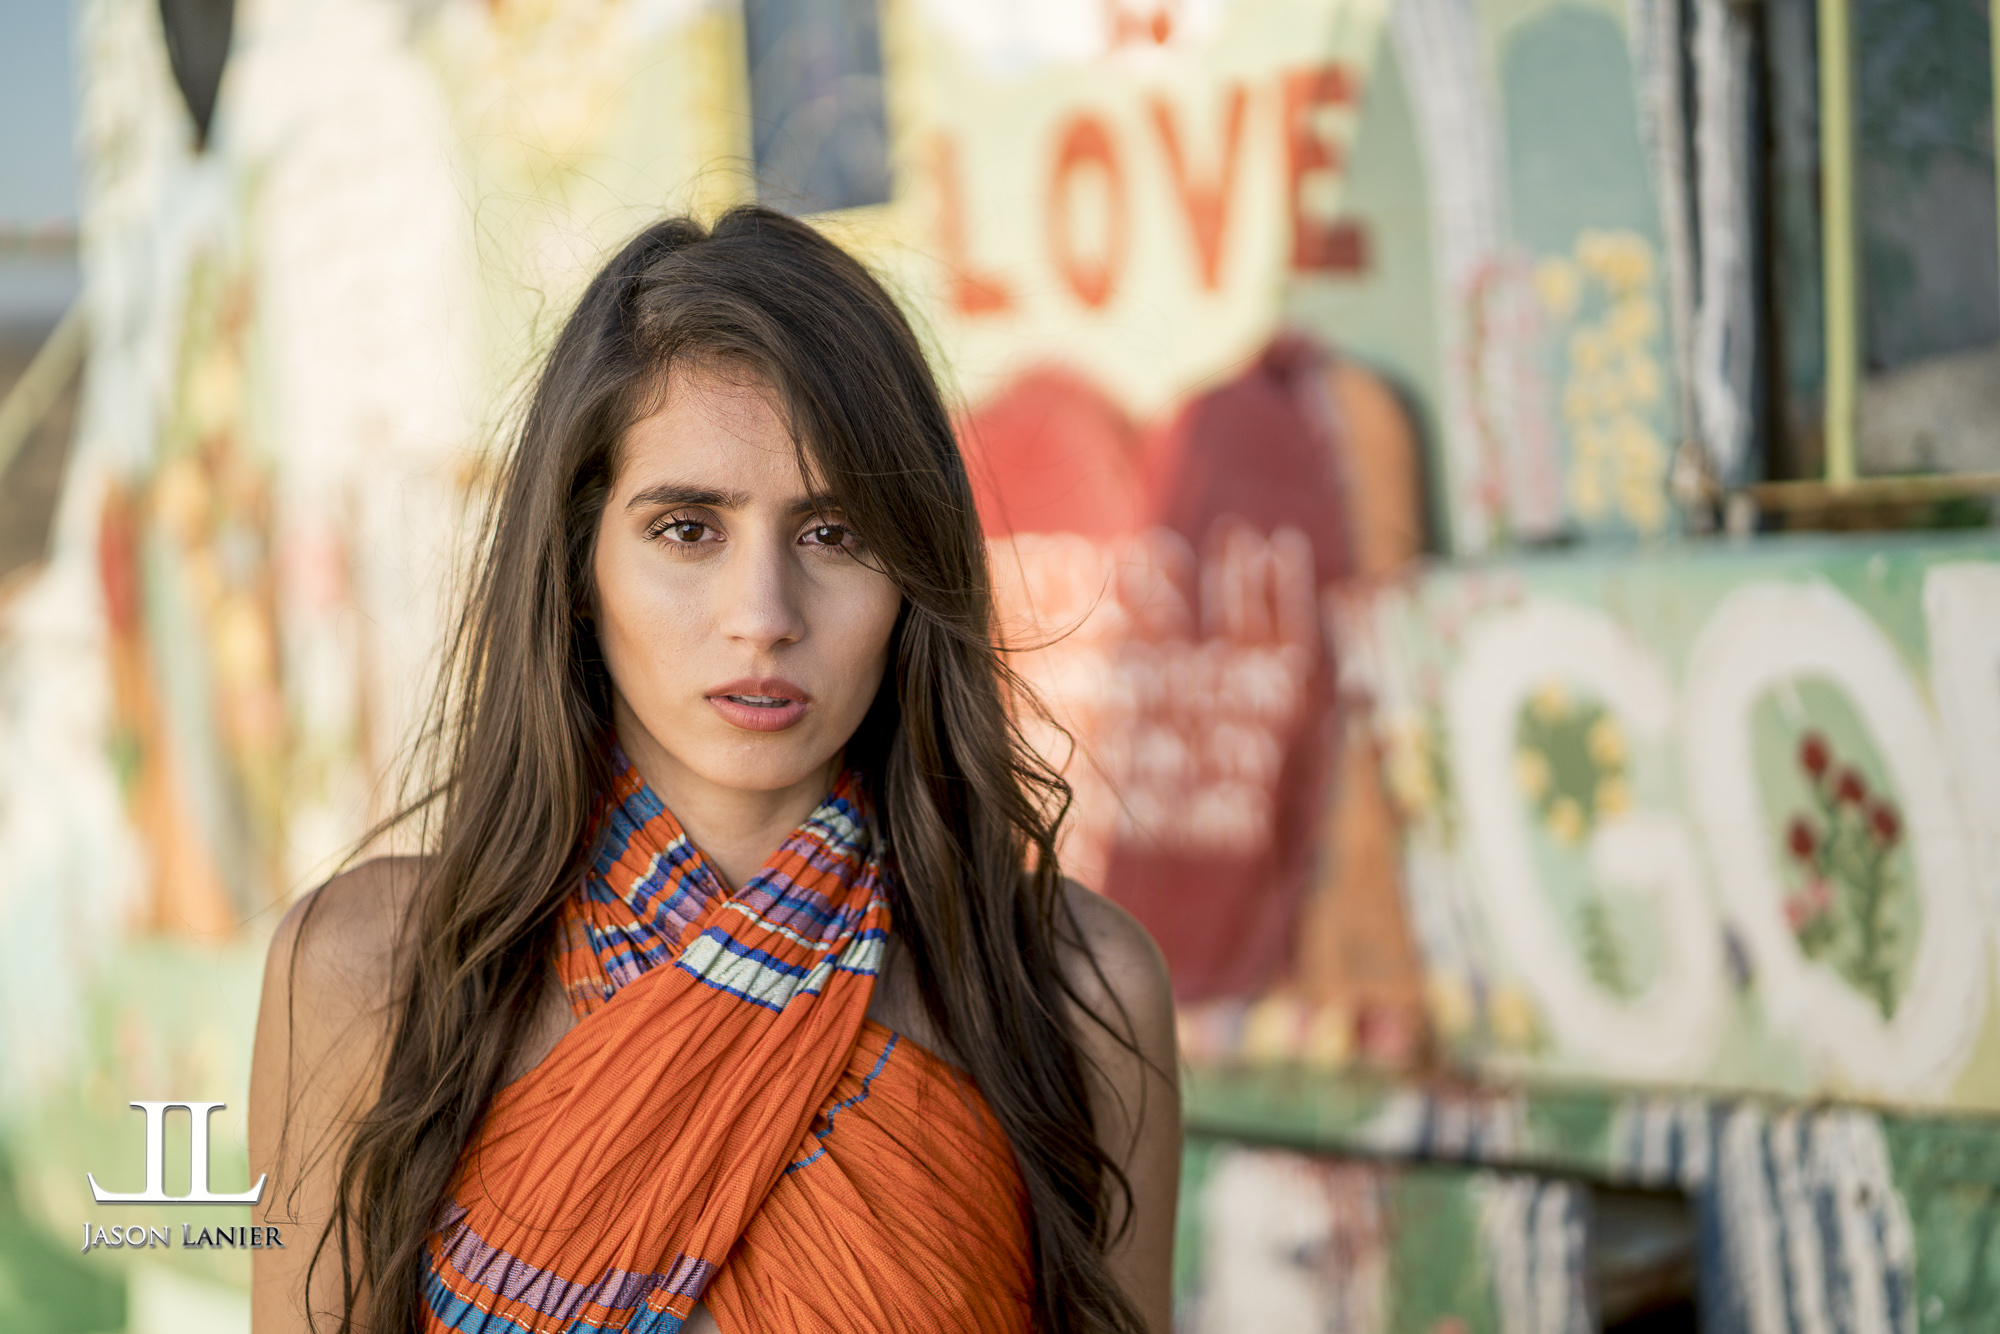
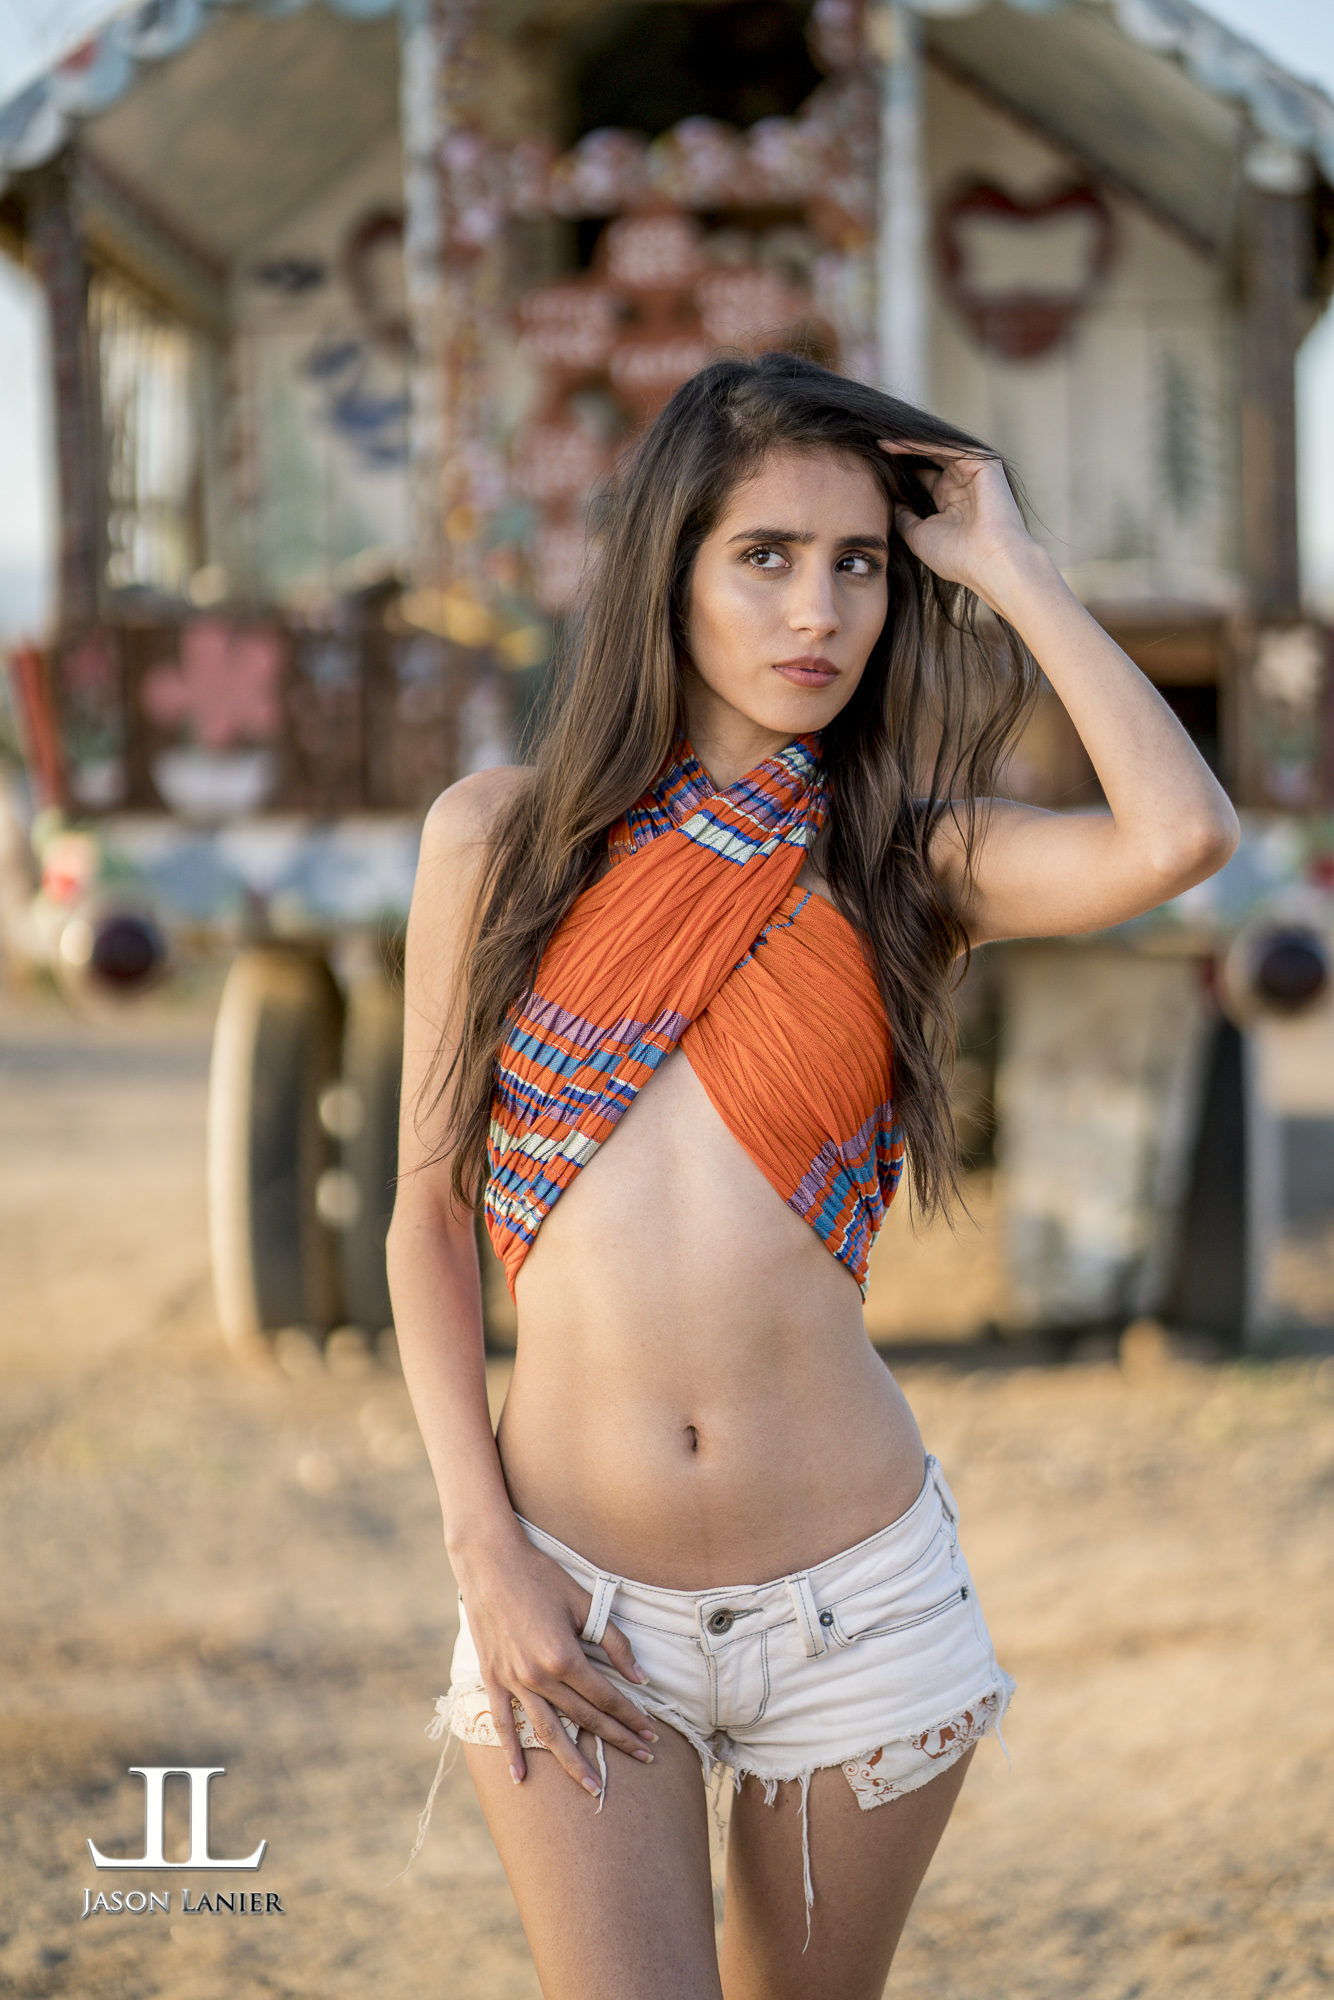
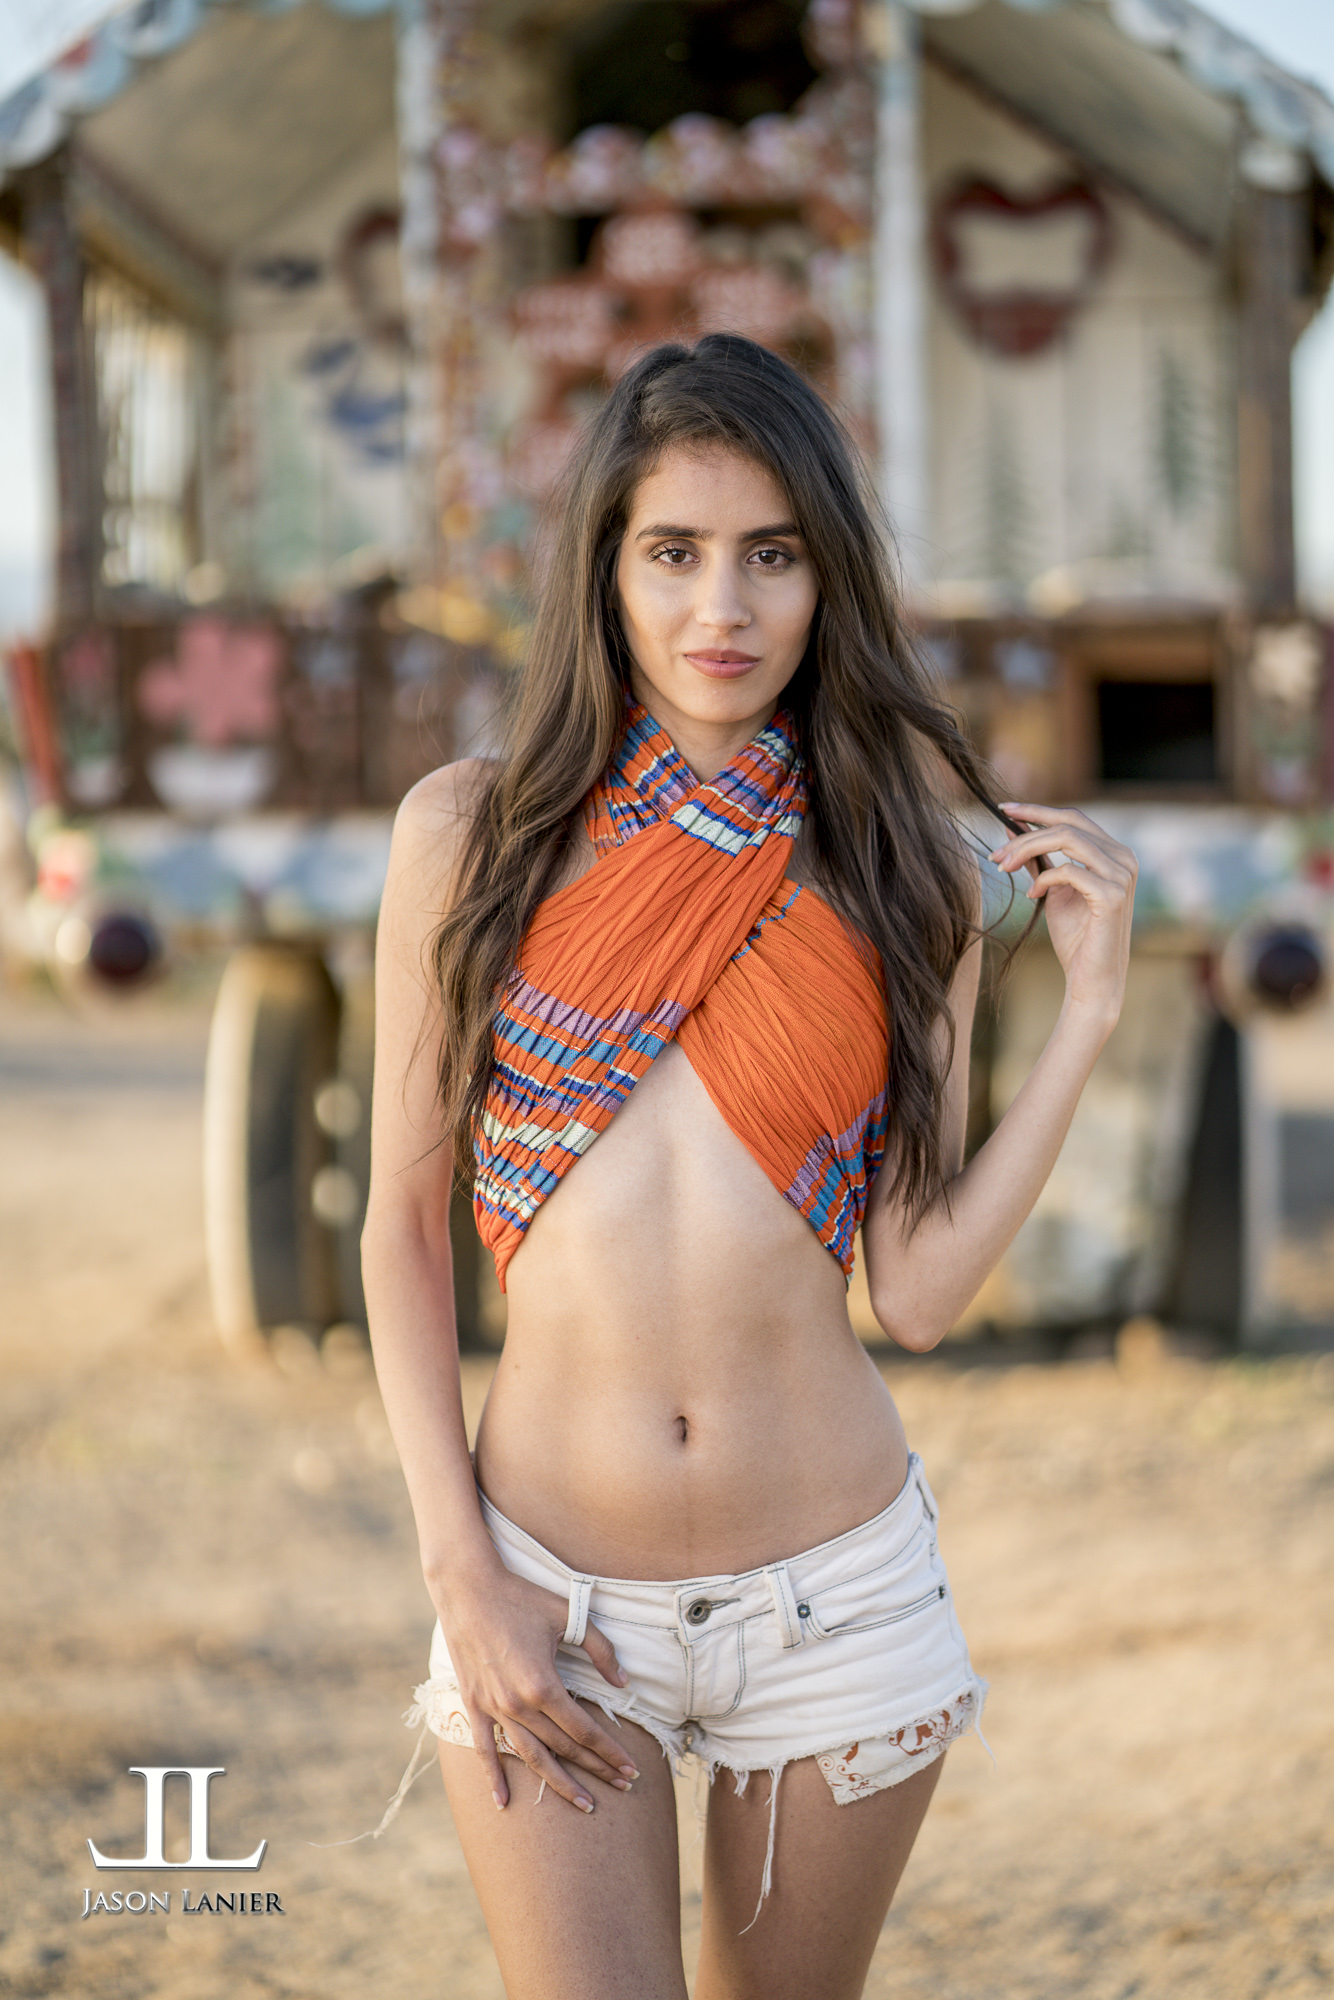
As you’ll see in the video I use the edges of the light modifier to cast light onto Emily vs. what I’d normally do which is use the center of the light source. Below are the resulting images from the shoot. I’m breaking them into categories based upon the lens used.

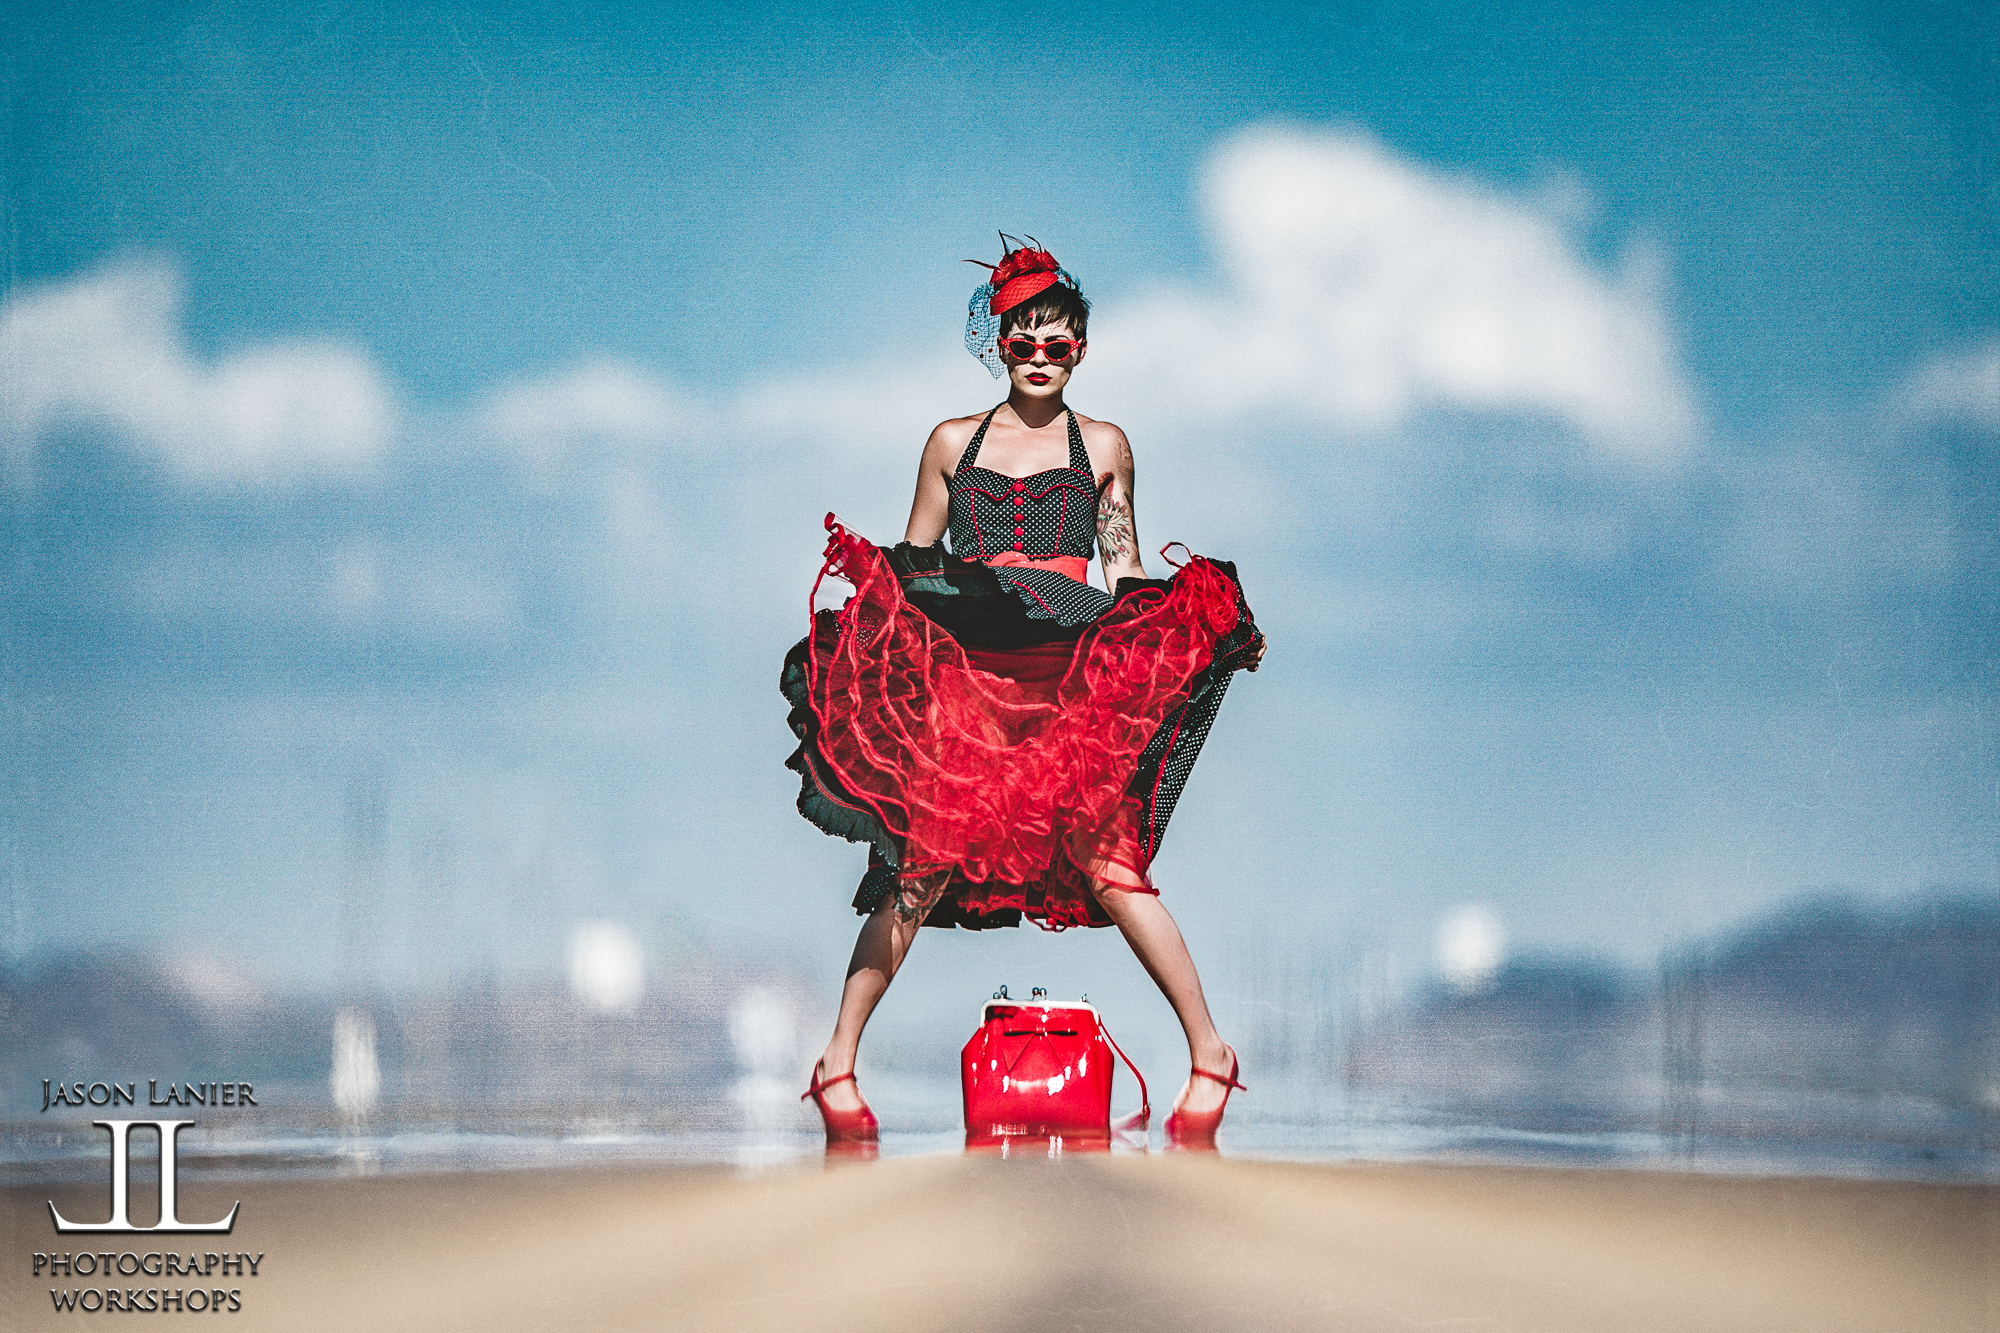
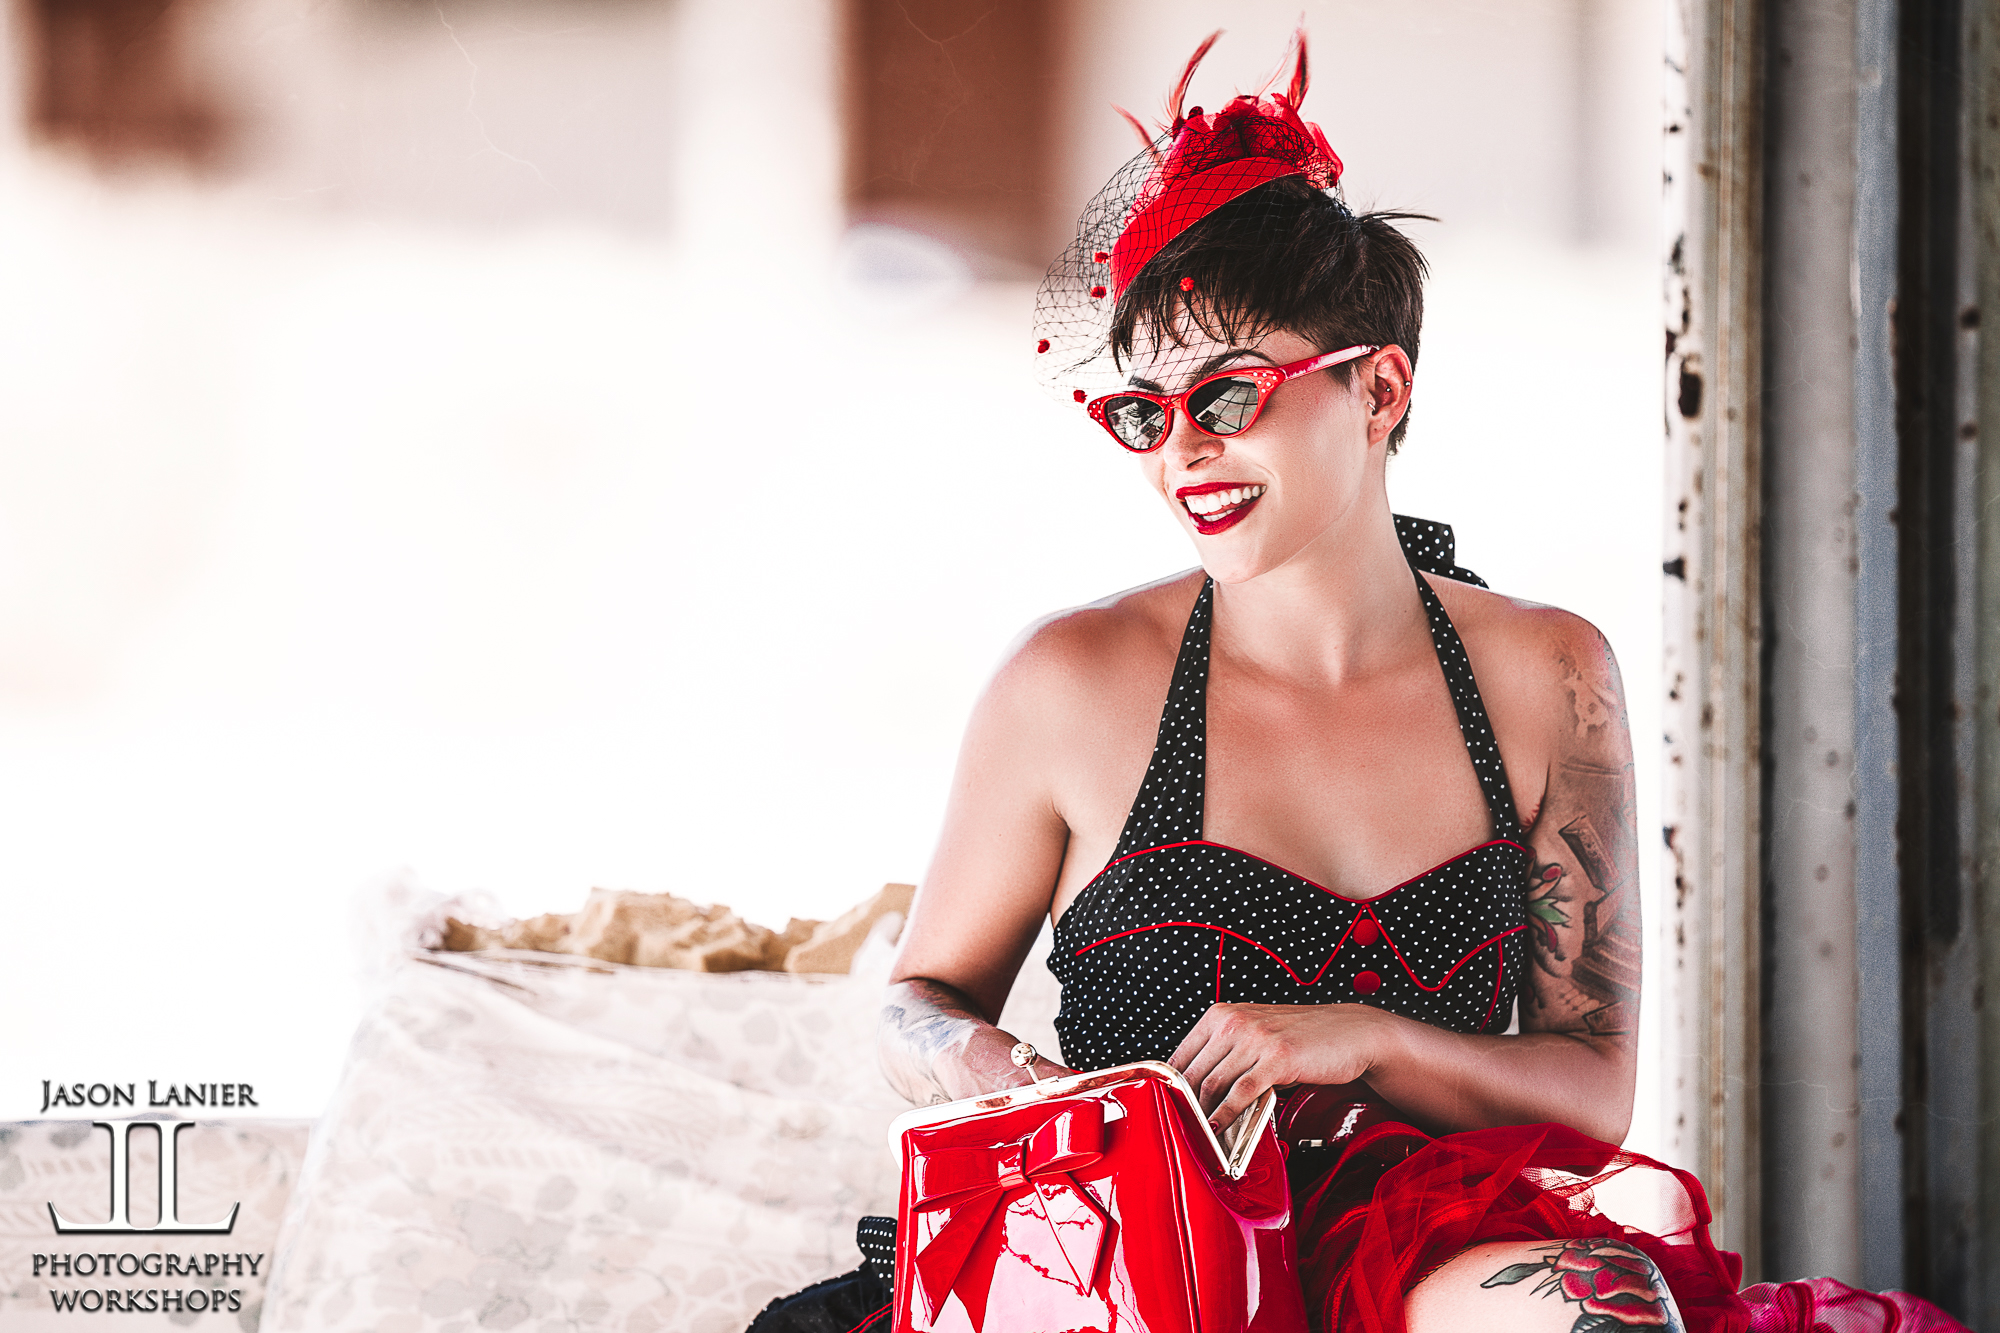
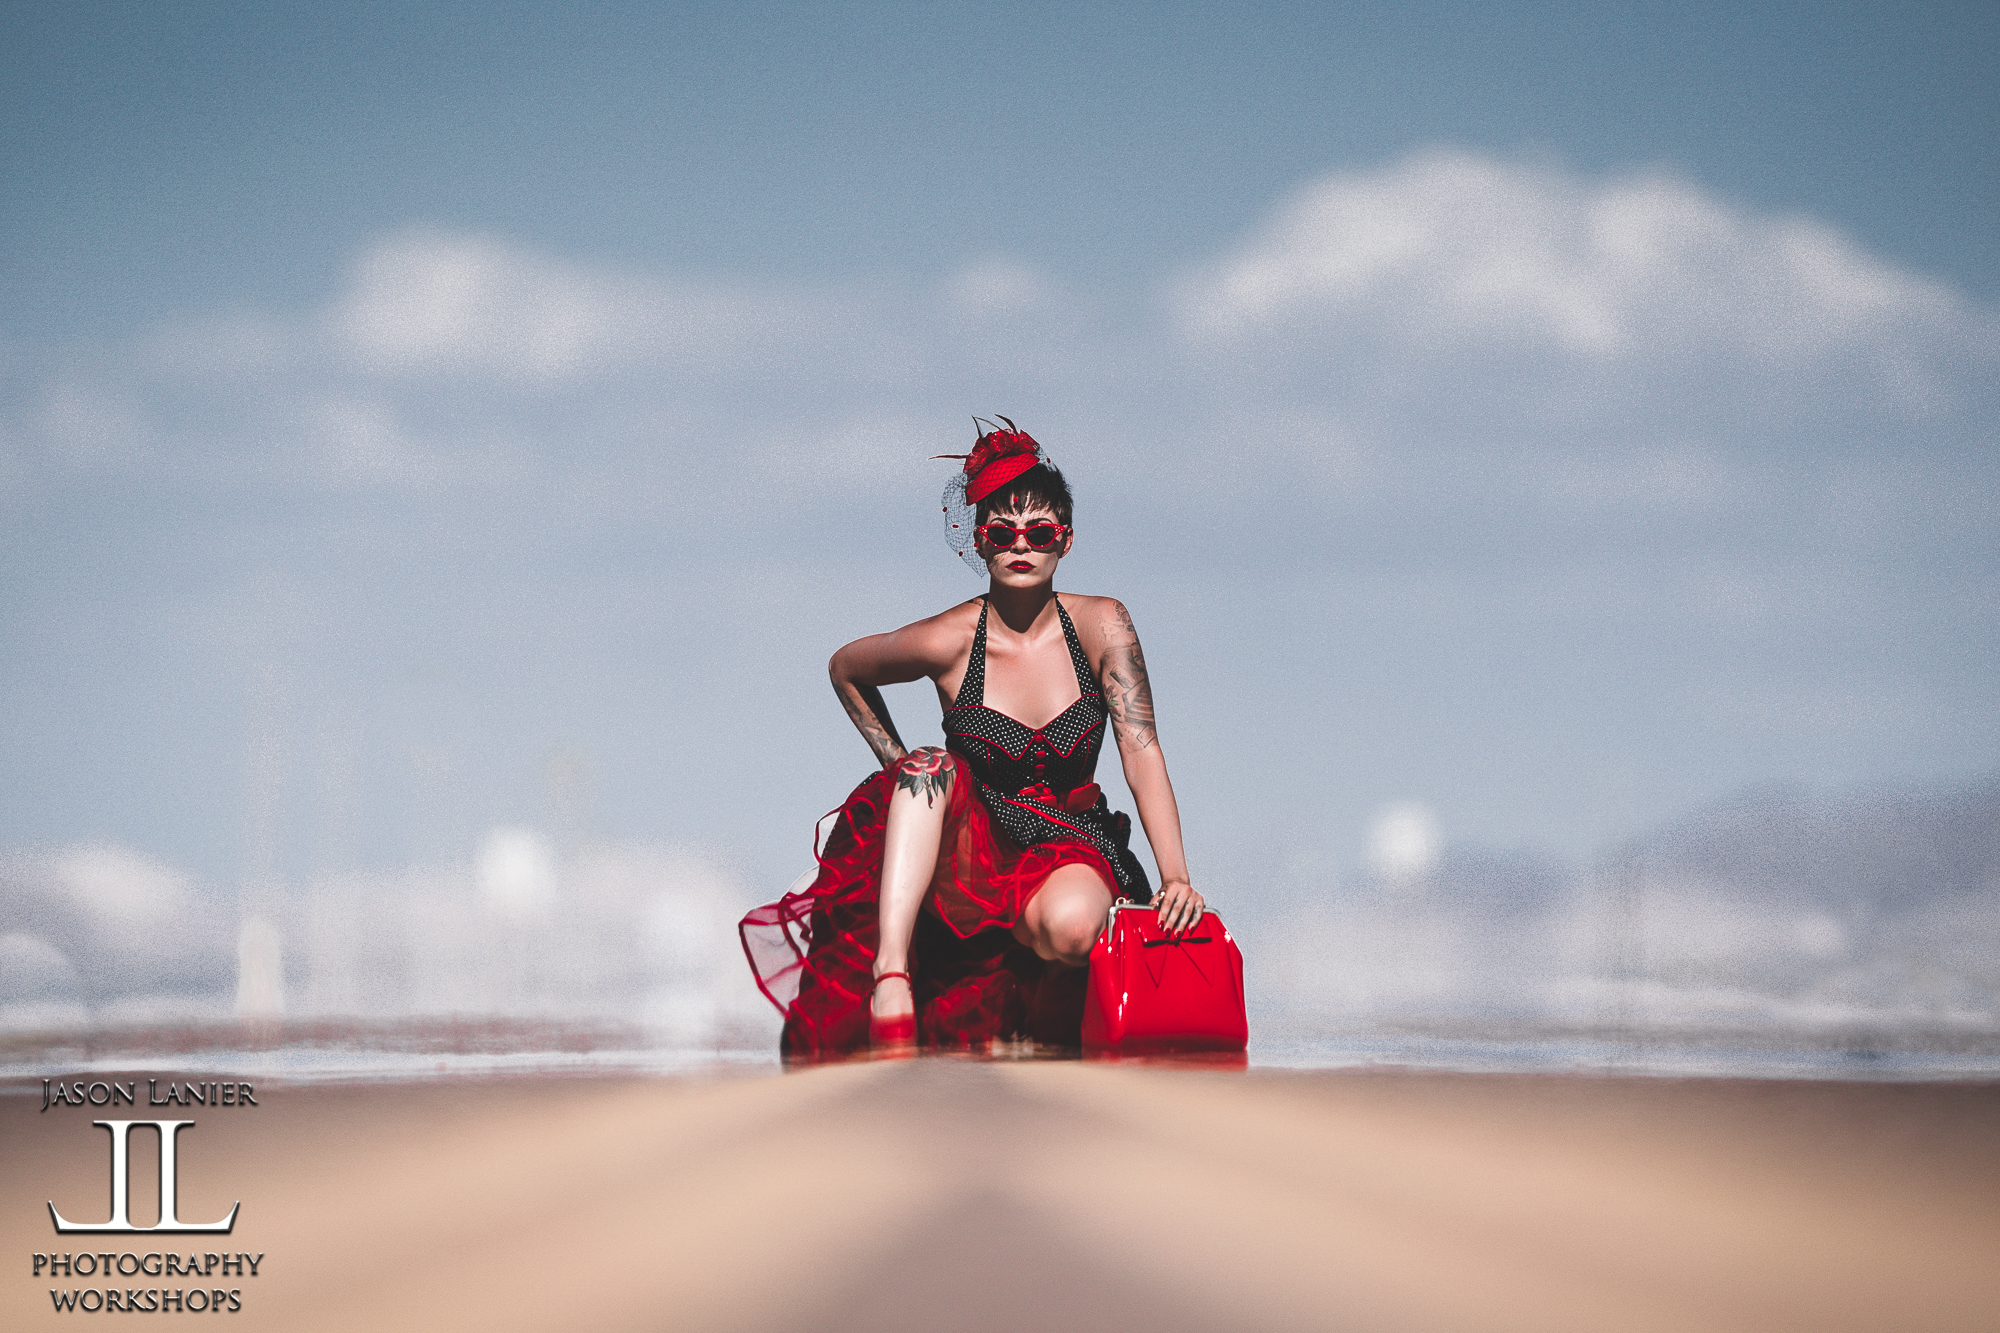
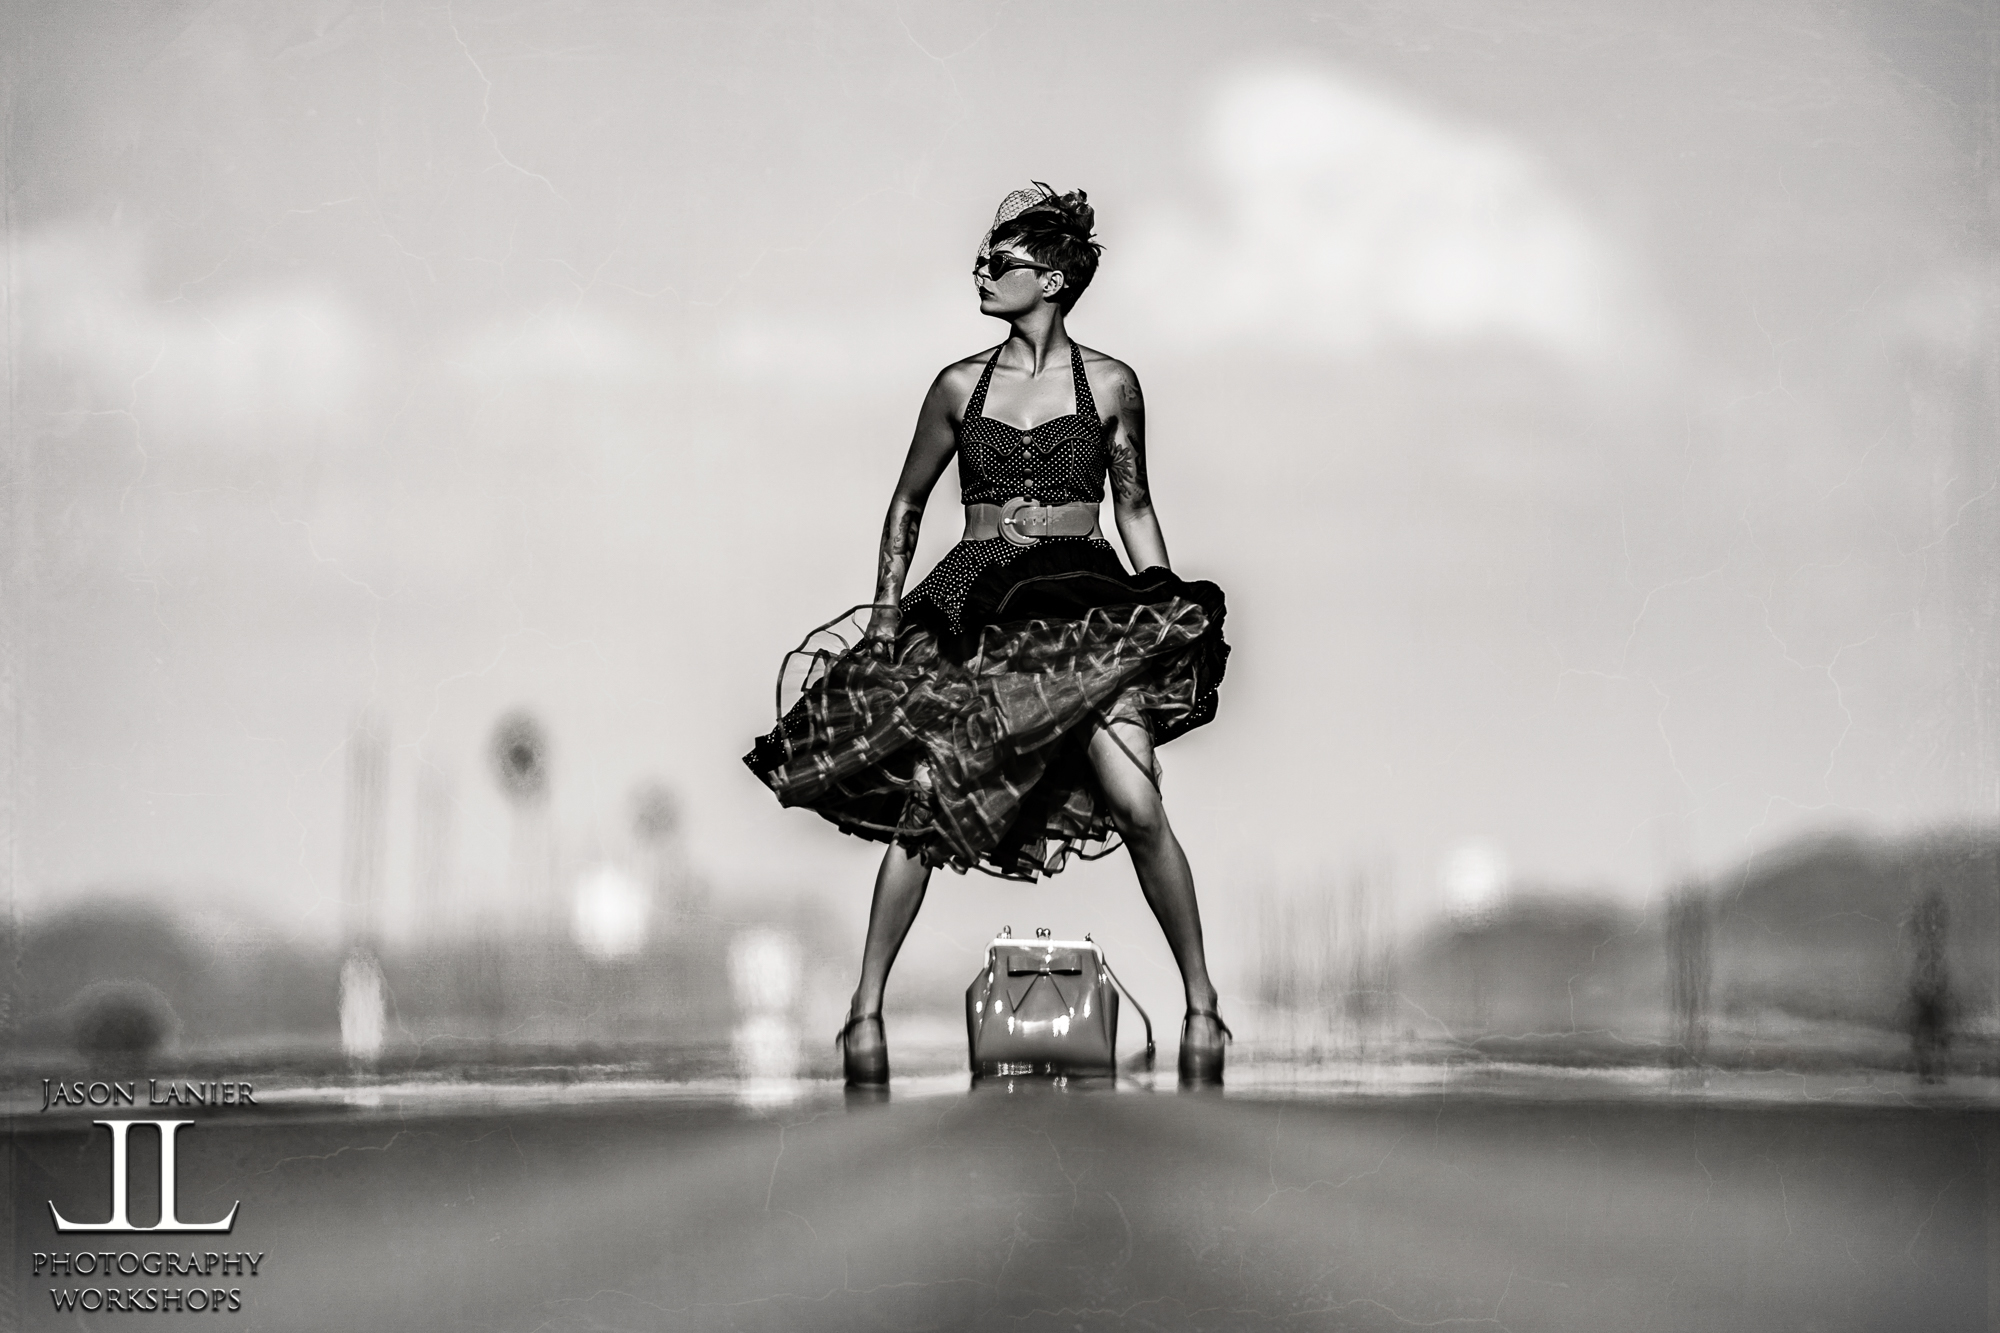
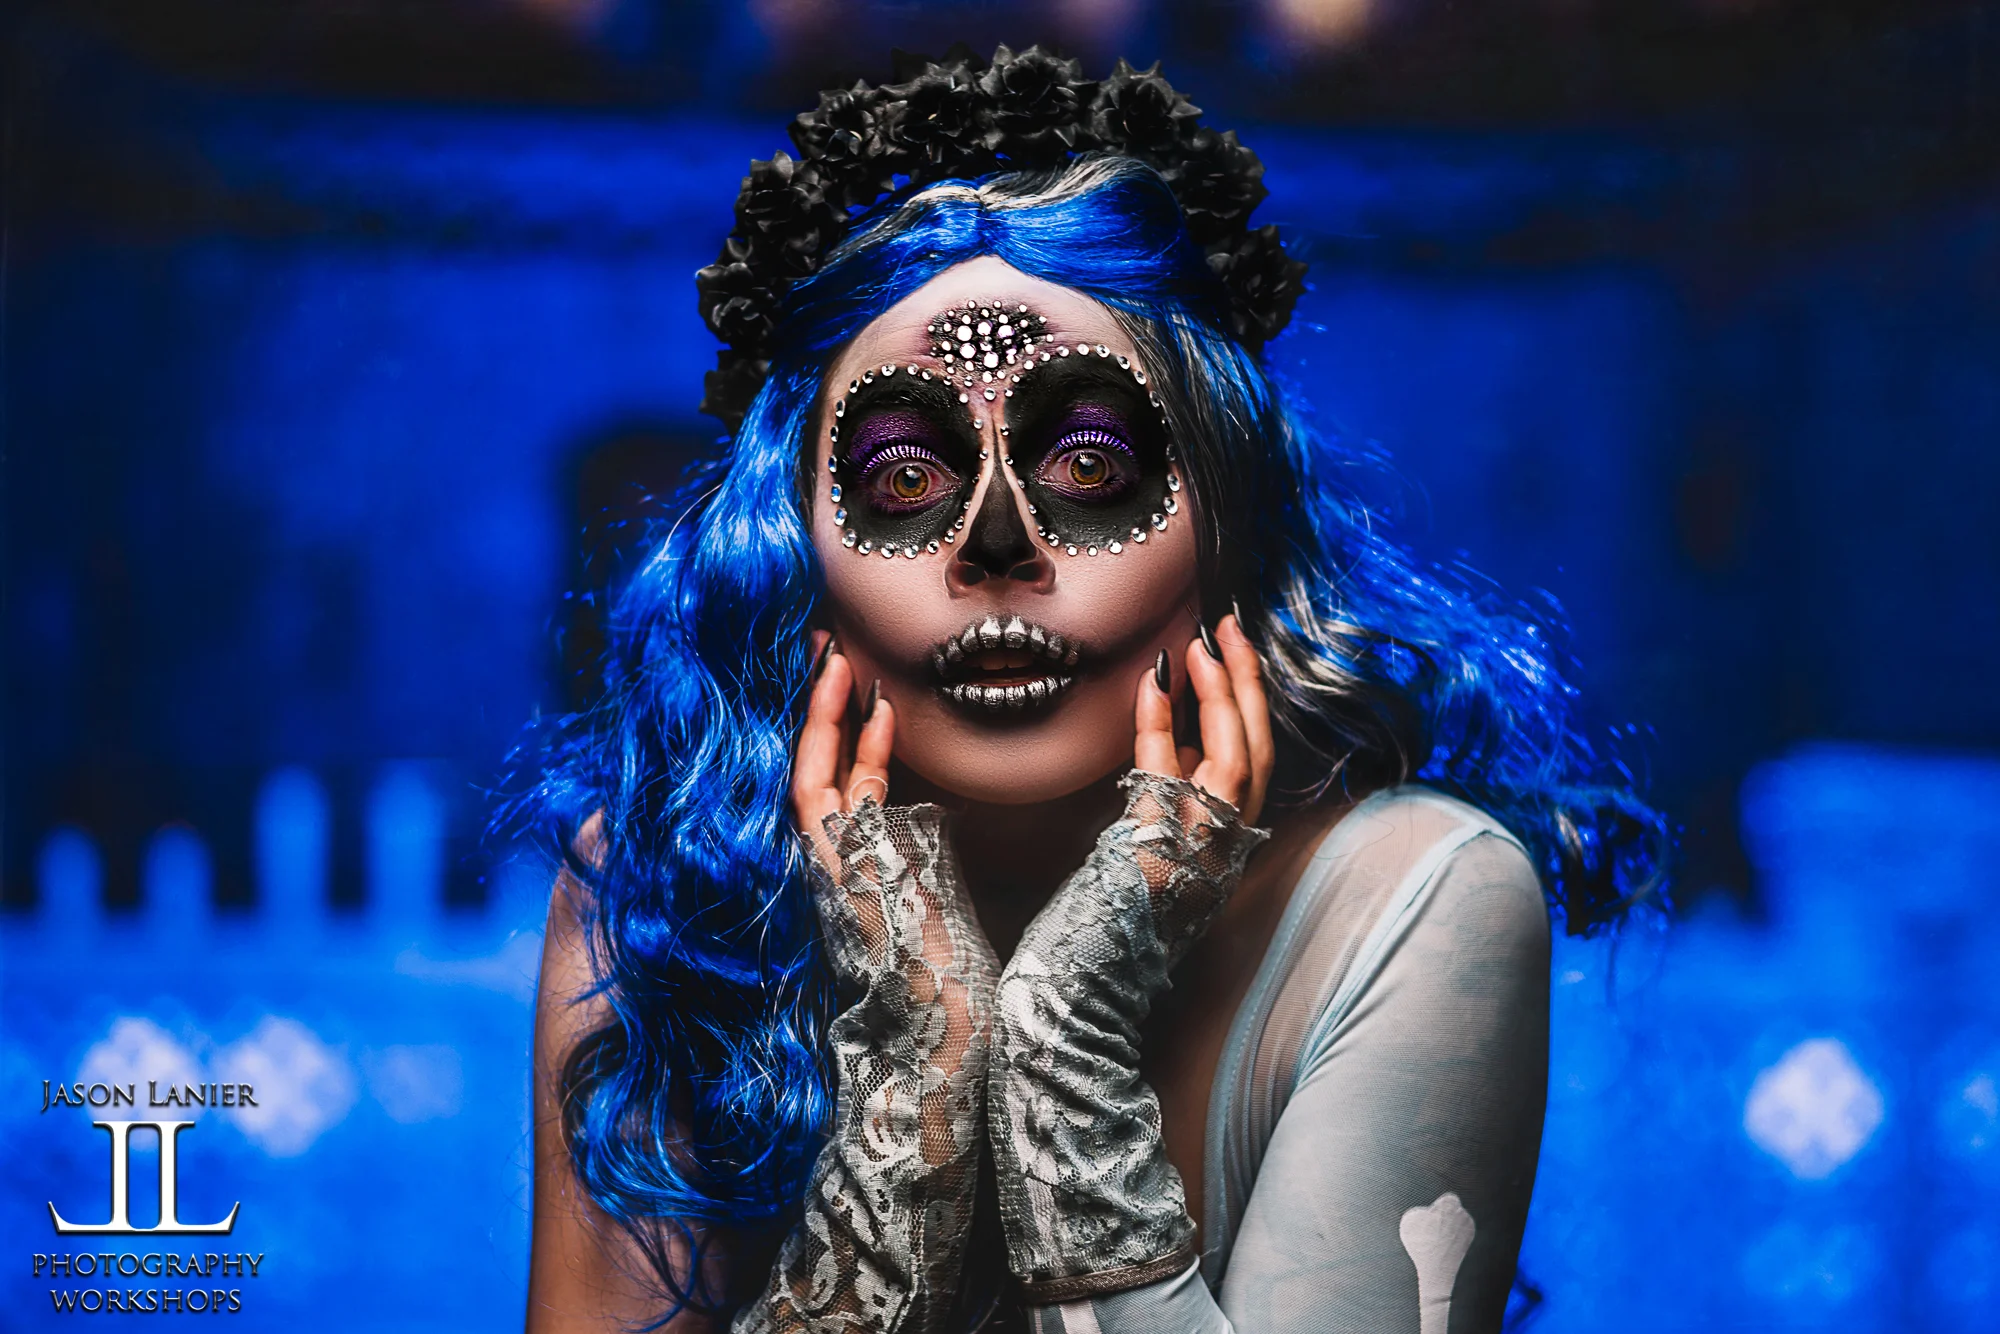
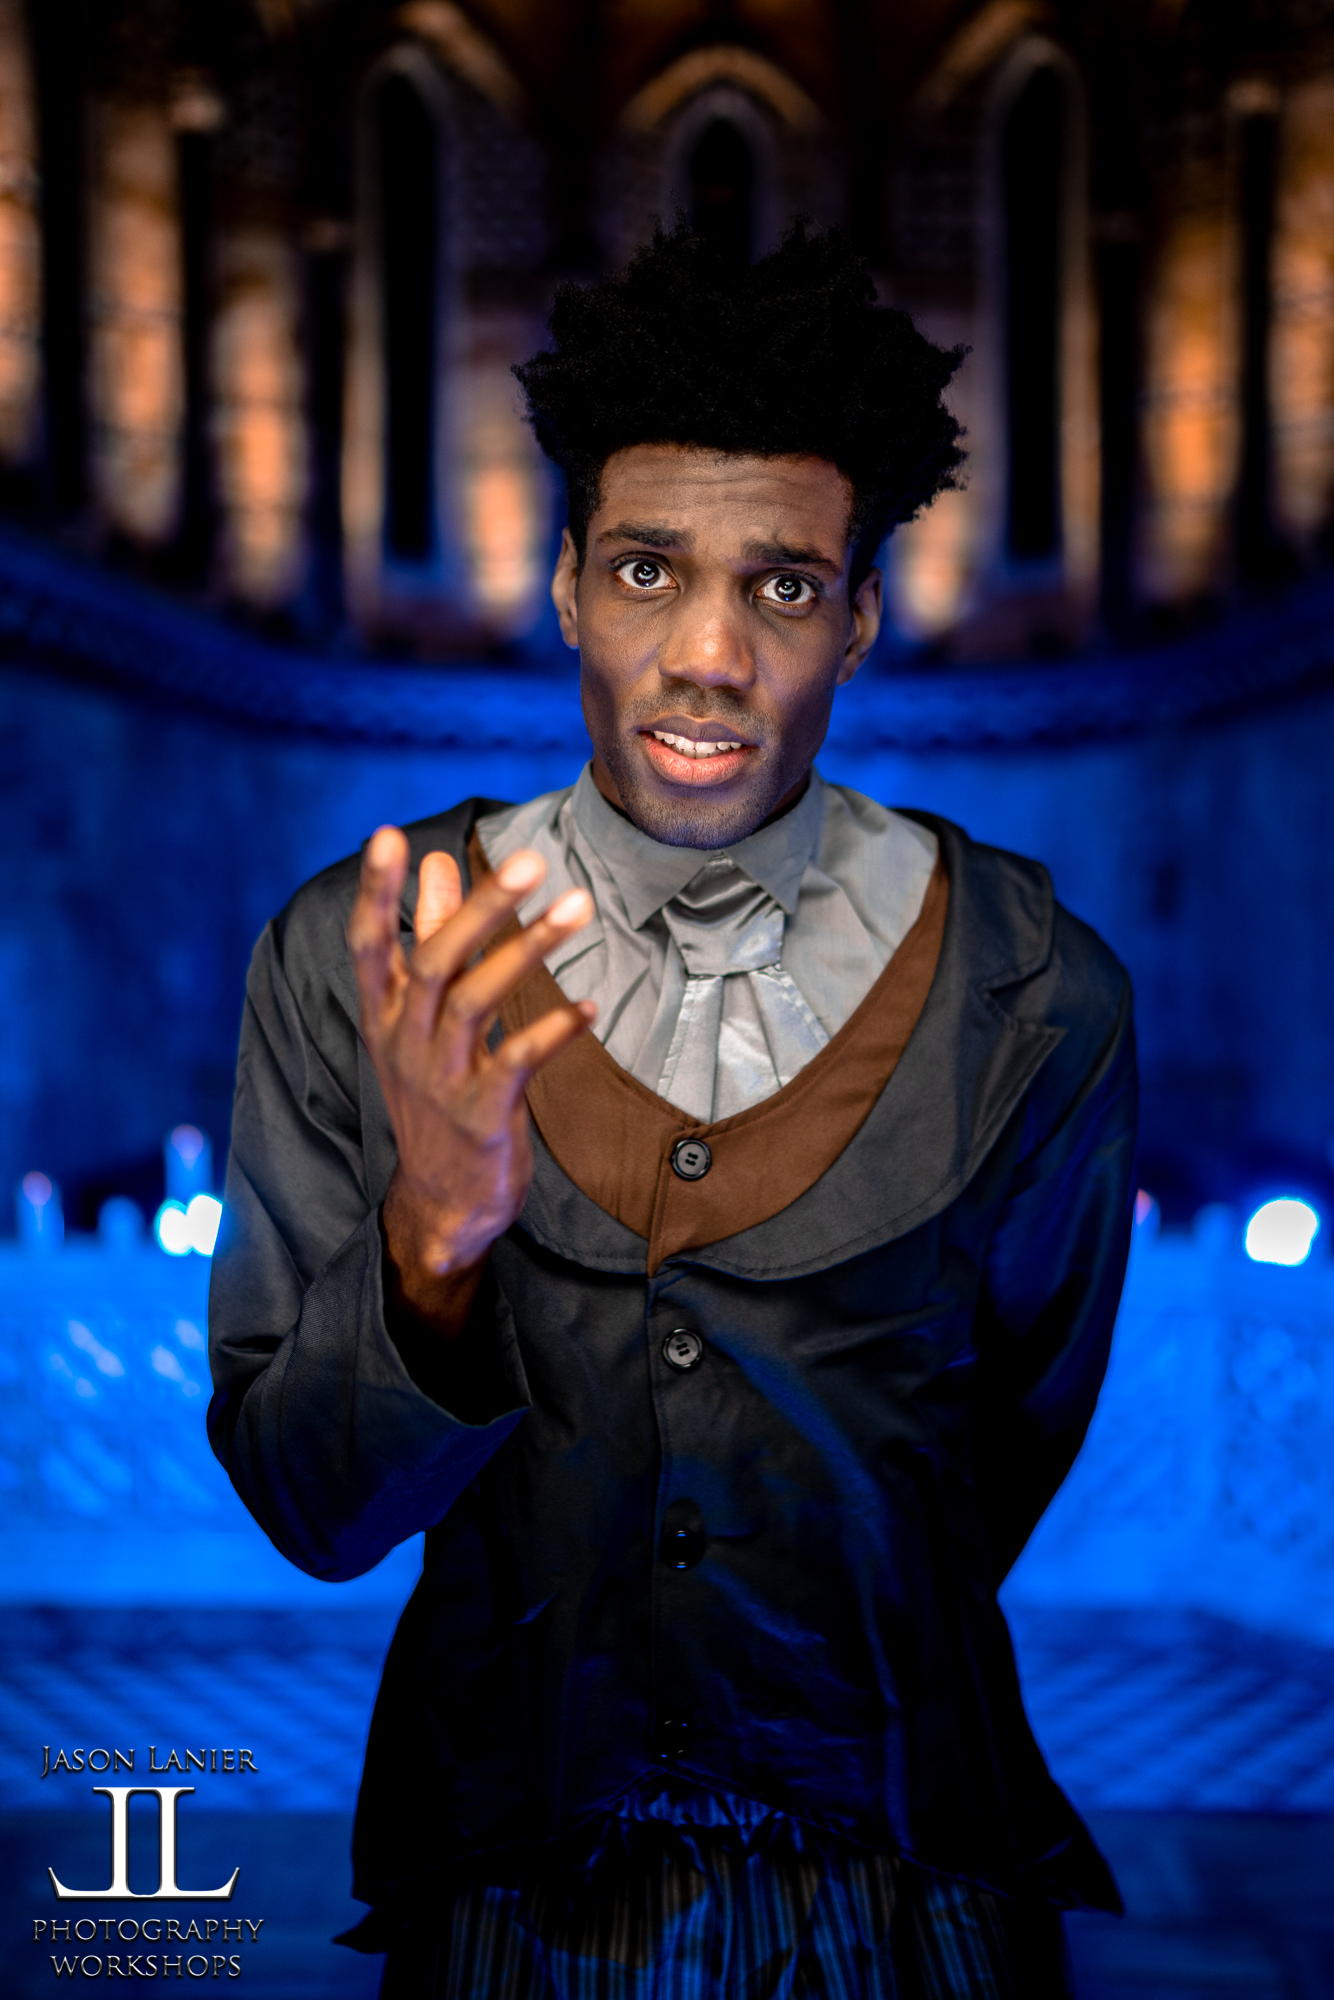
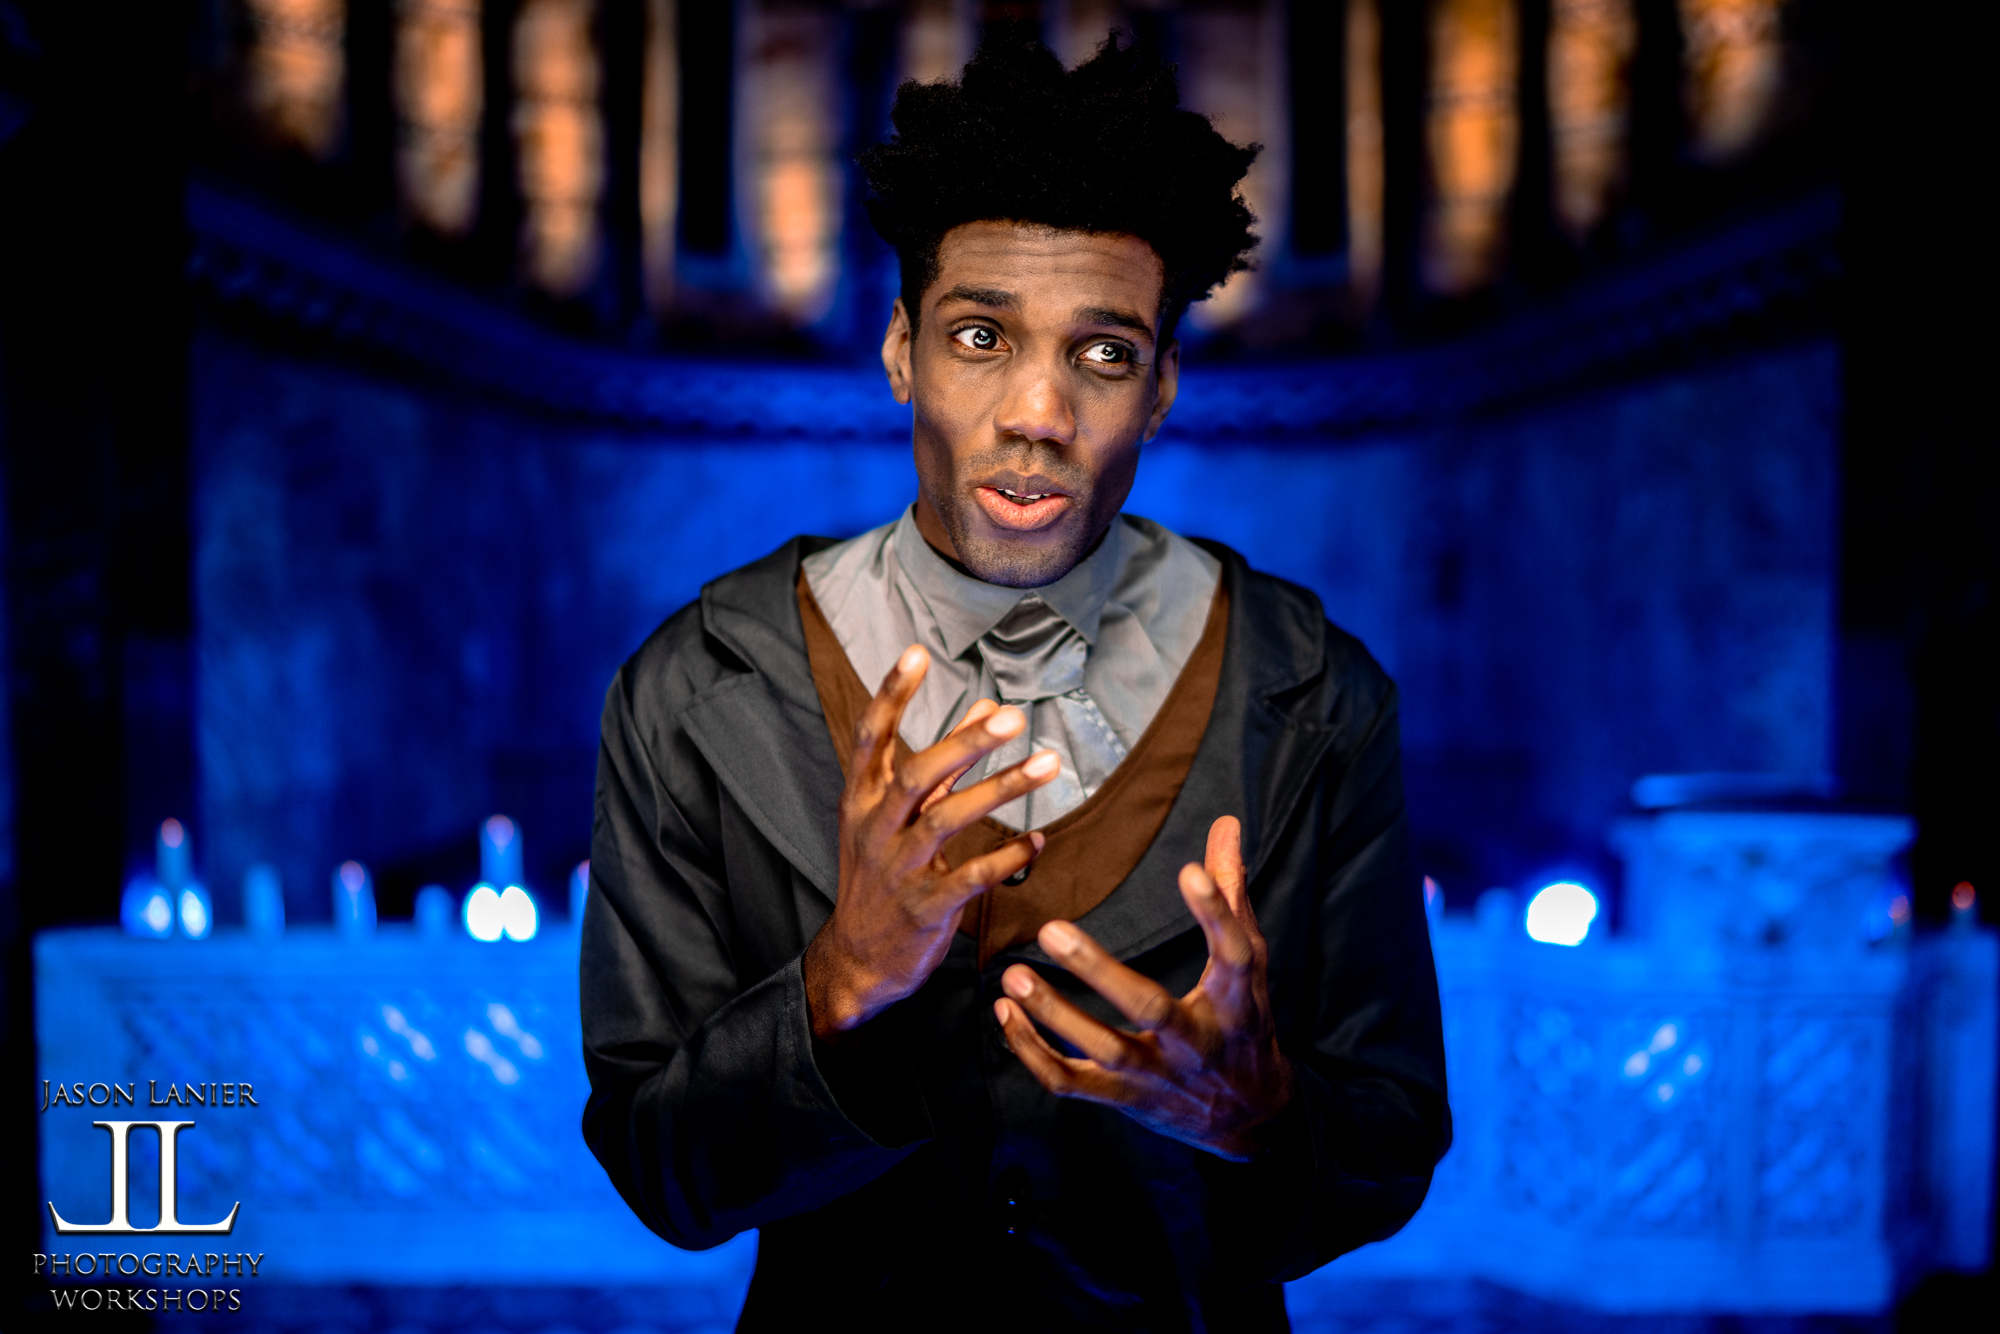
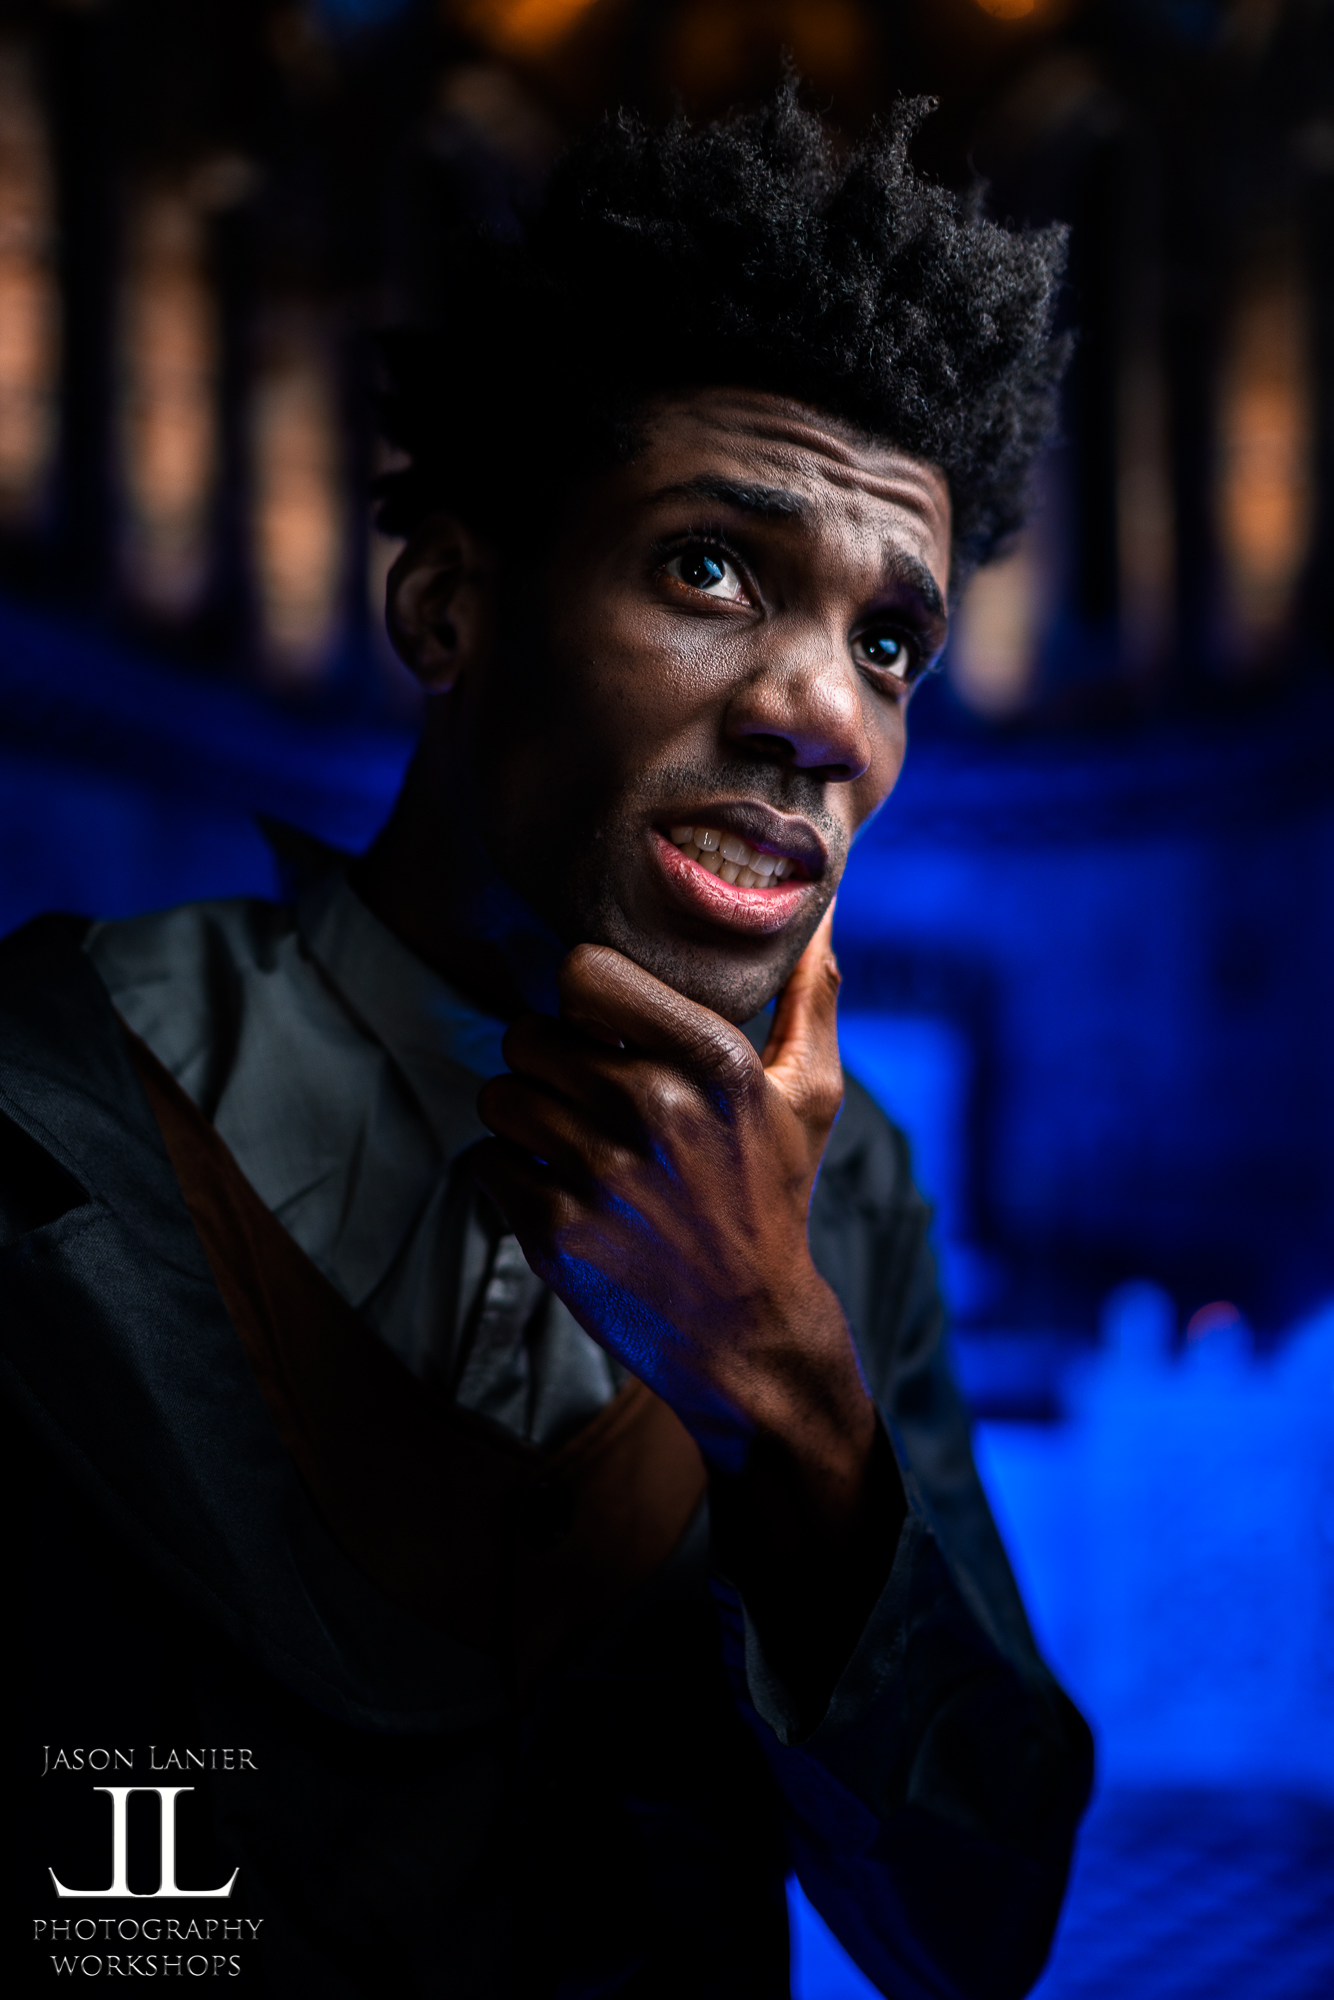
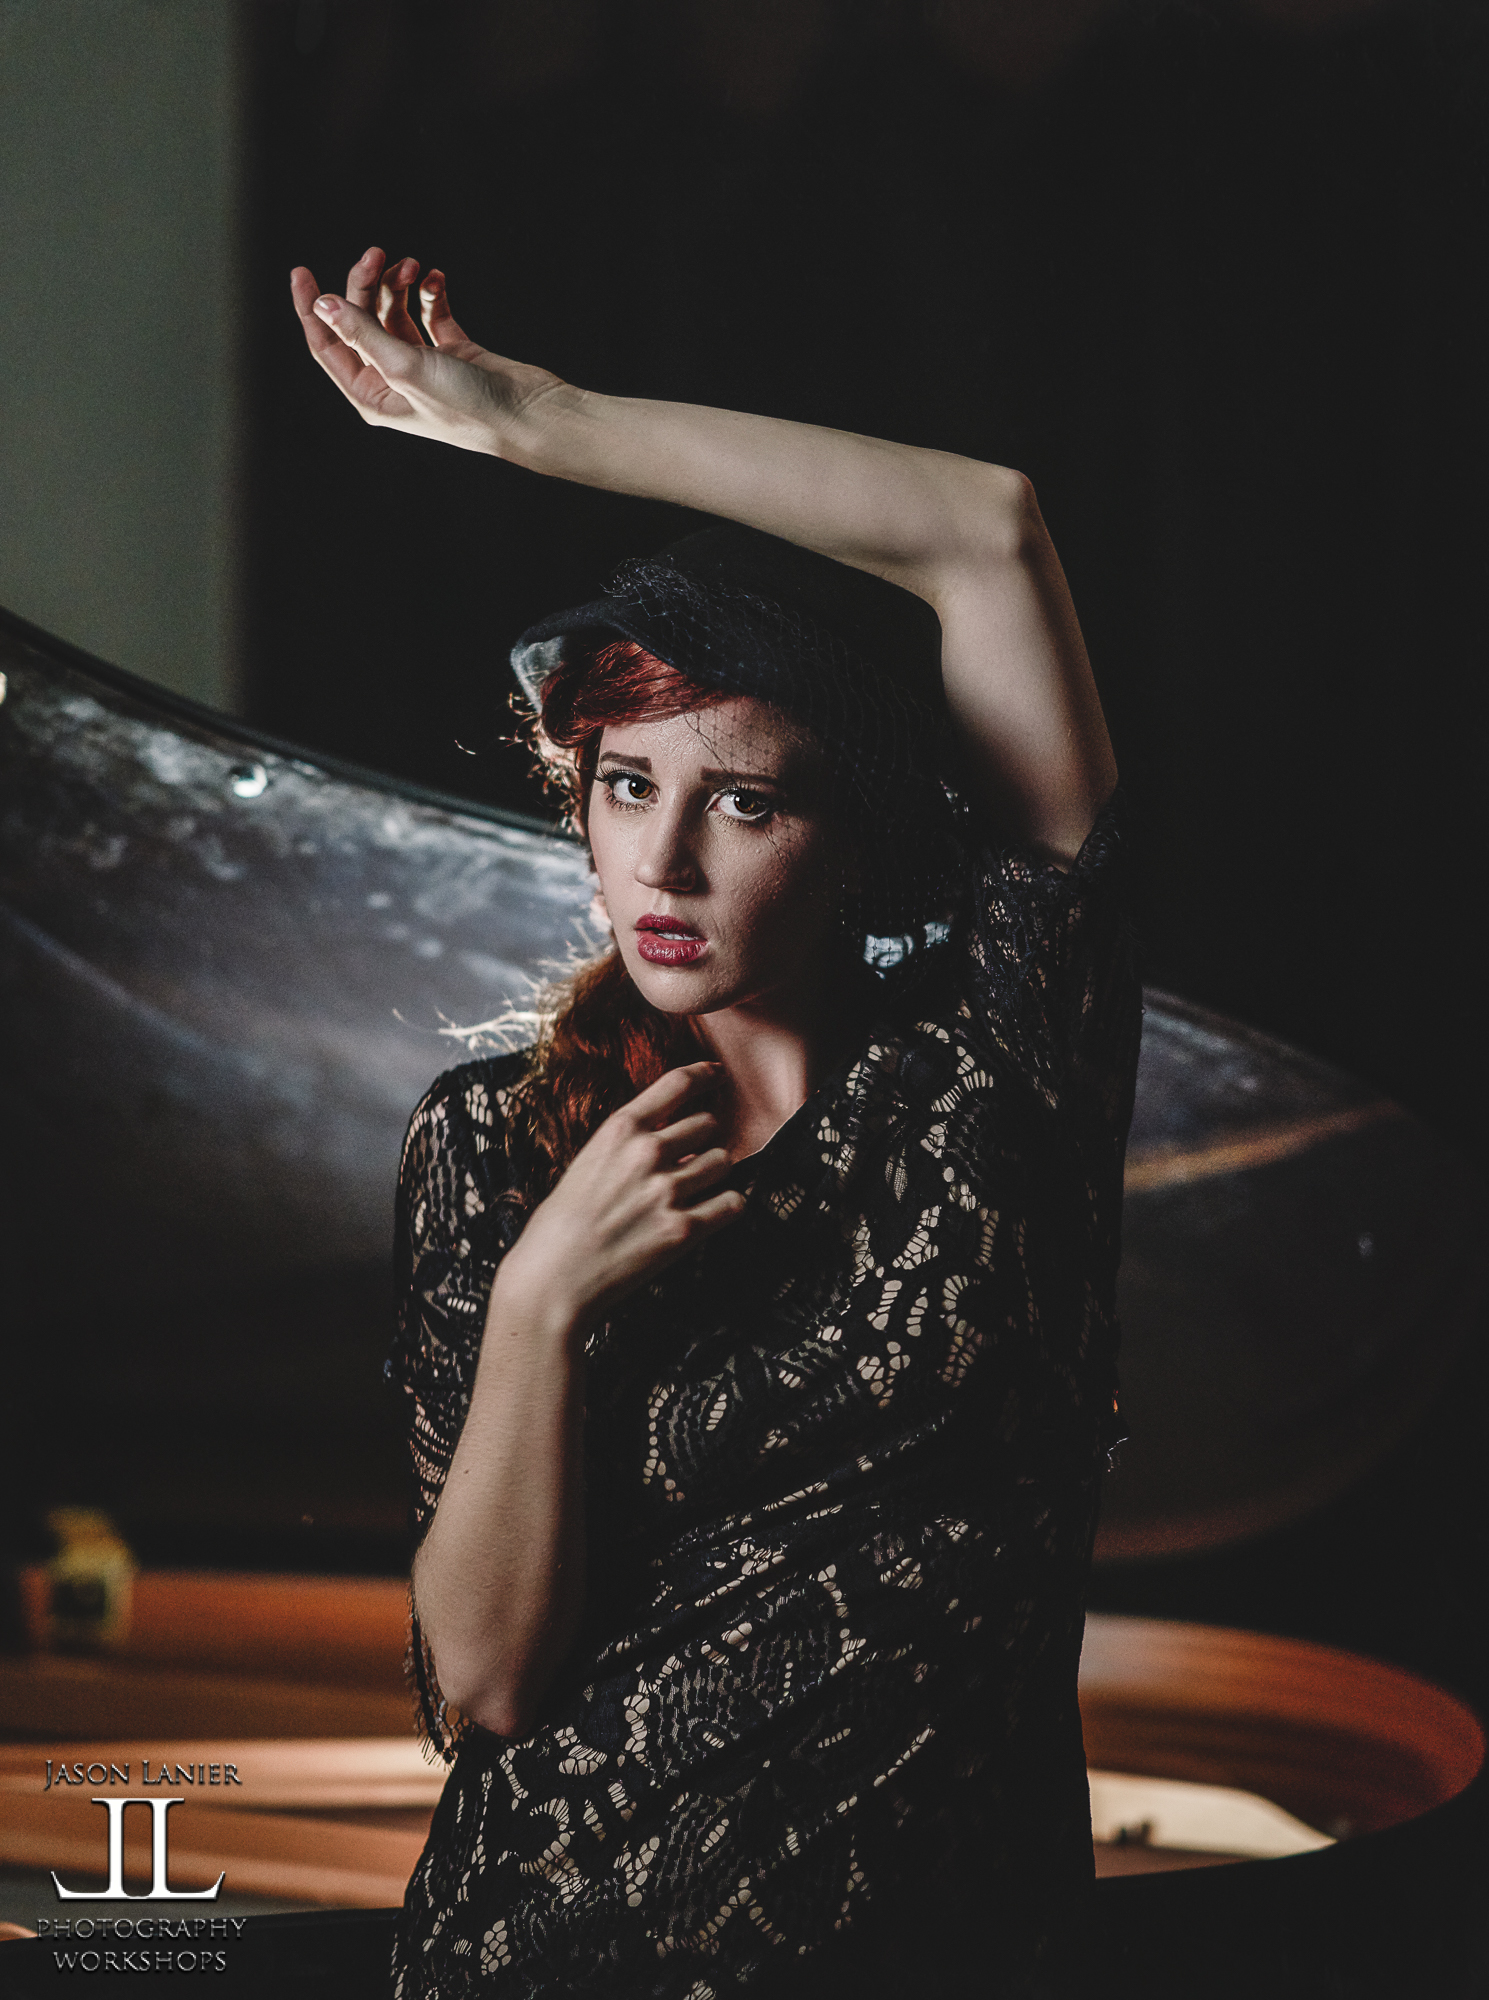
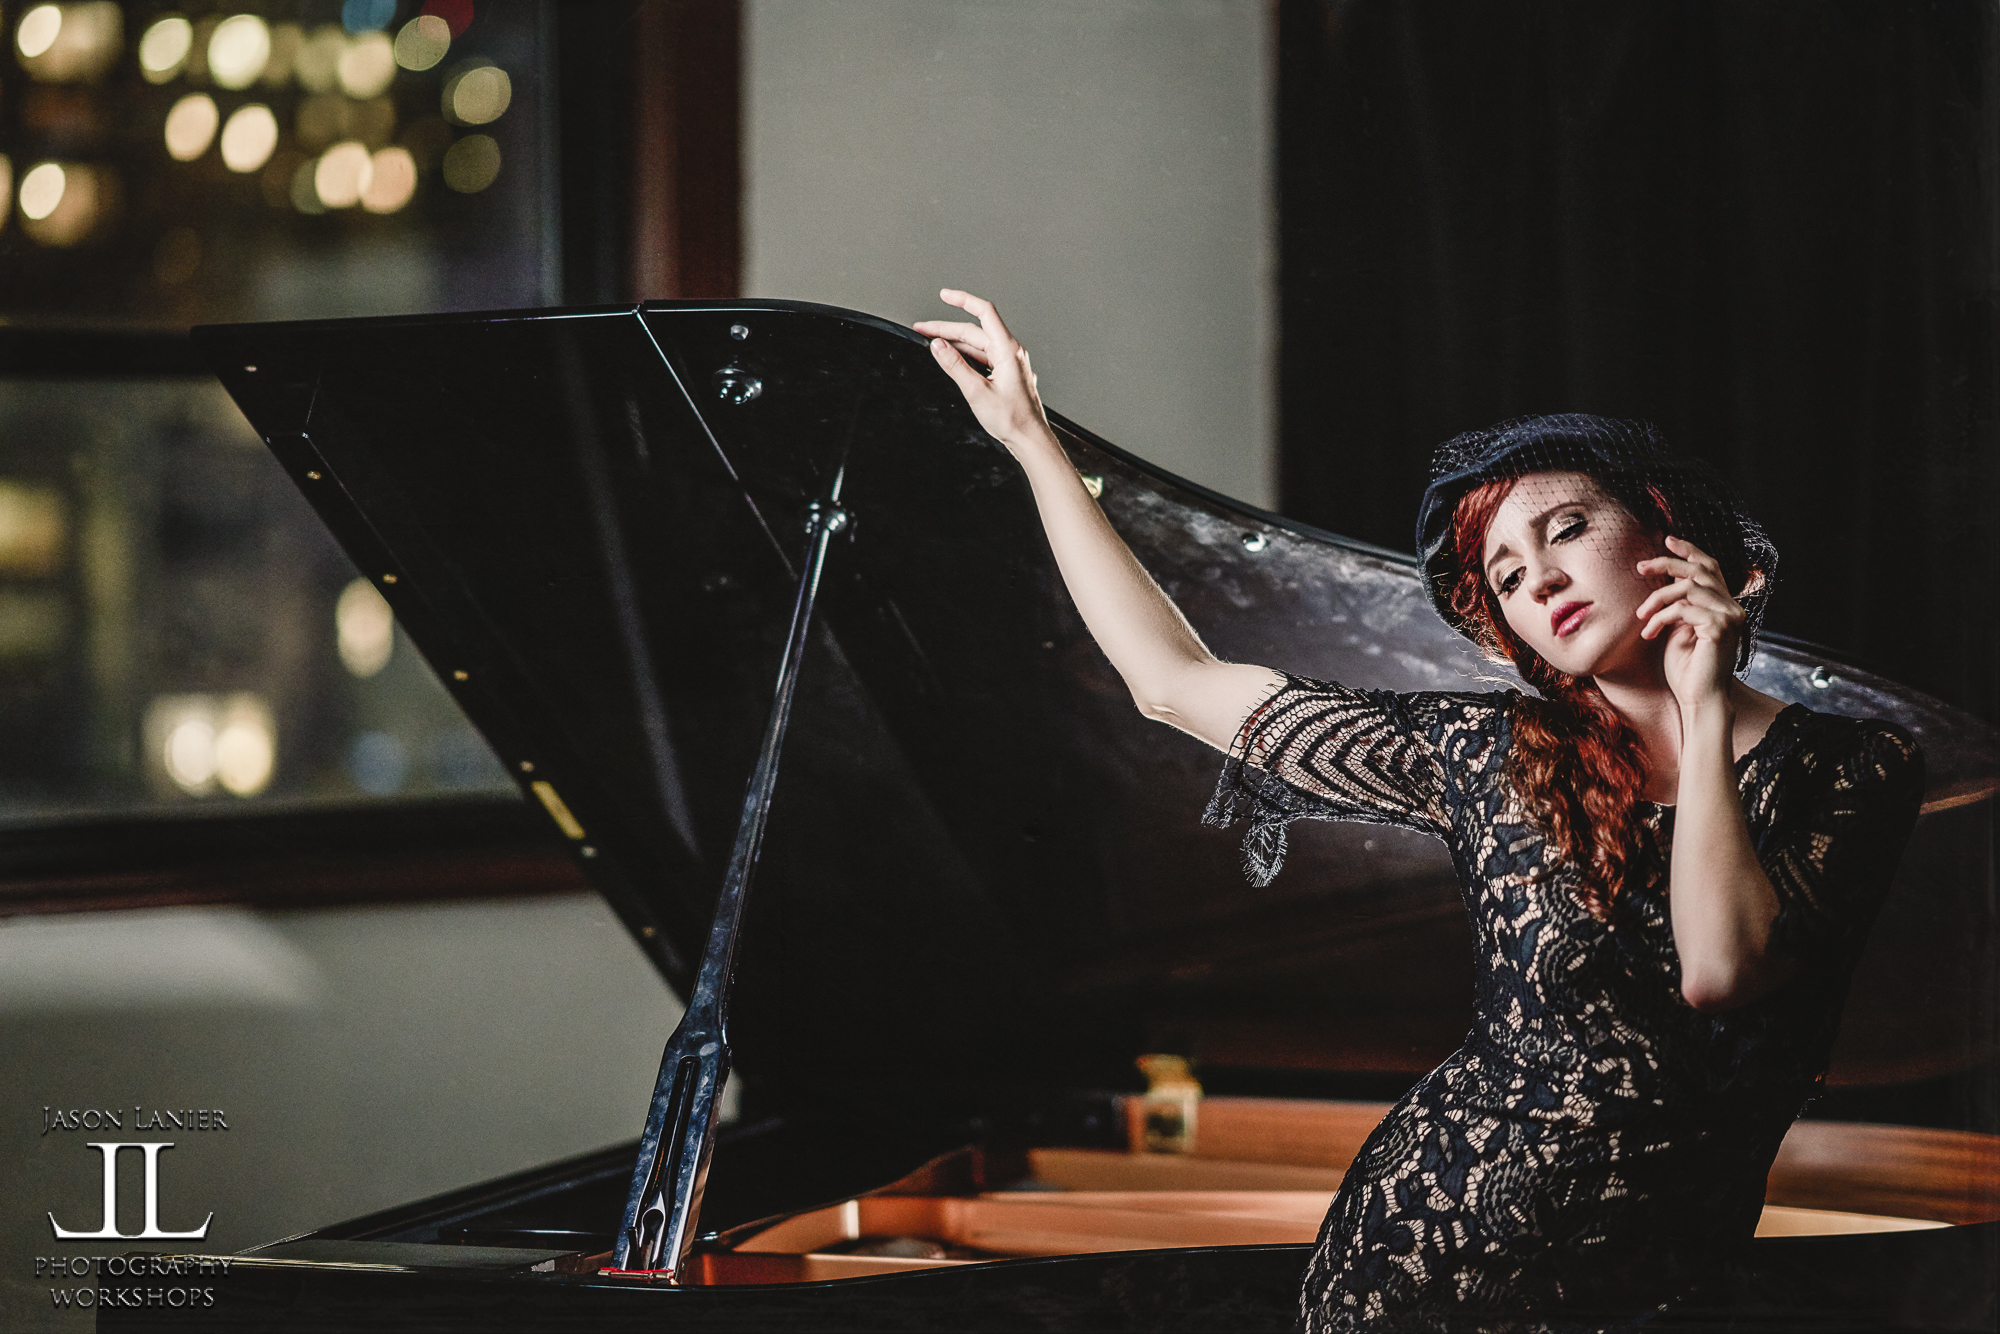
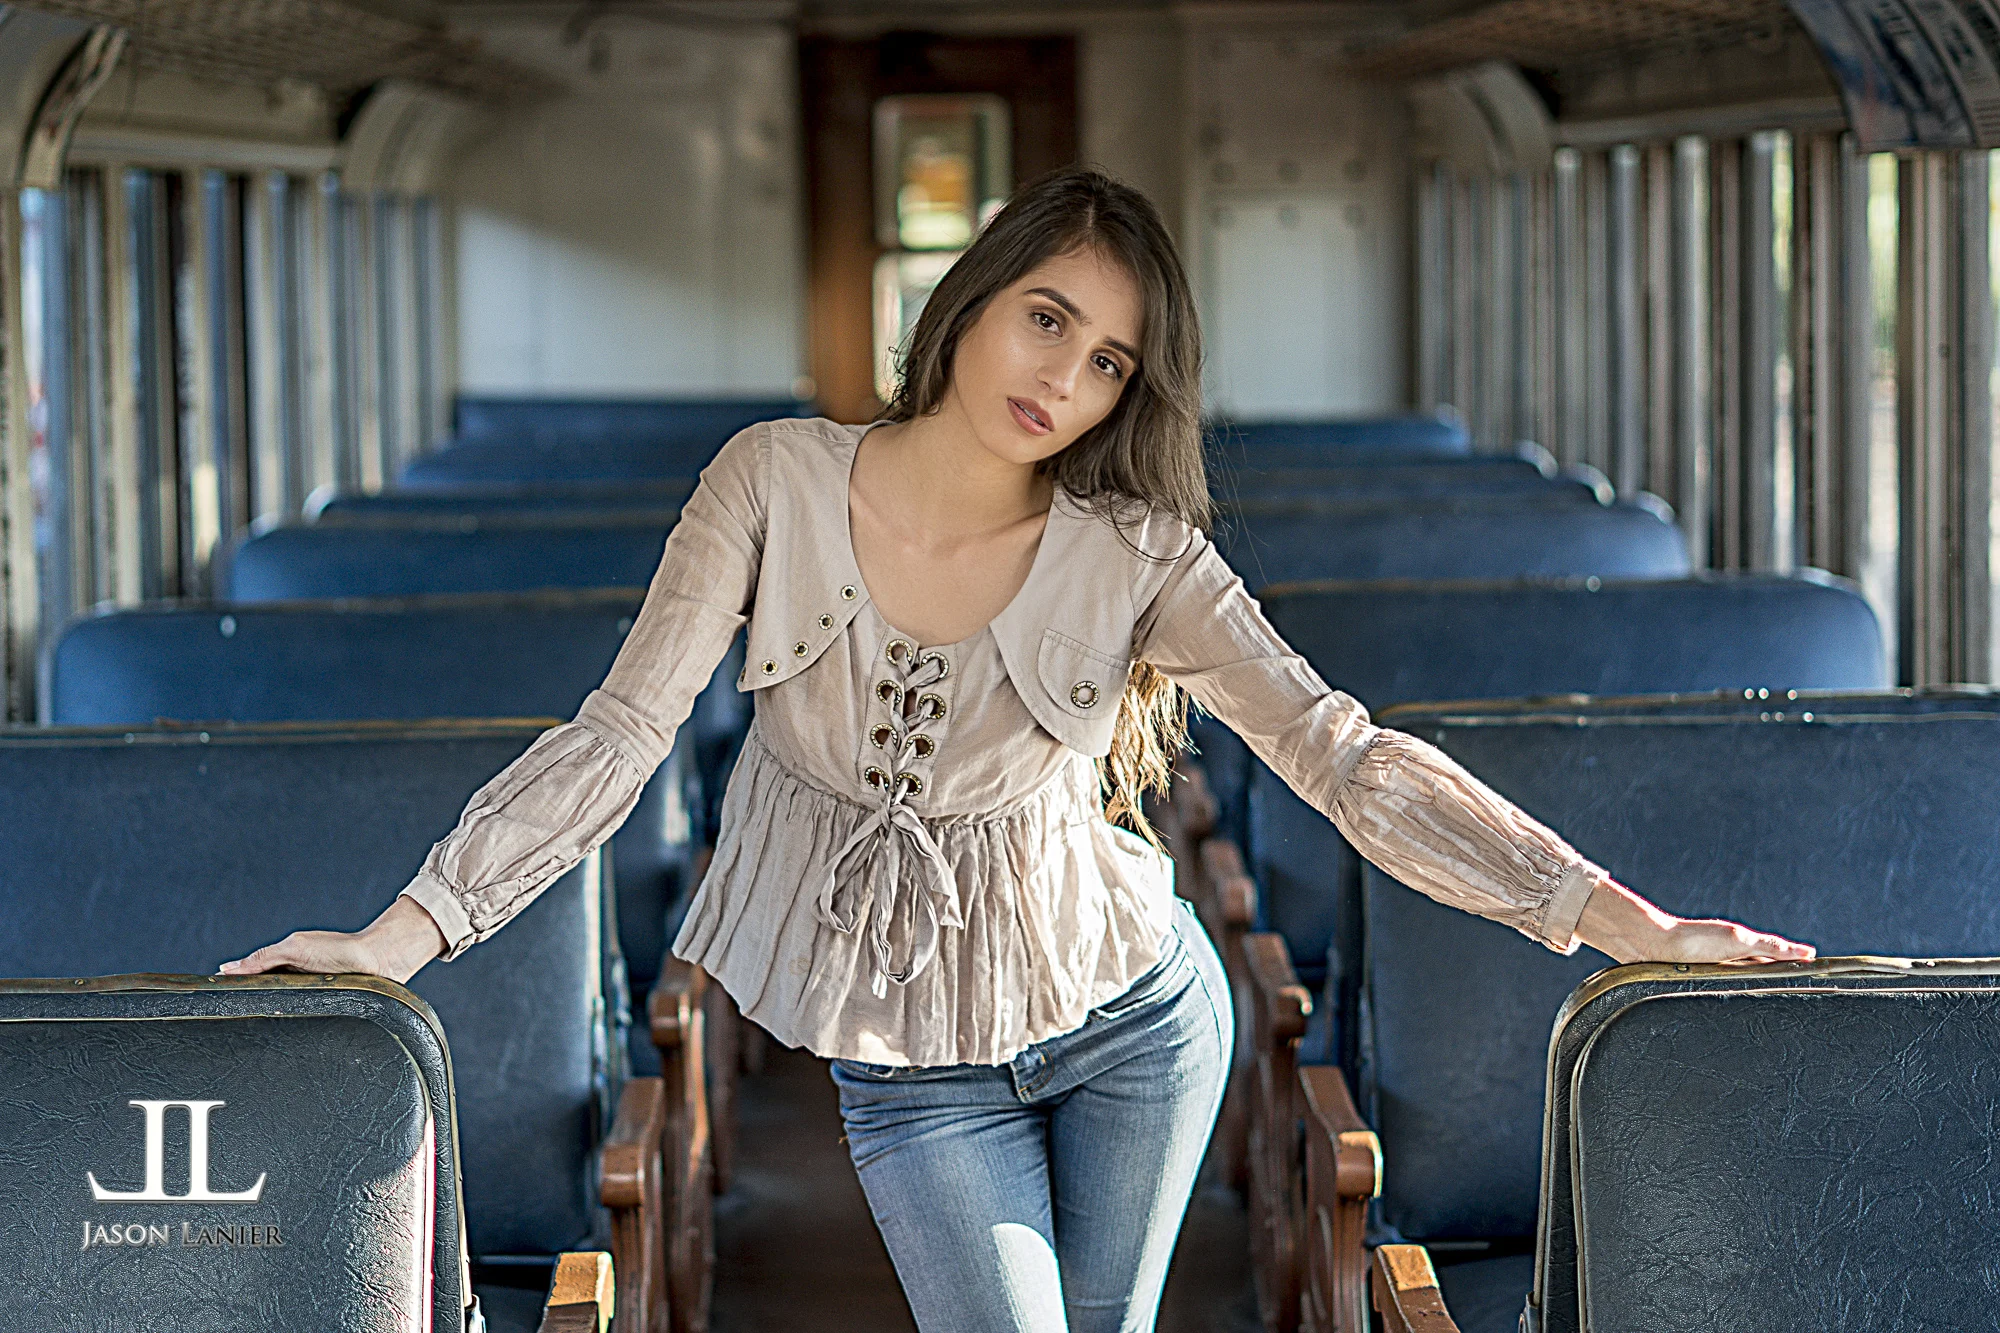
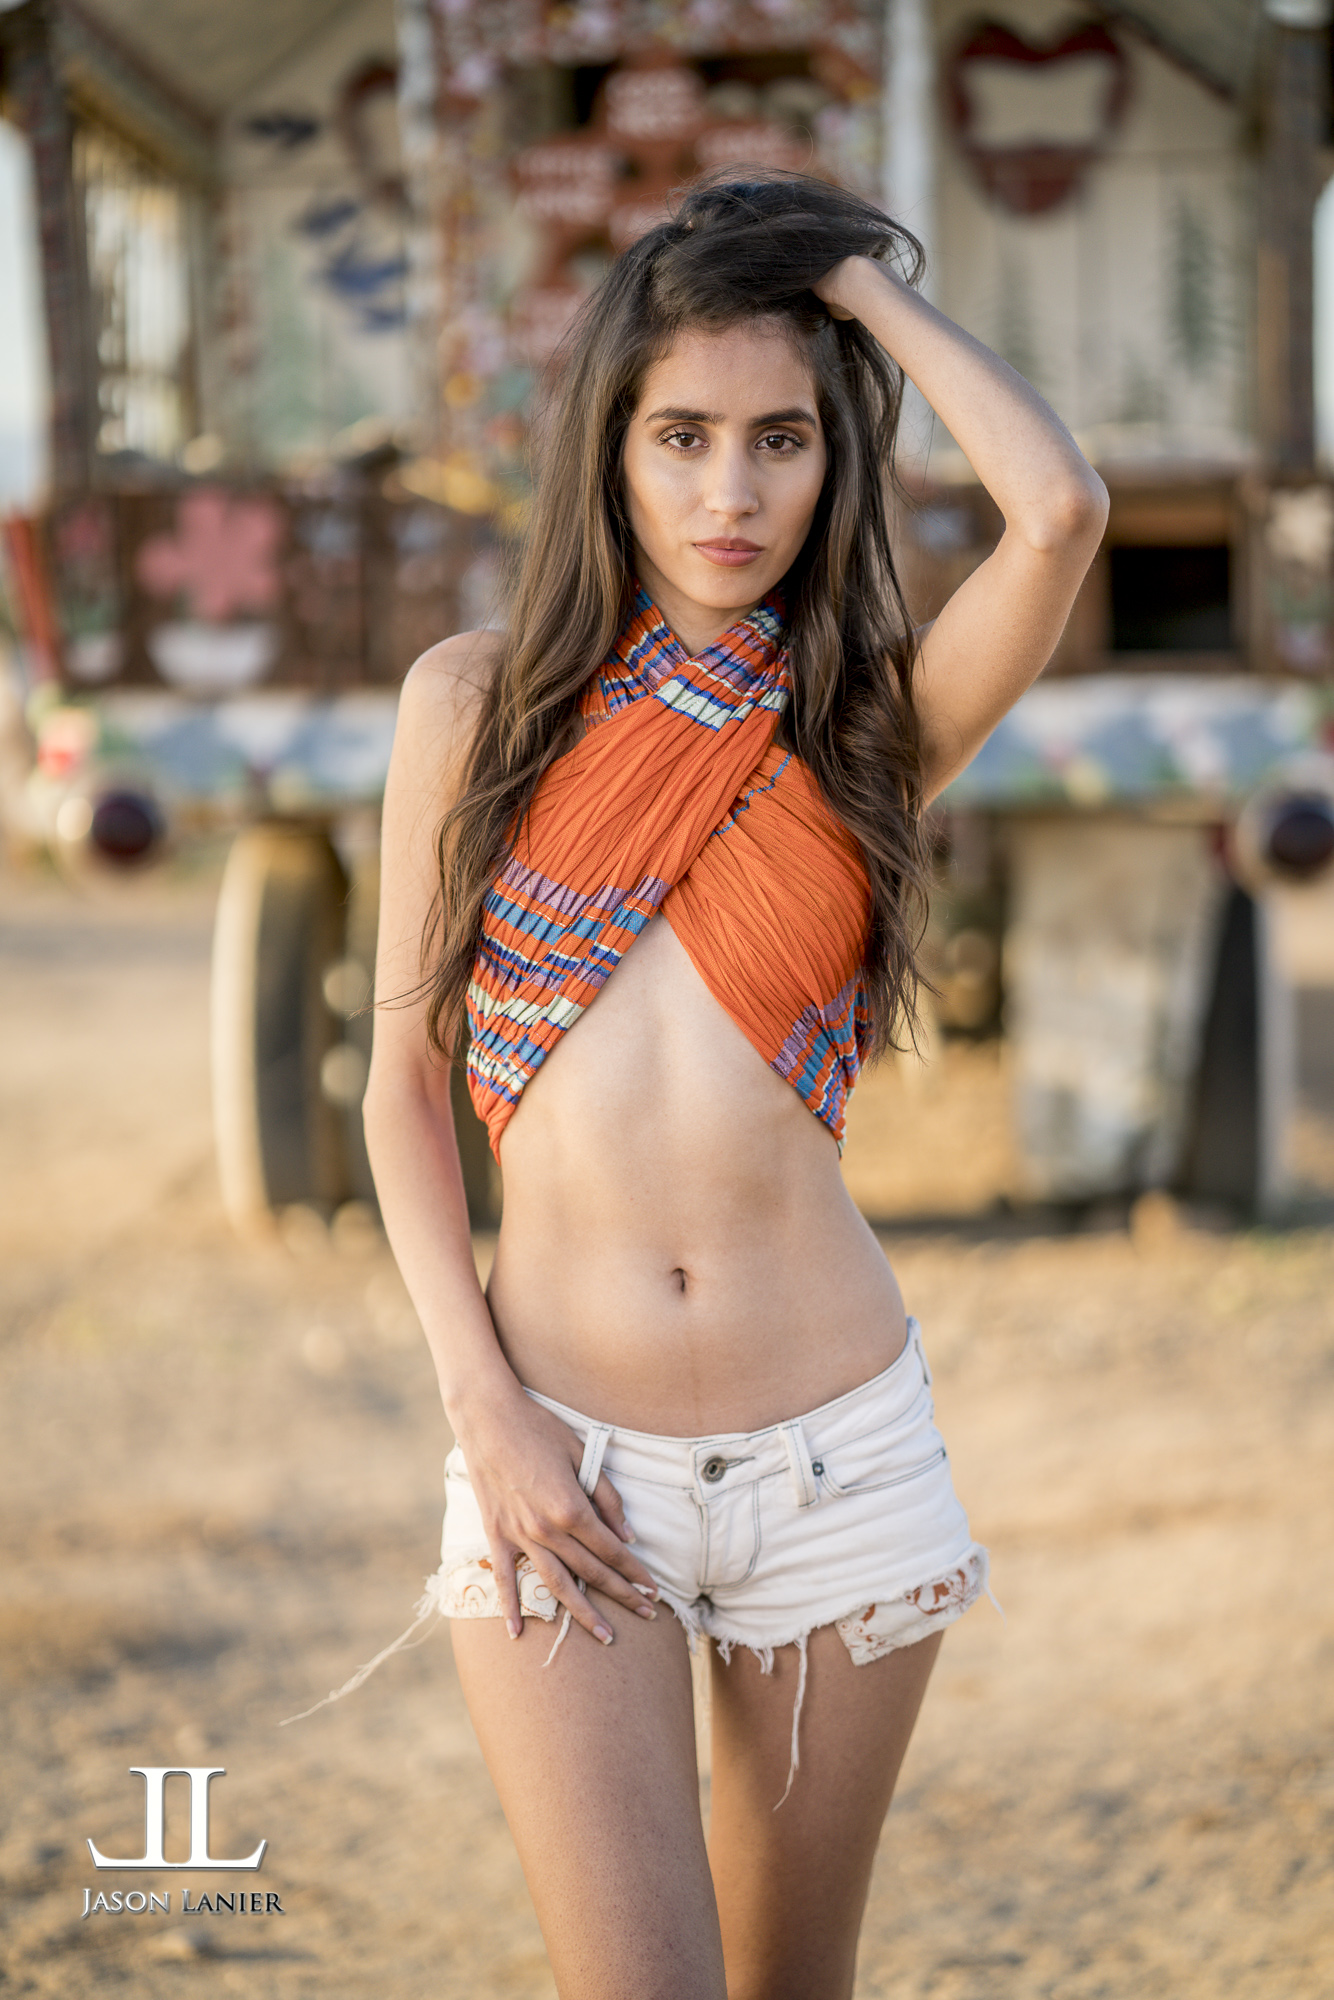
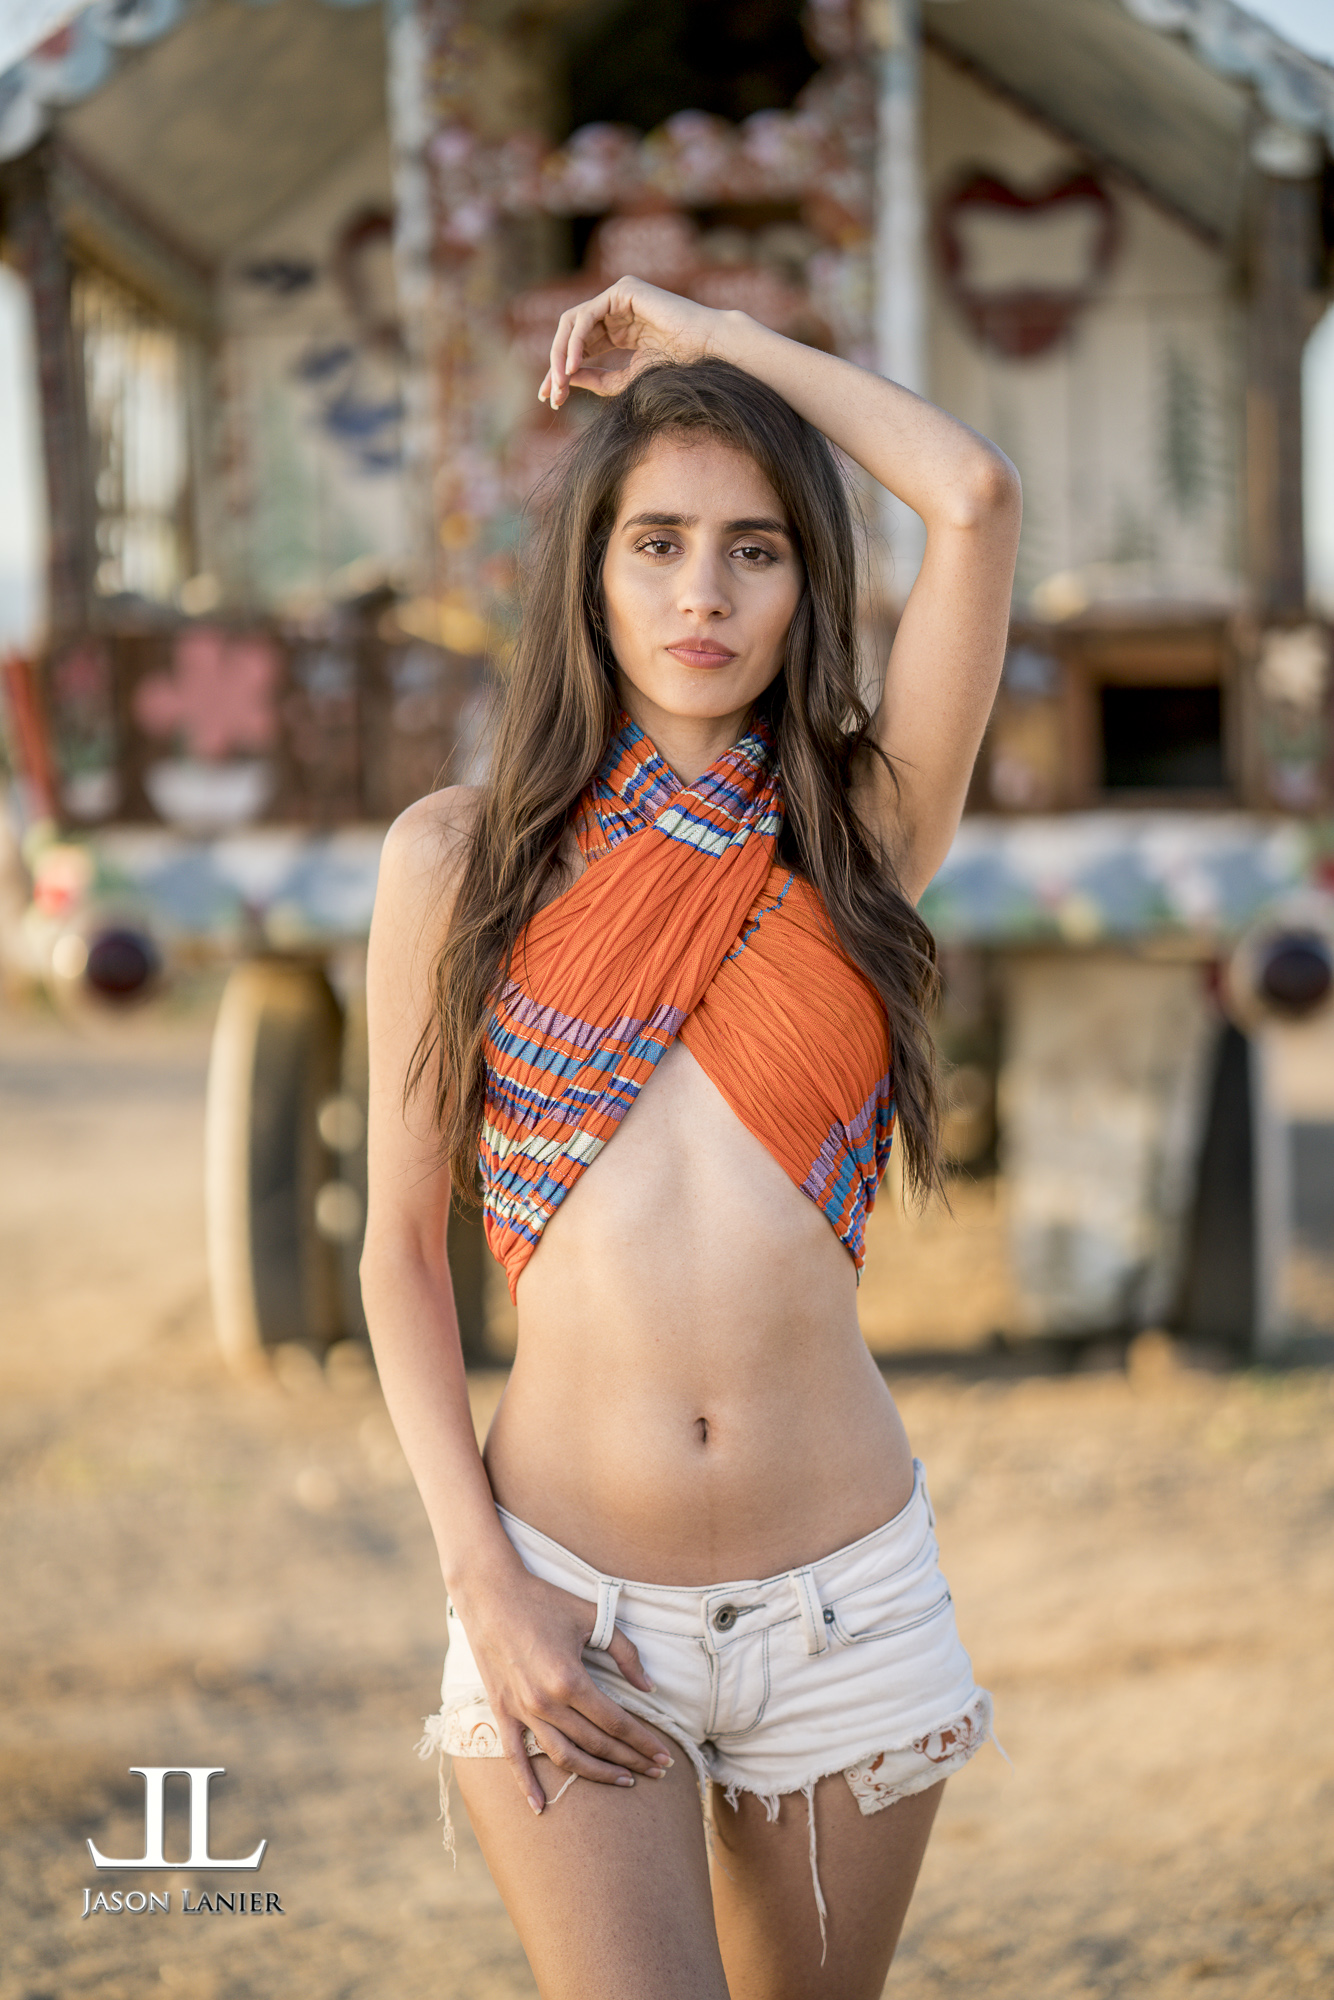
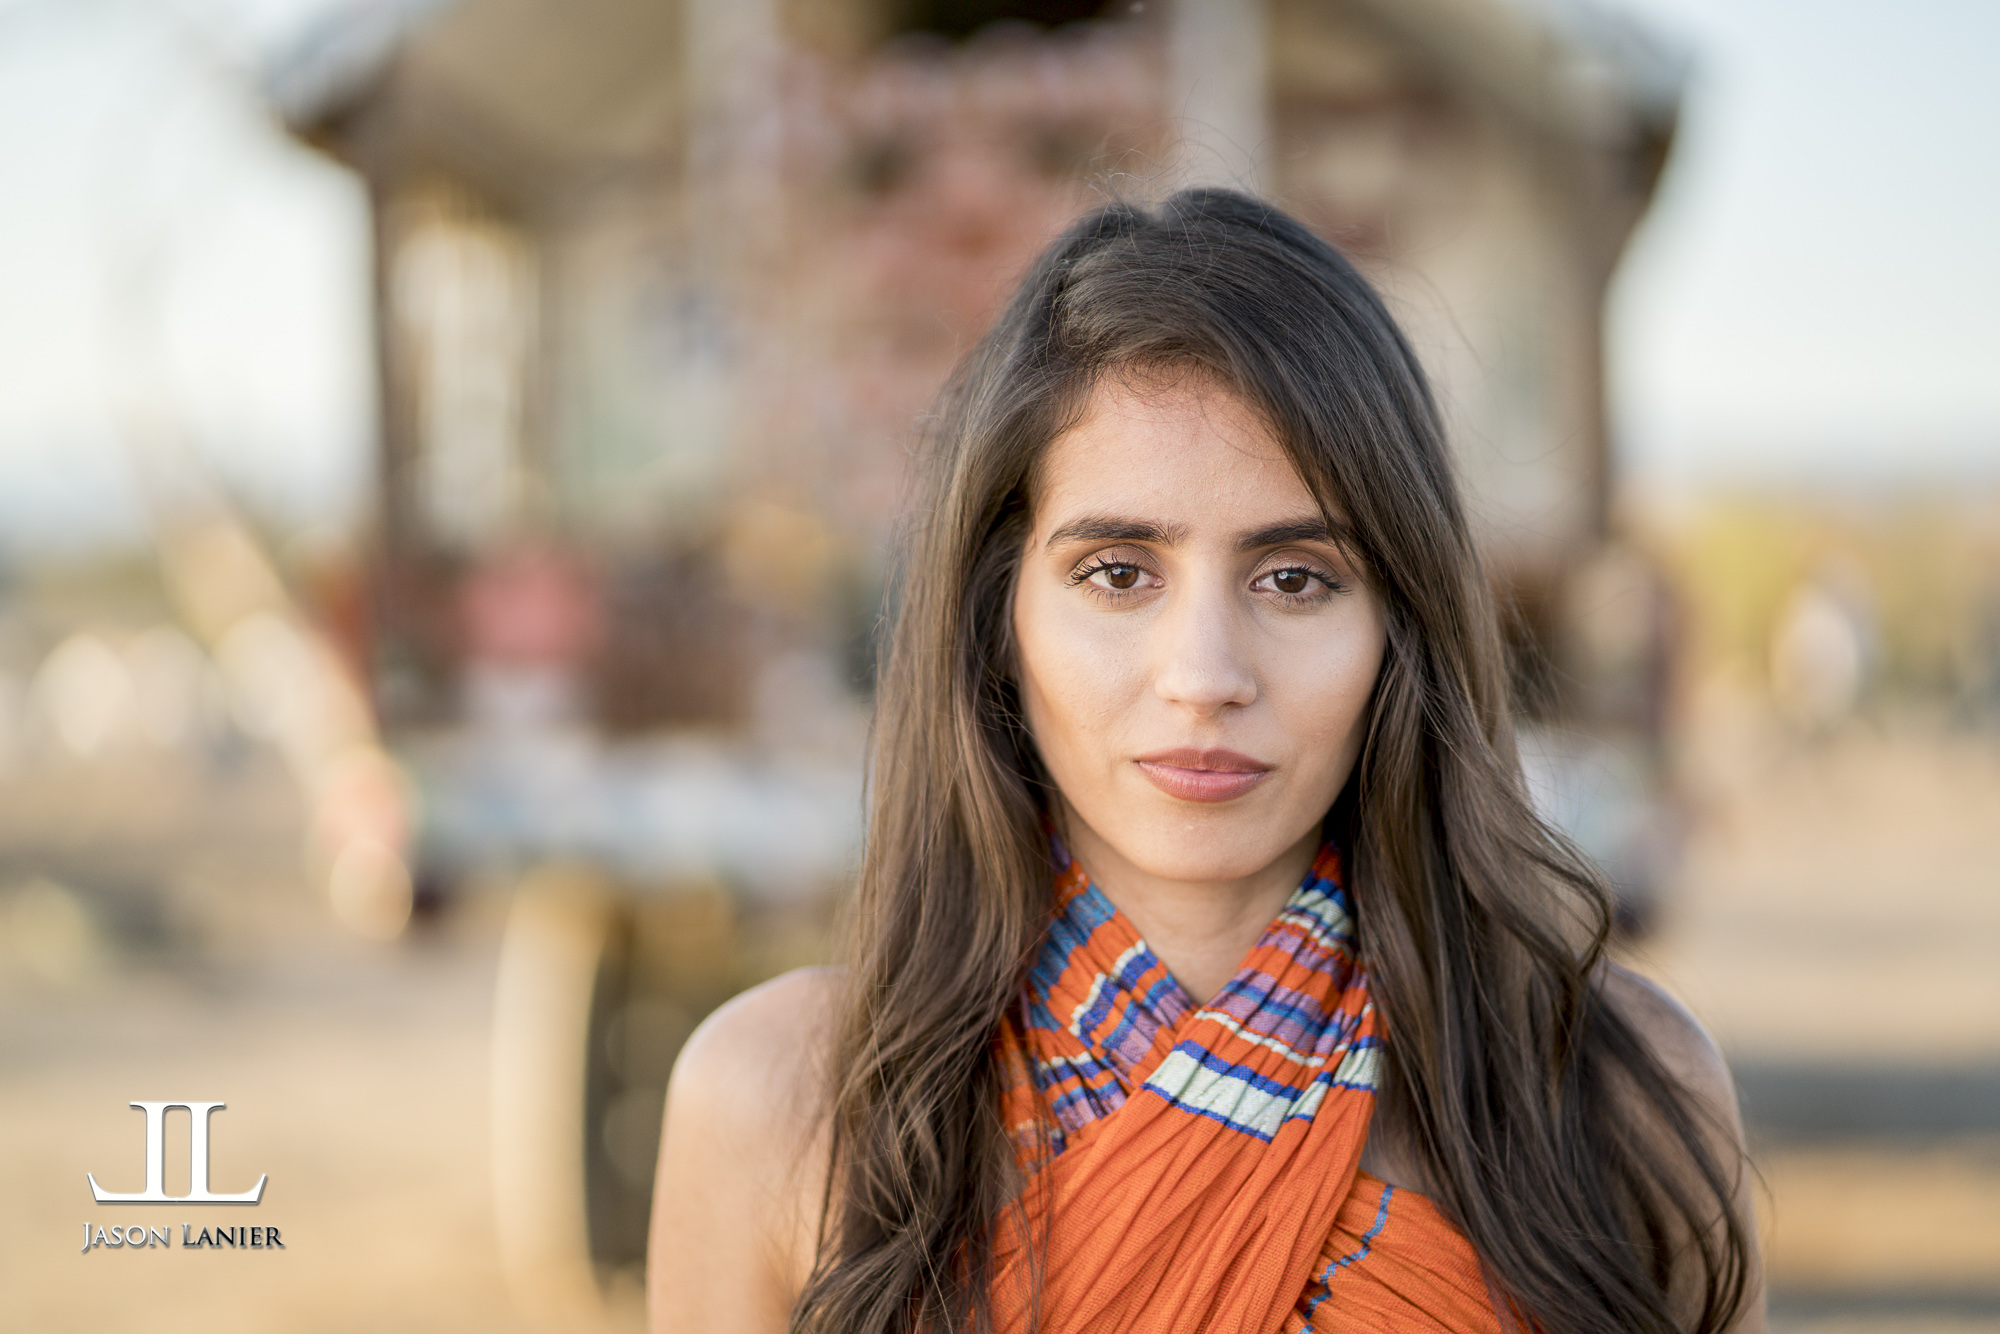
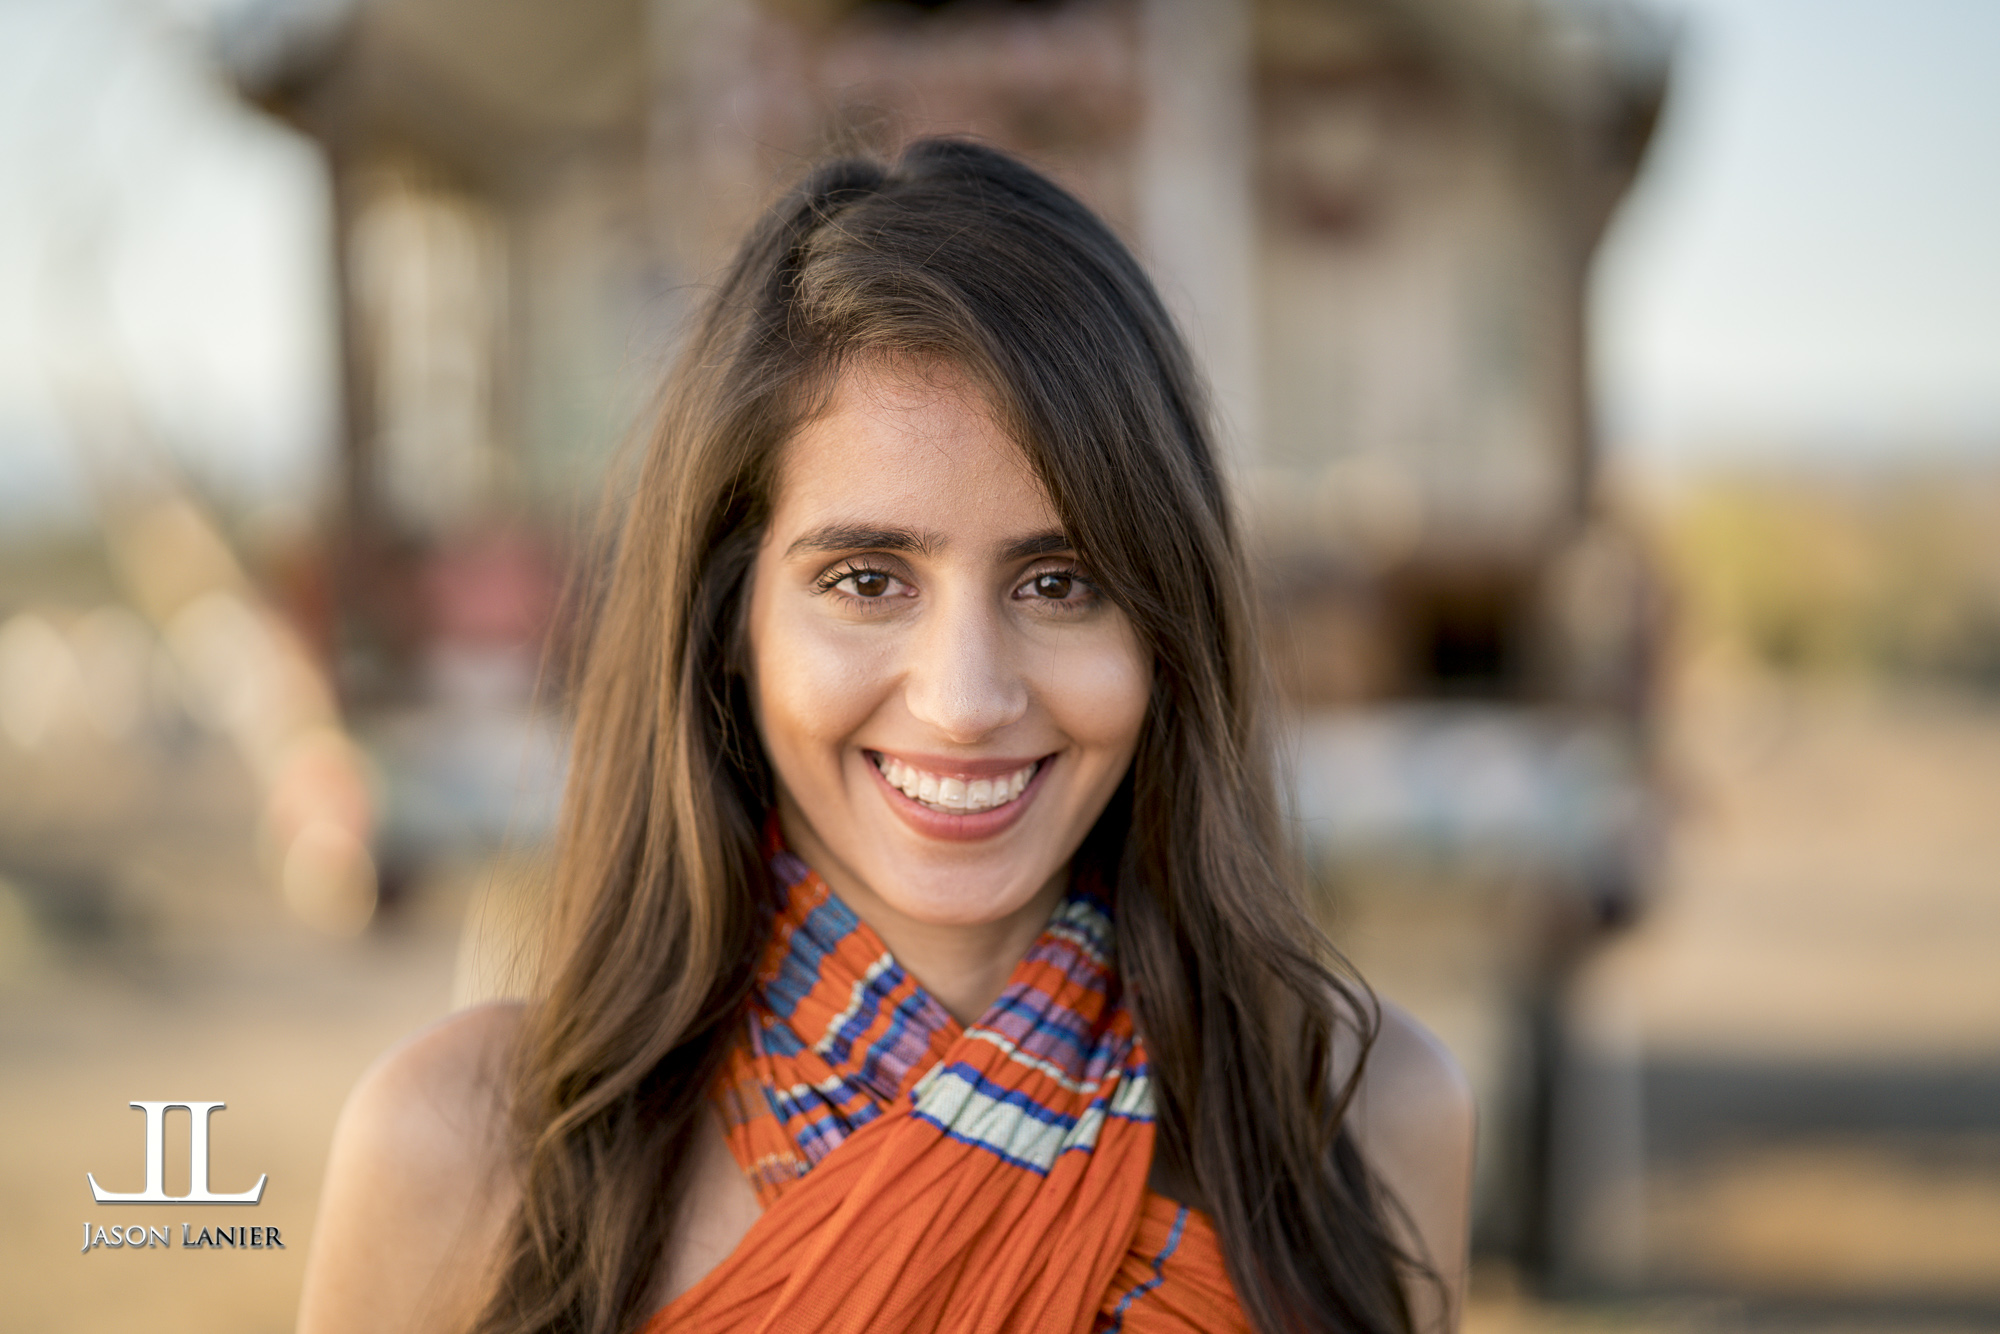
Shots using the Sony Zeiss 50mm:

Shots using the Sony G 12-24mm lens:

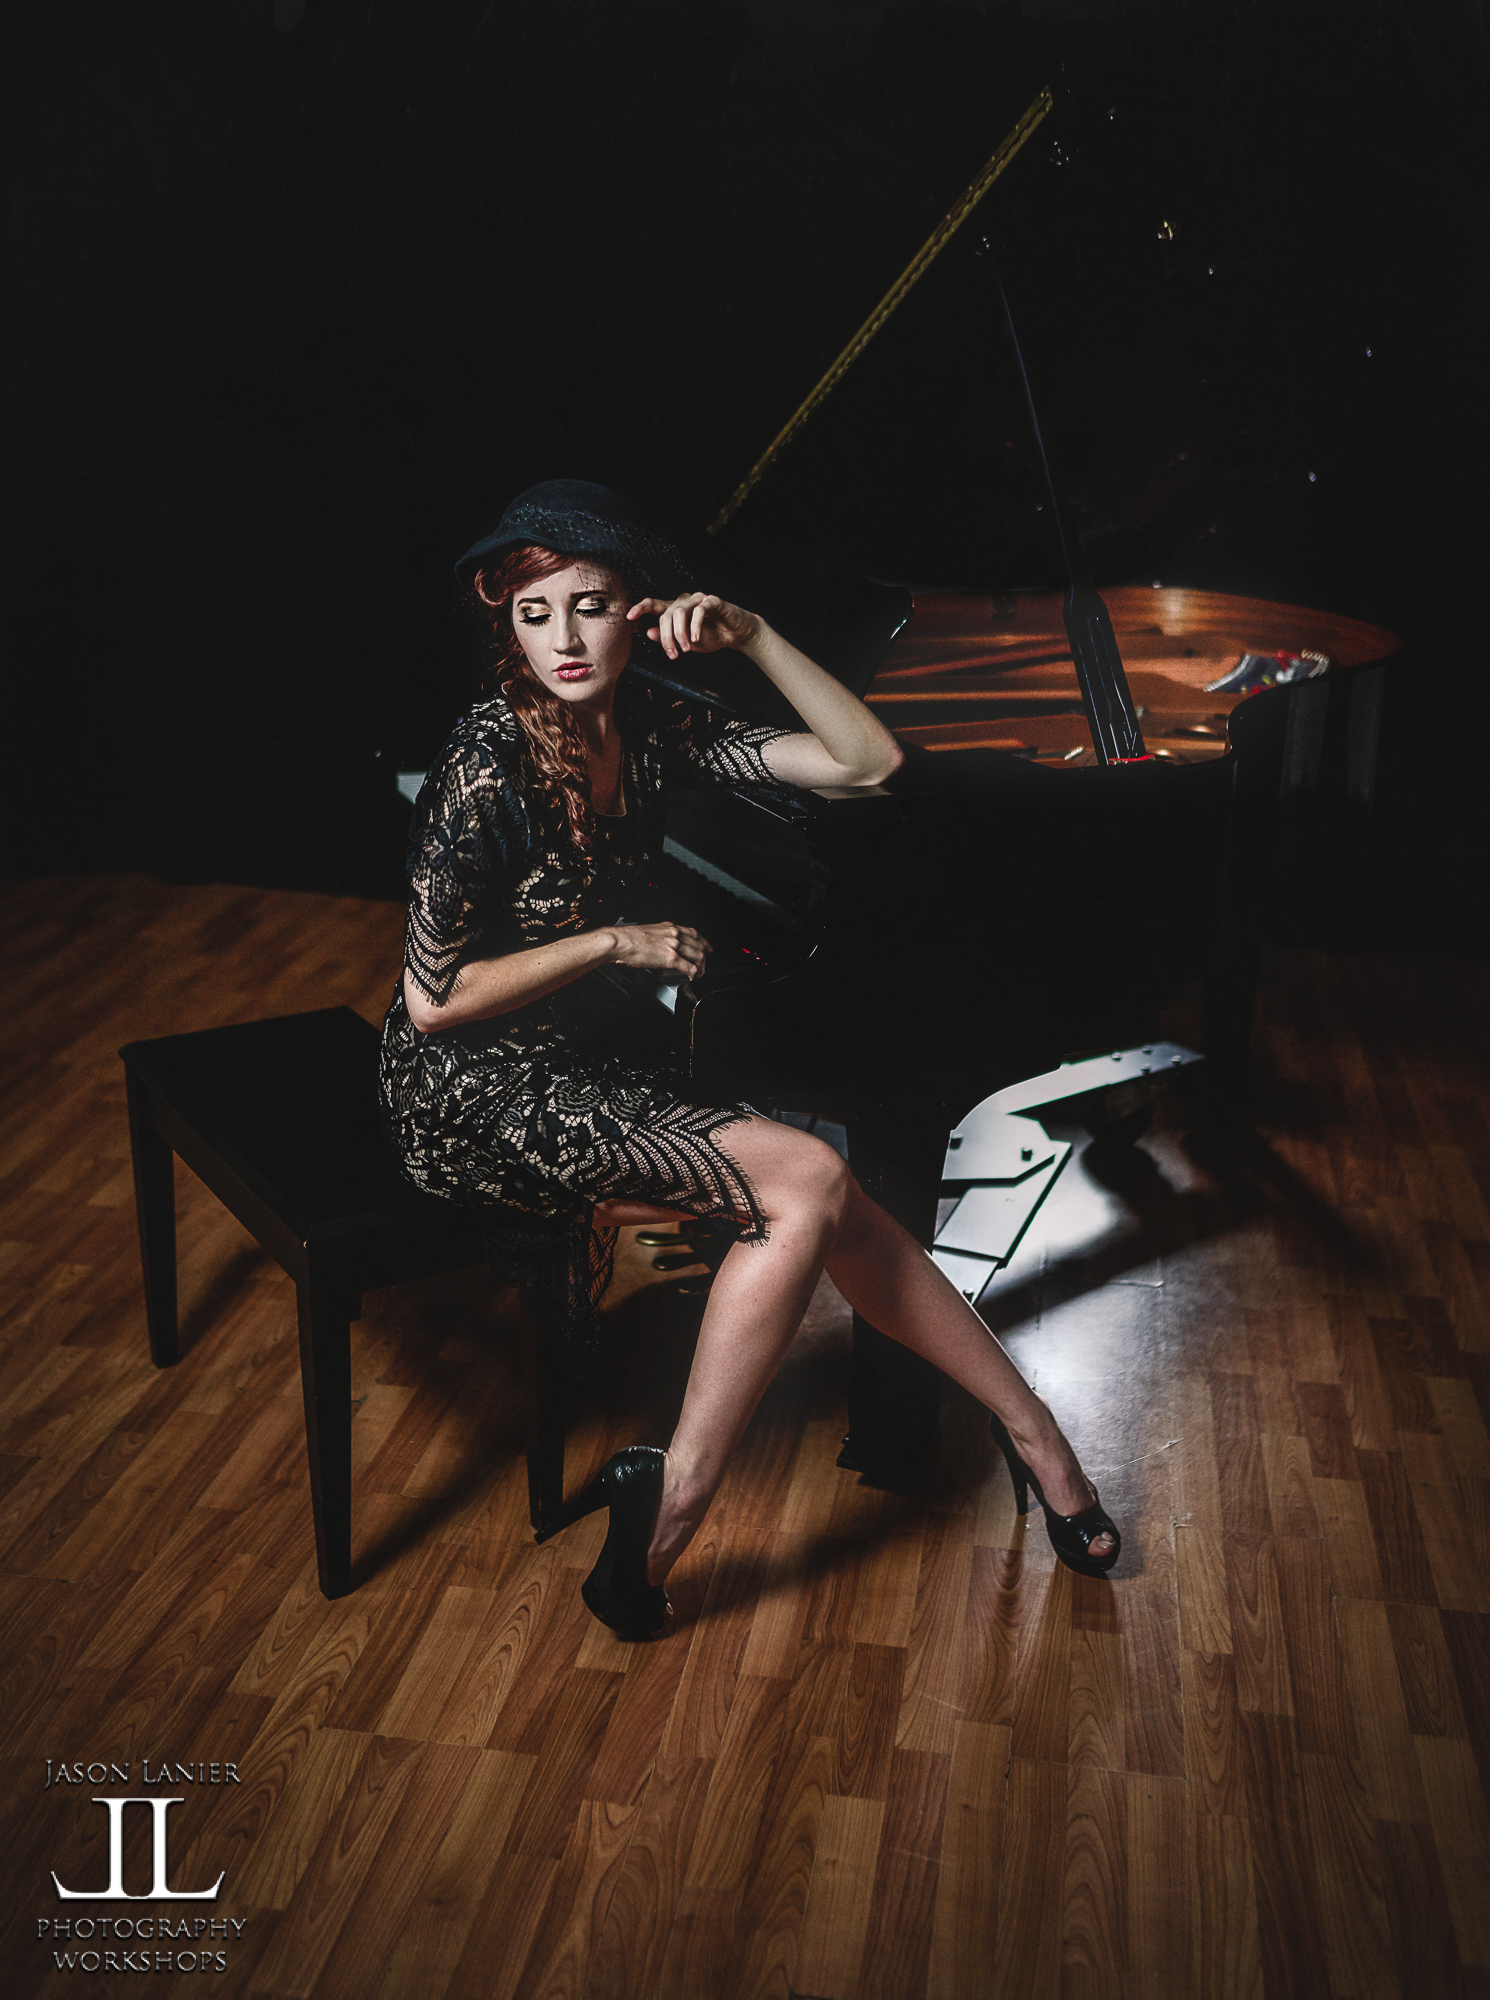
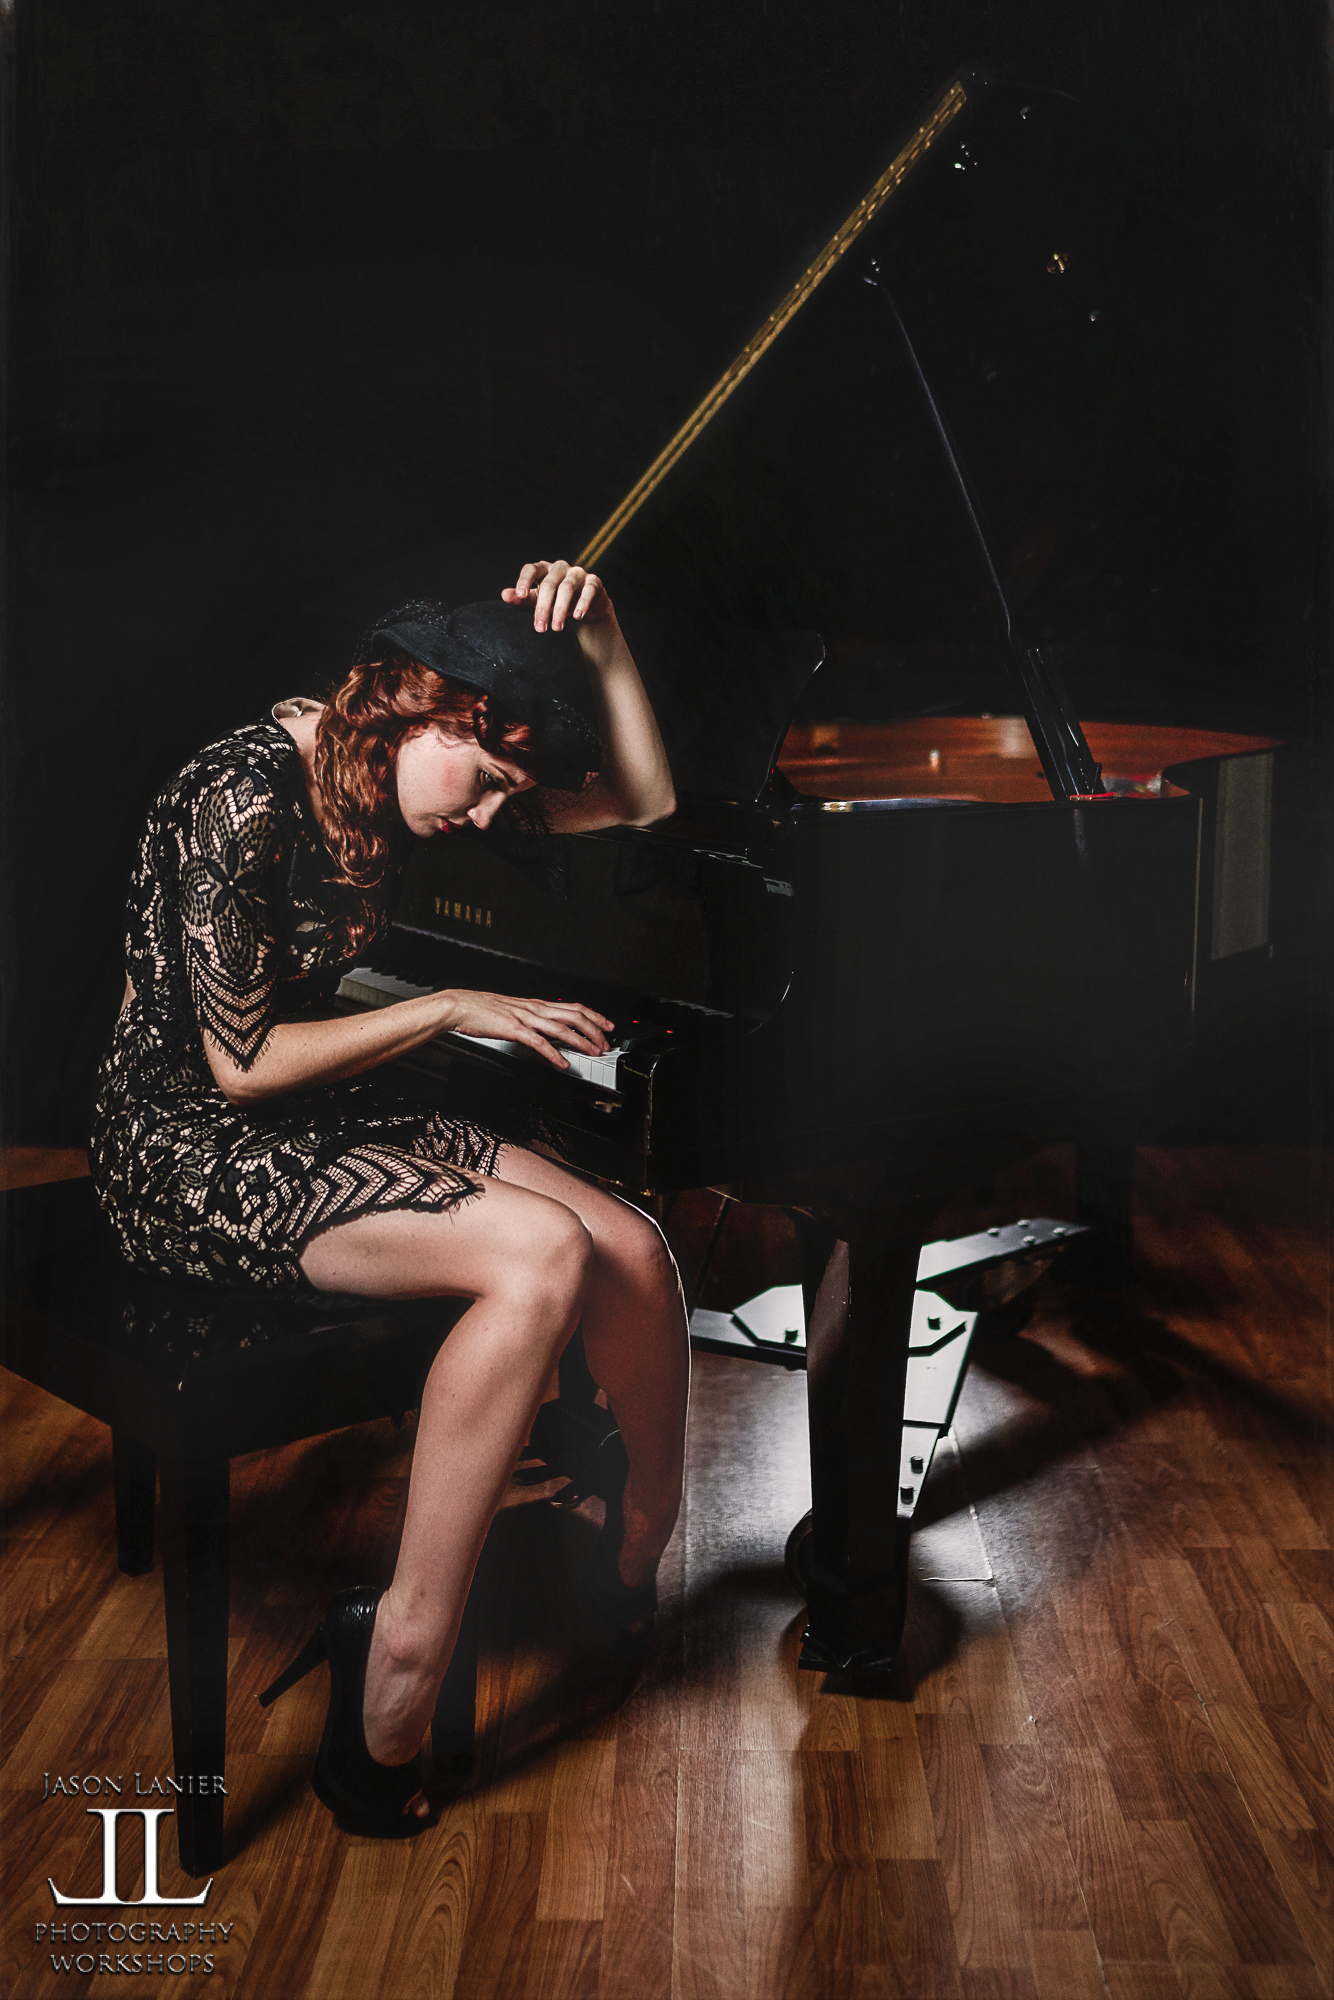
Shots using the Sony Zeiss 35mm:

I really hope this helps some of you out there to explore some alternative ways of lighting. The pros to lighting like this include creating some dynamic shots in a way that allows your ground area to remain dark. The cons are that you have to be careful of where and how your shadows fall on your subject.

Immediately following this shoot we did a live video blog/podcast. To check that out click below:


Thanks for visiting my blog. I really appreciate your support and thank you in advance for your comments and for sharing the content with someone you think can benefit from it. To learn more with us online please visit www.patreon.com/jasonlanierphotography.

To learn with us in person please visit www.jasonlanier.com/register.

We’ll see you soon!

Thanks,

Jason

1 Comment

Shooting the Lightweight Beast- my shoot with the Sony 400mm f/2.8 G Master lens by Jason Lanier

5 Comments

Shooting the Lightweight Beast- my shoot with the Sony 400mm f/2.8 G Master lens by Jason Lanier

I’m writing this blog in the early parts of December 2018. But once upon a time back in August of 2018, it was still VERY HOT. My Assistant Emily and I found ourselves in the middle of NOWHERE on the side of the road in Arizona. The temperature gauge inside of the car was telling us it was 115 degrees and boiling hot…but I digress.

Sony was gracious enough to lend me the 400mm f/2.8 lens for a few days for me to go out and test this thing. I already own the Canon 400mm f/2.8 so being able to play with this lens was a treat.

Questions abounded:

*If I already own a 400mm f/2.8, do I REALLY need to spend the amount of money as I would on a good used car to buy this lens?

*Is it really THAT much better than my Canon lens? I mean, this thing ain’t cheap.

So while driving down the road heading back to a cooler California, we saw this abandoned gas station and of course we HAD to go and shoot at it.

The first challenge was COMMUNICATION. I mean let’s face it, the 400mm wasn’t necessarily meant for doing portraits. BUT, I wanted a challenge rather than do the typical thing that most people do with this lens.

**Performance- From a performance perspective this lens hit all of the checkboxes. It focuses very sharp and very fast, has all the bells and whistles that you’d want on a premium lens and it is LIGHT! We weighed this thing and it was pretty much HALF of the weight of my Canon 400mm f/2.8. Why does that matter? Well, it actually makes the Sony 400mm f/2.8 the first lens in that range that can actually be used for handheld purposes. Why would you want to do that? Simple. It would be for the ability to be able to quickly change and shoot in areas like safari wildlife and sports. Having done both professionally in the NFL and in South Africa, I can attest to the fact that wielding a heavy lens and having to maneuver a monopod or tripod can mean missing some crucial shots.

Below are the images taken with the lens using the Sony A7Riii. The first three shots are with flash. The rest are without. If you’d like to see and know why check out the video above where the light takes a big FALL.

**VALUE- let’s not beat around the bush. This lens is EXPENSIVE. While it’s in the same stratosphere as it’s Nikon and Canon equivalents…all of these lenses are for the super pro who has a very particular need. So for pro wildlife and sports photographers who make their money shooting with the very best lenses this is a must have. For the average person out there the Sony 100-400 G Master is a great lens that is more versatile. The shots aren’t as special as they are coming out of the 400mm f/2.8, but they are very nice and the lens is about 25% the cost of the 400mm f/2.8. The other advantage of the 100-400mm is it is much more versatile for wider images which I did find very useful when I used it on safari in Kruger National Park in South Africa in July of this year.

A BIG thank you to Emily for braving the insane heat and giving me yet another epic performance. She is the BEST in every sense of the word. To follow her please visit www.instagram.com/em.explores today.

Please take a moment to let us know what you think by dropping a comment down below. Don’t forget to click on SUBSCRIBE AND NOTIFICATIONS so you’re updated every time we release a new video on Youtube. You can find our channel now by visiting www.youtube.com/jasonlanierpros. Please let me know what questions you have. If you have the money, this lens is phenomenal.

Thanks!

Jason

5 Comments

Shoot and Review of the Sony 24mm G Master Lens- the Mighty Mouse of the G Master line up by Jason Lanier

7 Comments

Shoot and Review of the Sony 24mm G Master Lens- the Mighty Mouse of the G Master line up by Jason Lanier

Early November 2018 I found myself in Manchester, England doing a workshop for Sony, Rotolight and Jessops Camera at the historic Chethams Library. Sony offered me the opportunity to use one of their 24mm G Master lenses to do some shooting fun with the newest G Master to the Sony family.

How could I say no? To watch the video from this shoot please click below:


This was an interesting lens for me. I’m not gonna lie, I originally had no intention on testing it out. Why? Well, it was simple. I have a TON of lenses. I mean I think I’ve blown my kids inheritance on lenses over the past number of years as I’ve purchased nearly ALL of the Sony E mount and FE mount lenses.

On top of that I already own a Sigma 20mm f/1.4 Art lens, so I just didn’t find myself in a position where I felt I needed another lens. But since I was already there, at the event, and since Sony was offering….I put it on my Sony A7Riii and decided to put it through it’s paces.

Initial thoughts when first handling it:

*Very light! I couldn’t believe how lightweight the lens is. I don’t know what Sony is doing with their glass but they are really breaking some new ground in delivering high quality, LOW weight lenses. This lens is right up the alley of the 400mm which is very light and high quality. This lens is HALF the weight of it’s bigger brother, the 85mm G Master.

*Feels solid- the lens like all the other G Masters the lens feels very solid and has all the stuff you want with a top of the line lens incuding an aperture ring, focus lock buttons, the ability to turn the focus on and off on the lens etc.

Thoughts when shooting with the lens:

*Very fast focus

*Makes no sound when using autofocus which could be good for video purposes for those who elect to use AF for their video work.

*Very sharp- I was impressed with the accuracy of the focus system, especially when shooting wide open at f/1.4 which as many people know, I shoot all the time.

Below are the images taken at the shoot:

PROS:

*Performance- Works just as you’d expect a top of the line lens to perform.

*Lightweight- the lightest of all the G Masters.

*Affordable…kinda- it’s the most affordable lens of the G Master family. But not many people would consider $1,398 cheap lol.

*Portable- due to it’s size and weight it’s a better choice for a travel lens than the Sony Zeiss 35mm f/1.4.

*Versatile- this is the kind of lens that can do A LOT. I could see myself using this as a wedding photographer for wide angle portraits, reception shots, ceremony shots etc. I mean being able to crank down to f/1.4 for low light ceremonies and receptions could be a lifesaver over the 16-35mm G Master at f/2.8 for example. I could also see myself using this lens a lot for videography purposes.

CONS:

*Other Options- to be fair there are other options out there, most notably the Sigma Art 24mm f/1.4. I personally own two Sigma Art lenses, the 105mm and the 20mm, both f/1.4 lenses. While they aren’t QUITE the level of the G Masters, they are pretty damn awesome, especially for the price. As a comparison the Sigma is $849 which is 40% cheaper than the Sony, so if you don’t have all the bucks for the G Master, the Sigma might look pretty enticing. It should be noted the Sigma doesn’t have the aperture ring which is very useful for videography work. But you’ll have to determine if that matters for you or not.

Summary:

If you have the money and want a versatile lens I think this is a great choice. Let’s face it, I think all the G Masters could be summed up similarly. Some may not be versatile, but all of them are amazing if you have the money. I personally own all of the G Masters except for the 400mm…but I have shot with that one extensively as well. If you have the money and don’t want to compromise performance the G Masters are a safe bet. But if you aren’t fortunate enough to be able to afford all of them, it is good to know that other options are popping up in the marketplace like the Sigma Art series and also some new offerings by Tamron.

**Links to Gear in the video and shoot:

*Sony A7Riii-

*Sony 24mm G Master-

*Rotolight Neo 2- www.rotolight.com, promo code: jasonlanier10

*Rotolight Aeos- www.rotolight.com, promo code: jasonlanier10

*Westcott Halo- https://www.fjwestcott.com/45-round-halo?acc=1c383cd30b7c298ab50293adfecb7b18

I want to thank you for joining me on my blog for this review. Please drop a comment below and let me know what you think about the lens and if this review was helpful to you. Also let me know what gear you’d like me to review in future episodes.

Instagram links to the awesome models from the shoot:

*Emily Rinaldo- @em.explores

*Victoria Lucie- @victoria.lucie

Thanks!

Jason

7 Comments

Shooting the Corpse Bride- a Cinematic Story Telling Shoot at the Fitzrovia Chapel in London by Jason Lanier

7 Comments

Shooting the Corpse Bride- a Cinematic Story Telling Shoot at the Fitzrovia Chapel in London by Jason Lanier

On Halloween 2018 I had the opportunity to do a very special shoot with the Rotolight team at the Fitzrovia Chapel in London, UK. It’s always pretty surreal getting to visit and shoot in some of these exotic locations and we wanted to do something really fun for Halloween. Click below to watch the video of this shoot!

My model Emily and I arrived at the chapel that’s tucked away in the center of London. This is an old chapel surrounded by big modern buildings and can’t be seen from the street. You have to navigate the CRAZY traffic in London (I mean I really HATE London traffic), park in one of the crazy parking lots that charge $60 for a couple of hours and THEN you drag your stuff all the way to the shooting location.

SO, after doing all of that, you certainly hope that the location is WORTH it. Was it?

IMG_5325.JPG

YES.

TOTALLY WORTH IT.

So I got Emily settled into the chair for hair and make up where she started the transformation into the Corpse Bride with her Corpse Groom Lawrence waiting for her:

IMG_5322.JPG

The biggest challenge when first walking into the church was trying to figure out how to take the ambient lighting down as it was very warm and convert it into the kind of cold blue tones that you’d want for a corpse bride (day of the dead) kind of shoot. So we killed all of the lighting in there and started lighting it up with blue lighting from all of the lights from the Rotolight Ecosystem. In this shoot we used the Rotolight Anova Pro 2, Aeos, and the Neo 2.

The Motion Blurr teamed based out of London filmed the shoot for me and did a great job. Below are the shots from the shoot. I really wanted to craft this as a story and I believe the shots below show the story unfolding even more than comes across in the video of the shoot.

I can’t thank Emily and Lawrence enough for their hard work in making all of this happen. They both did a terrific job of getting into the characters and going for it.

Below is a list of the gear used in the video:

*Sony 85mm G Master

*Sony 35mm Zeiss

*Westcott Halo- https://www.fjwestcott.com/45-round-halo?acc=1c383cd30b7c298ab50293adfecb7b18

*Westcott Eyelighter- https://www.fjwestcott.com/eyelighter?acc=1c383cd30b7c298ab50293adfecb7b18

ROTOLIGHT GEAR: To receive a 10% discount and FREE shipping on the Rotolights used in this video please visit www.jasonlanier.com/rotolight

7 Comments

Jason Lanier Working with Sony, Rotolight and Jessops Camera in epic 2 week trip by Jason Lanier

7 Comments

Jason Lanier Working with Sony, Rotolight and Jessops Camera in epic 2 week trip by Jason Lanier

In November 2018 I was blessed with the opportunity to work with three amazing brands, two of whom I’m very familiar with…at some very historic venues no less, the Fitzrovia Chapel, Pinewood Studios, and the amazing Chethams Library in Manchester, UK.

This started a few months ago when I received a call and was asked if I’d be able to fit this event into my schedule….and I was like, “How do I say no to this?”

So I got my Assistant Emily with me on a plane to London following our workshops in Richmond, VA and New York City and we took off to the ever amazing United Kingdom.

Our first stop was an appearance at the Camera World Live Event where I did a speech for Sony and Rotolight called, WYSIWYG- What You See Is What You Get. I get to do a lot of conventions and events and I love them all…but getting to see so many people for some jam packed events was an honor I’ll never forget. We did have a security guard outside of the event tell me I wasn’t allowed to put my elbows on the couch…but that’s for a later conversation lol.

IMG_5298.JPG

To check out the second of my two appearances there please click the video below:

Following the appearances at the convention some brave photogs ventured out into the very cold night air of London for a photo walk. We had a beautiful model named Sarah come out for that and we of course had the ever able Emily there as well.

IMG_5305 2.JPG

Following this event Emily and I made a quick pit stop down in Brighton for a fun photo walk on the pier that was a ton of fun! This was great as I’d never been to Brighton before. I’d say the toughest thing about this particular trip was the fact that the jet lag STUNK! Man with so many events the jet lag was tough to shake. Emily threw water on me a few times to get me to wake up. Be careful around here if you’re sleepy, she’ll use a defribillator on you! A big thanks to Darren Fellows for coming down to help with this photo walk as well.

IMG_5318.JPG

Following Brighton Emily and I returned back to London to get ready for our Jack the Ripper Shoot! I have to give a lot of credit to Emily for this shoot. Without her efforts it just wouldn’t have happened. You can check out the shoot and video by clicking below:

That was seriously one of the most fun shoots I’ve ever had the privilege to shoot. But we weren’t done there! Rotolight had contracted me for a commercial shoot at the historic Fitzrovia Chapel that we did just a day later. A videography crew called Motion Blurr was hired to document the event. That video will be coming out soon….but in the meantime check out this image of Emily taken at the shoot! This was done with her and a male model named Lawrence and both of them did just great. It was in a chapel and they did play the part of a married couple so…..officially I’ve shot Emily’s wedding lol.

DSC00688-Edit-2.JPG

We ended that shoot and had a tight turnaround because the next morning we were due at the historic Pinewood Studios to give a full days worth of presentations for Sony, Rotolight and Jessops Camera. This was such a fun event where I got to work with so many talented and amazing photographers who were Jessops trainers who came there to learn more about the synergy between Sony cameras and Rotolight LED Lighting. This was a fantastic day to be indoors because the rain and cold were out in full effect that day. Many laughs were shared. And it was such an honor to have so many of the Jessops trainers that were a part of Fedora Nation.

IMG_5349.JPG

After that it was a travel day from London to Manchester to get ready for our once in a lifetime event where I got to do workshops for Sony, Rotolight and Jessops at the historic Chethams Library. While the team was prepping for the event I was able to grab a few moments on the piano which was so exhilarating for me. Being able to play a grand Yamaha piano at such a historic place was something I’ll never forget, and I’m so grateful that my Assistant Emily was able to capture this moment with her phone:

Following that we did an event for two separate groups of photographers who came to learn about Sony and Rotolight, again working with the amazing folks from Jessops. It’s such a pleasure to be able to present for multiple sponsors when the products tie together so well.

DSC04669.jpg

This was a truly historic and fun event to do. I mean, how many photographers get to shoot in a library from the 1600’s that also has had scenes from Harry Potter shot there? Wow, what a blessing! We had some vintage clothing for all of the models. During the breaks between the two sessions I was able to quickly do some private shoots with the new Sony 24mm G Master with both Emily (my amazing muse) and another awesome model named Victoria.

DSC01997-Edit.JPG
IMG_5381.JPG

Following the event at Chethams we went out with a few brave souls that were willing to go out into the cold for one last Photo Walk. This was quite a way to end the 2 week trek as we braved not only the cold…but also some drunk dudes, some unruly minors who liked to smoke, and some fans who wanted to say hello. But luckily the group was lively and we had a phenomenal time.

IMG_5363.JPG

I can’t thank everyone enough for making this all possible. Emily was a tremendous help on this trip that was the longest of my career (because it was also tacked onto stops in New York City and Richmond before we even came to the UK). It wouldn’t have been nearly as successful as it was without her.

A big thanks to my sponsors Sony, Rotolight and Jessops. Sponsors can be such a tremendous support and help to open up doors. A super big thanks to my man Rod Gammons. He’s a real friend. Mark Baber, you know I love you! And last but not least my family at home. I couldn’t do it without the support of my wife and boys. I love you guys so much!!

Here are the production BTS shots from my time at Chethams Library. Thanks to Rotolight and Sony for taking these. Also stay on the lookout for more videos to come from these events.

I can’t wait to work with all of them again. Next up is speaking for Rotolight and Sony at the Profusion Convention in Canada!

Thanks for reading…:)

Jason

7 Comments

2 Comments

Jack the Ripper- Using Cinematic Lighting in the streets of London with the Rotolight Aeos and Westcott Halo by Jason Lanier

Just days before Halloween 2018 I had the opportunity to do a shoot of Jack the Ripper in the very streets where this once crazy serial killer roamed. My model Emily and I were in London for a number of events including the Camera World Live Convention where we spoke for Sony and Rotolight.

After the convention we had some free time before some of our other commitments started and I’d asked Emily to see if she could locate a shop for wardrobe in London. She found a place called Angels that completely outfitted both her and our Jack, a male model named Derek Martin.

I picked them up from the shop and Emily started doing her makeup as I location scouted in our rental car. The hardest part was driving around the crazy and completely chaotic streets of London. If you haven’t driven there before, you are in for a TREAT!!

We went to the White Chapel area of the city where Jack the Ripper once roamed. It was pretty surreal to be doing a shoot of Jack the Ripper in the very streets where he once walked. Creepy is an understatement.

After pinpointing on our GPS where I wanted to do the shoot we went to a restaurant in Brick Lane called All Star Lanes where we had a bite to eat with the team before the shoot. After a hectic day it can be a very good idea to relax for a minute or two before setting off to do a shoot. This gave me, the models and my helper Darren the opportunity to chat, eat, and relax a little before heading out into the very chilly air of the night.

Emily and Derek both changed into their costumes in the restaurant and then we were OFF to shoot! The most challenging thing about doing a period piece shoot is everything around you is modern. Cars, street signs, people, bikes etc betray the illusion that this shoot is being done in the 1800’s. You have to be careful with camera angles and where you choose to shoot if you want to try and pull off the look that it’s authentic.

We shot in two primary locations. A street with old windows and sheers and a nearby park. Using the Rotolight system with the Westcott Halo really gave me the ability to shoot a cinematic lighting effect. I put the Rotolight Aeos inside of the Halo and used Rotolight Neo 2’s for accent and rim lighting. Make sure to check out the video to see what I’m talking about.

Below are the shots from the shoot.

I hope you enjoy the shoot and thank you in advance for your support. As stated in the video I really tried to go out of my way to tell a story of what happened without glamorizing violence against women.

Don’t forget to click on SUBSCRIBE AND NOTIFICATIONS on my Youtube channel to be updated every time a new video is released.

Thanks!

Jason

2 Comments

1 Comment

840mm!! Using a Crop Sensor Camera with a Full Frame Lens and a Teleconverter by Jason Lanier

Ever wonder what a crop sensor camera would produce using a full frame lens and a teleconverter?  Well that's what I did when I photographed the lunar eclipse from Cape Town, South Africa.  Check out this video to see what I captured!  

I was in South Africa doing events with Sony and happened to be there during the lunar eclipse on July 27, 2018.  I went up to the rooftop of the hotel where I was staying at and photographed the eclipse using the Sony A6500 with the 100-400 G Master lens.  I then added the 1.4 Sony Teleconverter to this combination to get an equivalent 840mm!

When you put a 1.4 teleconverter on a 400mm lens it makes it an equivalent 560mm.  When you multiply that by the 1.5 crop factor it gives is a 840mm FOV equivalency.

In the video I shot both with the teleconverter and without to give you an idea of what both look like.  You'll also be able to see the difference in ISO between the two since the teleconverter changes the maximum aperture of the lens from f/5.6 to f/8.

Here are the images taken:

Without Teleconverter

Images taken using the Teleconverter:

I was very fortunate to be able to shoot both the solar eclipse in August 2017 in the United States and less than one year later shoot the lunar eclipse in South Africa.  It's a pretty surreal experience to capture one of these events, but to be able to capture two in less than a year is special.

I hope this video and blog helps you to better understand how to shoot a lunar eclipse, and that it helps you to understand how a teleconverter can work on a crop sensor camera.

**Links to Gear**

*Sony A6500-  https://bhpho.to/2Oe516m

*Sony 100-400mm lens-  https://bhpho.to/2Bx8UkP

*Sony 1.4 Teleconverter-  https://bhpho.to/2nLhK4D

I thank you in advance for watching and invite you to stick around and watch a few more videos while you're here.  Please make sure to click on SUBSCRIBE and NOTIFICATIONS so you're updated every time a new video is released.  My Youtube Channel link is www.youtube.com/jasonlanierpros

Thanks!

Jason

1 Comment

2 Comments

11 Essential Tips To Wedding Photography for Lead and Second Shooters by Jason Lanier

It's hard to make it as a new photographer.  Hard to understand what is required of you.  As a wedding photographer it's even more daunting because you are capturing a once in a lifetime moment....and you do NOT want to screw up!

Nearly every established wedding photographer has experience being a second shooter at a wedding.  Usually it's something they do when they are getting experience under their belts.  It's an invaluable way to learn how to be a wedding photographer without having the stress of the lead shooter.

As an experienced wedding photographer I've had the opportunity to be a second shooter for a few weddings when I first started.  I also have trained numerous second shooters over the years to help them become who they want to be as photographers.

Recently on my Patreon channel www.patreon.com/jasonlanierphotography my subscribers asked me to make a video about second shooters.  The do's and don'ts, with advice on how to make it all work well together.  So I got together with my Assistant Emily Rinaldo for a wedding of mine at the Stettenfels Castle in Germany and we recorded a video on lead an second shooters.

Below is a link to the video:

Here are the 11 Essential Tips to Wedding Photography for Lead and Second Shooters.  My assistant Emily helped me put this together...thanks Em!

  1. How Do You Become a Second Shooter?  Being a second shooter requires reciprocity. A lead photographer provides a second shooter with experience, opportunity, and exposure. In order to adequately reciprocate the exchange, the second shooter must ask themselves how they can benefit the lead photographer.   Pretty much what this means is a newer photographer needs to find a way to provide value to a more experienced, lead shooter.  If they can do that, they will be provided with more opportunities to shoot, learn and grow.

  2. How Should a Lead Shooter Handle Business with a Second Shooter?  It is highly recommended that the lead photographer initiate a contract. The contract should contain information that describes expectations. An expectation worth discussing includes: owning of images. A second shooter may ask, “are the shots I took mine?”. Well, yes of course they are; however, they were captured while working under the direction of the lead shooter.  The lead shooter set up lighting, posing, and hired the second shooter. As a result, the lead shooter owns the images. Does this mean that the lead shooter can claim the second shooter’s images as their own? Absolutely not - the lead photographer should most definitely provide credit where it’s due and vise versa, the second shooter should acknowledge that the images were captured when working with the lead shooter. Both parties should be mindful and considerate of one another.                                                   

  3. Can Second Shooters Use the Images in Their Portfolio? Second shooters may use the images they capture for the lead shooter in their portfolio as long as the lead photographer provides consent to do so. This will vary depending on the photographer. When updating your portfolio be sure to annotate that the photograph was taken when working under the direction of the lead photographer.

  4. When should Second Shooters post the images they take? As a second shooter it’s likely you’re photographing something new and exciting. With excitement comes eagerness to share on social media. Although it may seem tough, just remember to pump the breaks. It’s imperative that the second shooter waits for the lead photographer’s approval before posting shots. Approval may be dependent on different factors such as: when the client receives their shots and when the lead photographer posts their shots. It’s important to consider what it may feel like for the client to see shots of their wedding from a photographer who is not the lead. Just be respectful and wait until the lead gives the okay - if you’re not sure, just ask!

  5. What are the roles of a Lead and Second Photographer? A lead photographer is just as it seems, the lead. This means that they hold all responsibilities (i.e. lighting, posing, composition, time management, communication repair, problem solving, etc). The second shooter must support the lead as requested by them. While supporting, please recognize that the pressure is not entirely on you. Utilize those moments to observe and attend to how the lead is running the show. Pay attention to gear used, positioning of subjects, use of communication skills, and tactics used to maintain a forward progression of events or the event’s fluidity.

  6.  What gear should Lead and Second Shooters use?  Lead shooters must clearly describe what gear the second shooter should use. To maximize the range of shots taken, it is recommended that the lead shooter encourage the second shooter to use glass that differs from theirs (i.e. the lead shooter will decide who uses the zoom lens and who uses the wide angle). Lead shooters should also express that the second shooter should attempt to frame different shots. Don’t be a shadow second shooter; photograph at a different angle to provide the lead photographer and client with an alternative look.

  7. Don’t Try and Be a Hero-  As a creative, there are going to be moments where you want to photograph your perfect dream shot (i.e. an image where the focal point is on a lovely rose pedal and the audience is blurred out, or the bride’s shoe as she steps out of a nice vehicle). Those shots may benefit your portfolio; however, you need to remind yourself that you are on the clock and on someone else’s time. Therefore, it is important to recognize that hero shots, as lovely as they may be, take time and attention to compose. As I quickly learned, weddings do not wait, so it is imperative that second shooters remind themselves to fulfill their expectations as requested by the lead shooter. Don’t get caught up in the moment - stay focused on the task at hand.

  8. Prepping Gear for the Wedding-  SYNC YOUR EQUIPMENT. Lead shooters, save yourself the headache and sync your cameras. This includes: date stamps, times, etc. You’ll thank yourself later when editing. Another consideration is to shoot in the same white balance. This helps to maintain consistency within the work. Lastly, the lead and second photographer can shoot with different camera makes; however, shooting with the same camera is preferable. These tips are not necessarily required but have been deemed beneficial when working with a second photographer.

  9. Setting Expectations Prior to the Wedding-  Lead shooters, it is recommended that you review expectations with the second shooter when you first book them to do the wedding with you. You should then have a follow up call/meeting to discuss specific details after you have finalized the wedding itinerary with the client.  Expectations are necessary for adequate task completion. They should highlight roles and responsibilities required throughout the event. Clear expectations should facilitate understanding of the task at hand. When both parties are on the same page, the room for error is likely to decease. Please refer above for a description of suggested expectations (i.e. who owns images, when to post images, where the second shooter should stand, what gear the second shooter will use, a moment in time that the second shooter should aim to capture).

  10. Shooting Together Before the Wedding Can Be a Big Help-  Lead shooters, please take the time to take pictures with your second shooter prior to the event. This gives you opportunity to familiarize, socialize, and provides insight on their shooting style. Second shooters, here is a chance for you to feel comfortable shooting along side the lead photographer. Don’t be afraid to ask questions. Just the other day Jason took me out to shoot for the first time. And man was I nervous! I felt like every shot I took was unflattering. I was so excited to shoot, I forgot some of the basics (i.e. composition, framing, negating unwanted space). I expressed my feelings and Jason provided suggestions. Once implemented, I immediately saw better results and my confidence raised again. Overall, I’m really glad we shot together before the wedding - it helped ease some of my excitement that I felt on the day of.

  11. Understand what your client needs vs. what you want-  Without a doubt, weddings are beautiful. They’re full of life, laughter, and emotion. It’s easy to get caught up in the moment but you need to remind yourself why you’re there; to serve your clients. Avoid sacrificing a shot that the client needs, for a shot that you want as a photographer. To understand shots that the client needs, please check in with them before, and on the day of the wedding. Find out what they wish to have photographed. Some clients may want to include a really special center piece or wine glass, while others may wish to have portraits with specific family members and friends. Whatever it is, just ask, check for understanding, and be sure to include in your finished work.

Thanks Emily for helping me write up the 11 points!  We certainly hope this helps and thank you for reading my blog.  This was all done as part of my REAL Wedding Workshop at the Stettenfels Castle in Germany.  If you'd like to join us for one of my workshops please visit www.jasonlanier.com/register today!

Thanks,

Jason

Image taken by me at the wedding using a wide angle lens

Image taken by me at the wedding using a wide angle lens

Shot taken by Emily using the 70-200mm

Shot taken by Emily using the 70-200mm

2 Comments

Comment

Updates to Privacy Policy- GDPR

Updates to the Privacy Policy

Hi Friends in Fedora Nation,

It's the fantastic time to do some privacy updates thanks to our friends in the EU...:)

In light of the General Data Protection Regulation (GDPR), agreed upon by the EU and set to go into effect today (May 25th, 2018), we wanted to revisit our privacy policy and make a few updates for you.  Already in full compliance for GDPR, we’ve simply added details and adjusted language in the Privacy Policy to be more transparent regarding our collection and use of your personal data.

Our privacy policy updates will give you more clarity and control over how we collect and use your personal data when delivering our world-class products and services.

Here's a quick summary of the updates we’ve made:

  • We wanted it to be absolutely clear that we have never and will never rent, sell, or lease your personally identifiable information to other companies or individuals. We agree, it’s your info, not ours.

We trust you'll find these updates helpful and want you to know that our continued commitment to your data’s privacy and security will remain a top priority.

To review the full Privacy Policy please visit:

http://www.jasonlanier.com/gdpr-privacy-policy/

Please note that by being part of the Meetup Group here, you've already agreed to the Privacy Policy on Meetup.  Today's updates maintain our privacy agreement with you and by continuing use of the services on or after today, you’ll be in full agreement with the updated policy. If you have any questions please contact us anytime at info@jlpros.com

We appreciate you and your business.  Hope you’re having a wonderful day!

Thank you,

Jason Lanier Photography

Comment

My First Shoot Ever using the Sony A7Riii- shooting in Raw at a Penthouse in NYC

4 Comments

My First Shoot Ever using the Sony A7Riii- shooting in Raw at a Penthouse in NYC

In late October 2017 Sony announced a camera that should be a big seller for them, the Sony A7Riii.  The predecessor to the A7Riii, was the A7Rii, a very popular and widely acclaimed camera.

While in town in New York City for the PhotoPlus Expo I was able to get my hands on the new Sony A7Riii with the brand new 24-105mm FE lens that was announced at the same time as the A7Rii and give it a go for a night.  I had my Photographer's Unite Event planned at a Penthouse in Manhattan and I used the opportunity to put on a live shooting demonstration in front of the crowd as they got to witness my first shoot ever with this camera.  Below is a video of the shoot:

But most of you are probably here to see the images that came out of the camera right?  Well, they are posted below.  All of the images were shot in raw, developed using Capture One, and enhanced using Photoshop.  I'll post the images by the lens that was used to capture them.  Settings for all the images are included in the video:

Images captured using the 85mm Sony G Master

Images captured using the Sony Zeiss 35mm f/1.4:

---Gear used for the shoot---

**Sony A7riii-  https://bhpho.to/2ztvVDo

**Sony 24-105 G lens- https://bhpho.to/2zs27qp

**Sony 85mm G Master-  https://bhpho.to/2A2V83D

**Sony 35mm Zeiss-  https://bhpho.to/2zsIUoP

To save money and get FREE shipping on Rotolight products please visit:

**Rotolight Neo- www.jasonlanier.com/rotolight

Below is a link to the models in the video:

*Maddi- www.instagram.com/lalunetta

*Jade- https://www.instagram.com/jade.gallowayy/

*Alyssa-  https://www.instagram.com/aly_182/

I thank you for watching and invite you to stick around and watch a few more while you're here. We have plenty more videos coming with the Sony A7Riii and will also devote an entire playlist to that camera, so make sure to check that out as well.

Don't forget to click on subscribe and notifications on my Youtube Channel www.youtube.com/jasonlanierpros so you're updated every time a new video is released.  Thanks for being here!!!

Jason

4 Comments

The Shoot between Jason Lanier and Ken Wheeler the Angry Photographer using the Sony A9 and the Fuji GFX

41 Comments

The Shoot between Jason Lanier and Ken Wheeler the Angry Photographer using the Sony A9 and the Fuji GFX

I gotta admit, this is a blog post I never thought I'd write.  I never thought I'd make two videos out of the experience, and I really didn't think any of this would come together....but I always hoped it would.

When I switched from Nikon to Sony it angered a good amount of people out there.  My chief and most vocal critic on the matter was Ken Wheeler, the Angry Photographer as he's known on Youtube.  You can go back and search for all the videos related to this subject that have been created over the last two years, but suffice it to say that me getting Ken to agree to shoot was not something many people out there saw happening.

I reached out to Ken while I was on the East Coast teaching workshops in Washington, DC and West Virginia.  Ken lives in Lexington, Kentucky so getting down to see him from West Virginia was feasible.  It required about $1000 in expenses, but I felt the opportunity was worth it to meet the man face to face that has railed against me and Sony for years now.

When I reached out to Ken he was very hospitable.  He accepted my offer to come down there and meet and seemed pretty excited about the prospect as well.  We agreed to meet at his local camera store in town called Murphy's Camera.  Don Baker and the team there were very welcoming and allowed us to shoot our first video together in the store.  This was filmed with no crew.  I set up 3 cameras on tripods and filmed it in 4K using the A9, A7Rii, and the A7Sii.  I felt that having no crew there would make Ken feel more comfortable since he wasn't using to having a crew watching him like I am.  Take a look below to view this initial conversation between the two of us:

This first meeting between us caught a lot of people off guard, most importantly some of our followers.  They really didn't see this meeting coming and were surprised we made it happen. The overall response however was very favorable.  Ken and I grabbed some dinner that night and then agreed to go out shooting together the following day.

We met up again at Murphy's Camera but this time we had a model and two volunteer assistants with us as well.  The two assistants are followers of mine who were local in the Kentucky area and agreed to come down and help out.  They aren't trained videographers but nevertheless they agreed to film Ken and I during out shoot.  You guys gotta understand, this all happened SO FAST.

I called up Ken a day before I was scheduled to leave West Virginia and then a day later I was in Kentucky.  There was no time to bring my crew that I normally travel with to this event.  The model that I had with me in West Virginia needed to go home, and my permanent videographer Jason Coccio was enjoying time off to attend a wedding in California.  So we made the best of it.

I was contacted by a local model named Tiffany Williamson who lived Knoxville, Tennessee and she agreed to come out for the shoot.  You can follow her at www.instagram.com/spacekittyxd. We agreed to terms and she then made the trip out to Kentucky for the shoot.

We left Murphy's Camera and went to the Kentucky Horse Park which is just gorgeous.  Below is the video created from our shoot together:

The video and the shoot are not intended to be a shootout, but rather a mutual shoot where we shared a great day together.  I think my favorite part was watching Ken get in trouble with the cops lol.  He really was initiated into my lifestyle as that always seems to happen to me as well.  Please take a few minutes to watch the video and you'll see two former rivals share a great day together.  Below are the images that we took at the Kentucky Horse Park:

For the shoot I used the Sony A9 with the 70-200 f/2.8 Sony G Master, using natural light only. Below are the images from the shoot:

Below are the images taken by Ken.  He used the Fuji GFX using flash and natural lighting:

For what it's worth, I'd encourage anyone watching this to focus on the coming together that this event facilitated vs. any rivalry that used to exist.  It took courage for Ken to agree to meet and to come out and shoot with me knowing the world would see everything we did.  I applaud him for these efforts and thank him for acting like a gentleman during our time together.

Thank you Ken.

Maybe more in the photography industry can do the same to come together.....:)

Thanks!

Jason

41 Comments

Sony A9 vs. the Sony A7Rii Landscape Shoot Resolution Challenge by Jason Lanier

9 Comments

Sony A9 vs. the Sony A7Rii Landscape Shoot Resolution Challenge by Jason Lanier

So many people know I absolutely LOVE my Sony A7Rii.  It's been my go to camera for the past 2 years and I absolutely love the beast.  When Sony came out with the A9, I was one of the first photographers to be able to play with the camera.  Given it's speed and many features, I pegged it as the ultimate sports and wedding photography camera in the Sony lineup.  And I assumed I'd continue to use my A7Rii for landscape, architecture and portraits.

But just to make sure, I decided to do a quick little shootout comparison of the two cameras while at Crater Lake National Park in Oregon.  I was there during a family vacation and that place is just breath taking.  Being that I was just there with the family and had no film crew etc. I had to make sure with filming a video using just a monopod and my ThinkTank backpack...and the use of my trusty son Michael as an Assistant.

I did the shoot using two different lenses.  The Sony Zeiss 16-35 f/4 and the Sony G Master f/2.8 70-200mm.  Both are favorite lenses of mine and I thought they'd give the viewers a good variety of shots and focal lengths to look at.  I also did some cropping in on both images to show how both cameras render an image when zoomed WAY IN!

I won't render a final judgment here.  Why?  I don't want to sway opinions too much....:) . I'll just let the results speak for themselves and let you guys decide what you want to do.  I'll just say the results surprised me, and I'll be more comfortable in just taking the A9 everywhere with me than I would've been before doing the test...the resulting images from the shoot are below:

Sony A7Rii

Images are as follows: 16mm, 16mm, 35mm, 70mm, 100mm, 200mm

Sony A9

Images are as follows: 16mm, 16mm, 35mm, 70mm, 100mm, 200mm

Here are the crop comparisons as shown in the video

*16mm SUPER cropped in:  A7Rii on left, A9 on the right

*35mm Cropped in- A7Rii on the left, A9 on the right

*70mm Cropped in- A7Rii on the left, A9 on the right

*100mm Cropped in- A7Rii on the left, A9 on the right

*200mm Cropped in- A7Rii on the left, A9 on the right

I thank you for taking the time to visit my blog and watch my videos.  I appreciate every single person who takes the time to give me a read or a view.  Thanks guys!  I hope this helps...:)

Jason

9 Comments

Portraits of a Cuban Tobacco Farmer using the Sony FE 100mm STF and 70-200mm G Master Lenses by Jason Lanier

Comment

Portraits of a Cuban Tobacco Farmer using the Sony FE 100mm STF and 70-200mm G Master Lenses by Jason Lanier

Recently I had the opportunity to visit Cuba for the first time.  Like many folks from the United States I was very excited to do so since it has been closed off for visiting for the last 60 years. One of the main things I wanted to do was to visit some traditional Tobacco Farms.  It isn't because I'm a smoker, because I'm not.  It's because Cuba is world famous for their Tobacco and I just had to visit the farms that create this product that is coveted the world over.

So my Assistant Brenda and I ventured into the beautiful countryside of Vinales on horseback where we found some beautiful people and locations to shoot.  I really recommend watching the video above to get a real feel for the shoot.  I also did a voice over in the video to explain everything going on and why I decided to use what lenses.

Below are the images taken during the shoot and I'm separating them by the lens used.  Both sets of images were taken with the lenses shooting wide open at 100 ISO with the Sony A7Rii.

Images taken with the 70-200 G Master Lens

Images taken using the Sony FE 100mm STF lens

***Links to Gear***

*Sony A7Rii-  

*Sony 70-200 G Master-  

*Sony 100mm STF G Master-  

I really hope you enjoy the video and this complementary blog post.  I invite you guys to subscribe to both my Youtube Channel and my blog and thank you for visiting today.

Adios!

Jason

Comment

Battle of the Sony G Masters!  Sony FE 100mm STF vs. the Sony FE 70-200 G Master

5 Comments

Battle of the Sony G Masters! Sony FE 100mm STF vs. the Sony FE 70-200 G Master

So recently I had the opportunity to test two really awesome lenses.  The Sony FE 100mm STF vs. the Sony FE 70-200 G Master.  The G Masters lenses are considered the best lenses for the Sony mirrorless system.  For well over a year I've been raving about the 85mm G Master and the 24-70, but it wasn't until recently that I was able to get my hands on these two new kids on the block.

The purpose of this comparison was for portraiture purposes.  The 70-200mm definitely offers a lot that the 100mm STF doesn't being that it's a zoom.  But one of the bigger requests my followers on Youtube had for me was to compare these two lenses to see how they would perform under the same circumstances, and to let the chips fall where they may.  

If you haven't had a chance to already please check out the video that accompanies this shoot that's listed above.  I explain so much in the video that I'll keep the writing here short.  The main purpose of this post is to serve as a companion piece to the video and to let my viewers be able to see the shots that were created for a closer look.

Please note that all of the images were processed identically in Lightroom.  I hope this helps.  And for the record, I just can't believe how SMOOTH the 100mm STF lens is with the background.  It is truly in a league of it's own in regards to that...:)

Images taken using the Sony FE 100mm STF with the Sony A7Rii

All Exif data is included in the video...

Images taken using the Sony FE 70-200 G Master with the Sony A7Rii

All Exif data is included in the video...

I thank you for watching/reading and invite you to subscribe to both my Youtube Channel and Blog.  If you feel like picking up any of the gear that you see here, please consider using the links provided.  When my followers use my links I get a little bit of money (it's not much y'all)....but the more important thing is it helps my affiliates to see that it's beneficial to get some of this gear in my hands so I can share my findings with all of you.

Thanks!

Jason

5 Comments

CHEAP Lens Challenge- Shooting the Sony FE 50mm with the Sony A6500 in a train

16 Comments

CHEAP Lens Challenge- Shooting the Sony FE 50mm with the Sony A6500 in a train

I'm blessed....I'll admit it.  I work hard for what I've achieved, but I'm very grateful and humbled that I get to shoot with some of the best lenses in the world.  I've shot with Zeiss, Sony G Master, Sony Zeiss and many more.  I've also shot with nearly all of the Canon L lenses and many Nikon lenses to boot.

So one comment and/or request that I get quite frequently is, "Can you do some videos or shoots with some cheap stuff that the rest of us can afford?  We love seeing your shoots but I'll never be able to afford that stuff."

Fair enough.

I remember the days of saving up income for good amounts of time to be able to afford gear.  I REALLY DO.  Those days aren't too far in my past.  So I decided to start adding (yes I bought them), some cheaper lens options into my gear arsenal so I can represent and reflect all of the photographers that follow my work and my Youtube Channel.

So recently I did a shoot using the Sony FE 50mm with the Sony A6500 inside of an old train. The shoot was quick as we had only 15 minutes to complete it.  I think that's a good thing because it shows you what was able to be created without an elaborate setup or time that could honestly make the lens look better than it is.

**Links to Gear:

*A6500-  

*50mm FE lens-  

*DJI Osmo-  

*Westcott Rapid Box XL-  

If you haven't already please take a moment to check out the video that we rolled that will show the focus tests, the shots using natural and artificial light and more.  The video explains much more than I can properly articulate here in a blog post, so I kindly invite you to watch it now.  

For those who have already watched it you'll know that for $200, I think it's a pretty sweet little lens that is a welcome budget friendly addition to the Sony mirrorless lens lineup.  Below are the shots taken at the shoot.  All of them have been edited using Lightroom and Photoshop.  I hope you enjoy...:)


The model is the beautiful Cassandra Caballero.  Please let me know what questions you have...and thank you for watching!!

Jason

16 Comments

Sony FE 100mm STF Auto Focus lens- my rain shoot at Balboa Park in San Diego

8 Comments

Sony FE 100mm STF Auto Focus lens- my rain shoot at Balboa Park in San Diego

Recently I had the opportunity to borrow the Sony FE 100mm STF lens from Sony to test out.  My followers asked me to not only shoot it on my A7Rii as is typically the case for me, but to also shoot it on some lower cost Sony mirrorless bodies that my followers can more easily afford.

So we went down to Balboa Park in San Diego and it POURED rain.  I put the 100mm STF on my Sony A7ii and commenced to do a shoot where I illuminated the model in the rain by using the Flashpoint Xplor 600 as my backlight and the Rotolight Anova Pro as my key light with a 2 Stop Diffuser by Westcott called the Illuminator.

I gotta say I was very impressed with the lens.  My full write and recommendation will be in a following post and video, but I wasn't disappointed by this lens at all.  It has an F stop of 2.8 and a T stop of 5.6.  It was very sharp, it found focus very quickly and it was a challenging condition to shoot in.

As you'll see in the video it held up just fine with some rain getting on it and didn't give me any issues at all.  Towards the end of the shoot I really started to test the STF Smooth Trans Focus elements of the lens.  It's pretty amazing how that lens can turn virtually any light source into a gorgeous Bokeh ball.  I can't wait to do more testing on that.

Below are some of the images taken during the shoot.  These were all shot wide open at the aperture of f/2.8 but the t stop value of 5.6.  ISO range was anywhere from 2,000 or higher with a shutter speed at 1/60 sec.  I think this lens is a keeper....but more on that in my full review.  I have more shoots to do with it but just wanted to share this one on the A7ii.  I hope it also helps people out there that I did it with a more affordable camera body like the A7ii.

Thanks!

Jason

8 Comments

Budget Batis- is the new Sony FE 85mm f/1.8 lens as good as the Zeiss Batis for half the price?

17 Comments

Budget Batis- is the new Sony FE 85mm f/1.8 lens as good as the Zeiss Batis for half the price?

Recently I had the opportunity to get the Sony FE 85mm f/1.8 lens on loan from Sony to be able to take out and test in the field.  When my followers found out I had the lens one of the first things they asked me to do was to compare the new lens against the sought after Zeiss Batis 85mm f/1.8.  Below is a video of the shoot took place doing this very comparison:

The Zeiss Batis was the first Auto Focus 85mm lens available to Sony Mirrorless users and I fell in love with the lens about two years ago.  I must have done at least 20-30 videos on Youtube using this lens that I just loved.

Then Sony released the 85mm G Master f/1.4 lens and that thing is a BEAST.  It is definitely a pro level top of the line lens and while the Batis is amazing, it can't keep up with the G Master.  BUT, the G Master also comes at a premium price and due to that many Sony users still consider going for the Zeiss Batis because it's about $600 less than the G Master.

Then earlier this month Sony announced their own FE (Full Frame E Mount) 85mm f/1.8 lens. What made this a game changer for many is the fact that it's $600 less than the Zeiss Batis and over a $1000 less than the G Master.  Hence, that's why I received so many requests to compare it to the Zeiss Batis.  Because if it's even CLOSE to the Zeiss Batis it's definitely a lot more affordable.

So we went out to Salvation Mountain in the California desert and I did a straight apples to apples comparison between the two lenses.  Both lenses were shot on a tripod using the Sony A7Rii with the exact same settings and lighting.  All images were developed using Lightroom only using the exact same settings via Batch Processing.  So the results are identical.

As you'll see in the video and or the images you are viewing below, I was pretty stunned on just how the shots look identical.  If I didn't know any better I would swear they are the same lenses in different shells lol.  Take a look below for yourself:

Set 1- Sony FE lens- 85mm, f/1.8, 1/2500 sec, ISO 100

Set 1- Zeiss Batis- 85mm, f/1.8, 1/2500 sec, ISO 100

Set 2- Sony FE85mm, f/1.8, 1/2500 sec, ISO 100

Set 2- Zeiss Batis-  85mm, f/1.87, 1/2500 sec, ISO 100

Set 3- Sony FE- 85mm, f/1.8, 1/2000 sec, ISO 100

Set 3- Zeiss Batis-  85mm, f/1.8, 1/2000 sec, ISO 100

Set 4- Sony FE-  85mm, f/1.8, 1/1600 sec, ISO 100

Set 4- Zeiss Batis-   85mm, f/1.8, 1/1600 sec, ISO 100

**Links to Gear:

*Sony A7Rii-  

*Sony FE 85mm f/1.8-  

*Zeiss Batis 85mm-  

*Lastolite 6x6 Diffuser-  

*Westcott Rapid Box XL-  

Thanks for coming by and checking out this post.  Don't forget to subscribe to my Youtube Channel and also this blog for future posts!!

Thanks,

Jason

17 Comments

Salvation Mountain-  My First Shoot with the Sony FE 85mm f/1.8 on the Sony A6500

7 Comments

Salvation Mountain- My First Shoot with the Sony FE 85mm f/1.8 on the Sony A6500

So thanks to the kindness of Sony, I was able to borrow the Sony FE 85mm f/1.8 lens prior to it being released to the public.  So I asked my followers what they wanted me to do with the lens and one of the most frequent requests was that I slap that puppy on my A6500 and show the world what the images looked like.

So I booked my crew and a model and we headed out into the middle of nowhere....literally.  We went out to Salvation Mountain which is somewhere between Mexico and Palm Springs out in Niland, California.  It is a CRAZY place!!

We did a number of shoots earlier in the day and as the sun was getting close to setting I threw the lens on my A6500 and did a quick shoot.  I wanted the shoot to be something similar to the time frame I'd have when shooting for 10-15 minutes at a wedding...like the couple shoot after the ceremony just to show people what can be done in a short amount of time.

Lighting wasn't necessarily optimal, but I wanted to show what could be done in less than ideal situations.  I used the Flashpoint Xplor 600 monolight with the Westcott Rapid Box XXL as a modifier.  Below are some of the shots from the shoot.  All of the images taken were shot wide open at f/1.8.

We hope you enjoy the shoot.  Please let us know what you think and what questions you have. We certainly have high hopes for this lens and the performance of it paired with this camera is quite a combination!!

**Links to Gear:

*Sony A6500-  

*Sony 85mm f/1.8 lens-  

Thanks!

Jason

7 Comments

Inauguration Day Riots, Fake News, Burning Cars and more for Donald Trump's Inauguration

2 Comments

Inauguration Day Riots, Fake News, Burning Cars and more for Donald Trump's Inauguration

Well, inauguration day 2017 was one for the record books.  Truly an unforgettable experience.  I've been able to shoot a lot of interesting and exciting things in my career but I've never been able to shoot riots following an inauguration.  Check out the video below to see exactly what went down!

Below are some of the shots taken during the riots and protests that followed the inaugural address and went into the evening on the streets of Washington DC.  I've separated them by the lens used for my photographers out there who are wondering what I captured them with.  All images were taken with the Sony A7Rii.

These images were taken with the 16-35 Sony Zeiss lens

These images were taken with the 24-70 G Master lens

These images were taken with the 70-200 G Master lens

These images were taken with the 85mm G Master lens

I thank you for visiting my blog and invite you to subscribe!!

Thanks,

Jason

2 Comments

Inauguration Day Chaos- Protesters Block Trump Supporters from Entering the Inauguration for Donald Trump

4 Comments

Inauguration Day Chaos- Protesters Block Trump Supporters from Entering the Inauguration for Donald Trump

Being a freelance photographer has its challenges.  You don't have as much access as credentialed press, you have to pay for your own way, you really don't have any support or anyone helping you out.  It can be tough to do it on your own.

The advantage to being a freelancer is you get to do exactly anything you want without any agendas or any commitments that you have to keep.  You can shoot what you want, when you want to, and can tell the story that you find.

Having covered the past two inaugurations for President Obama in the same way, I booked travel for my team and I to Washington DC for the inauguration of President Donald Trump.  My experience for both of Obama's inaugurations prior to the swearing in was pretty simple really. Get there early, get a spot and watch the inauguration.  There were a lot of people there, especially in 2009 where there were more than in 2013, but is was pretty much devoid of any protests or controversies outside of the normal 1 or 2 "Believe in Jesus or Go to Hell" guys that you see regularly in any big city.

That wasn't the case at the inauguration for President Trump.

We took the metro in and got off near the Ford's Theater where President Lincoln was assassinated.  We heard chanting and yelling as we headed towards the entrance to the inauguration.  What we discovered there was something pretty surreal.

There was a large group protesting and blocking the entrance to the Trump supporters not letting them pass to be able to enter the National Mall area to view the inauguration.  For those who have never attended an inauguration before access is restricted and you have to pass through security to enter.  At the Obama inaugurations in 2009 and 2013 access was easy.  You waited your turn in line and got in.  At this entrance the protesters were locking arms and would not let Trump supporters pass.  

The police were present but would not intervene unless a Trump supporter was in the middle of the fray as they tried to get past the protesters.  I try to make a point in my photojournalism to not say too much as I don't want to paint the narrative.  I prefer to let my pictures and my films show what happened and for the viewer to decide on their own what they think of it all.

For what It's worth I'd show good and bad behavior on either side of the political spectrum without hesitation.  I truly do want to just convey what occurs and let others decide what it all means.  I hope you find that it moves you in some way.  

Below are images from the protest taken. Images and video footage from the inauguration, the riots at night, and the Women's March the next day will also be coming soon.


Thanks,

Jason

4 Comments